Selecting the right type of insulation is far more complicated that simply looking at a product’s R-value. It’s important to understand the entire long term impact of sourcing and using a particular insulation product. This means how and where the product is made, the ingredients, the waste generated during manufacturer and during installation, what happens at the end of its useful life, the R-value as tested, the R-value at extreme temperatures, the R-value long term as it ages, the vapor permeability, the air permeability, the resistance to water, the resistance to rodents and insects, the ease or difficulty in installation, the stability, the availability, and the cost. Rather than doing a deep dive, to make things easier we’ve summarized the most common insulation board products into this quick Insulation Cheat Sheet.
AVOID
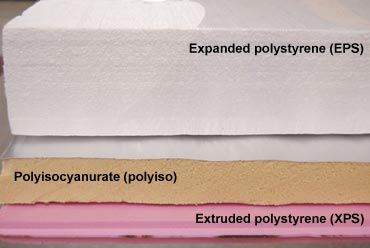
XPS FOAM
extruded polystyrene
closed cell / vapor impermeable
typical blue or pink under names “Styrofoam” and “Foamular”
R-5 / inch but loses R value as it ages. actual R-4 / inch.
suitable for below grade / underslab / comes in different densities
blowing agent (currently used in US) has very high GWP and therefore should be avoided.
High Availability / Low Initial Cost / High GWP
3 Primary Types of Foam Insulation
USE SELECTIVELY BUT BEST TO AVOID
EPS FOAM
expanded polystyrene
semi closed cell / essentially vapor impermeable unless very thin
typically white and made of tiny beads
approx R-4 / inch
suitable for below grade / underlab / comes in different densities
blowing agent has fairly low GWP.
Readily Available / Low Initial Cost / Medium Low GWP
GRAPHITE EPS FOAM
expanded polystyrene with embedded graphite particles
semi closed cell / essentially vapor impermeable unless very thin
typically white and made of tiny beads
approx R-4.5 / inch
suitable for below grade / underlab / comes in different densities
blowing agent has fairly low GWP.
Medium Availability / Low Medium Initial Cost / Medium Low GWP
POLYISOCYANURATE FOAM
typically faced with foil or felt
semi closed cell / vapor impermeable
typically yellowish / off white with silver foil facing or black felt facing
approx R-6 / inch but less R value at colder temps. actual R-5 / inch.
not suitable for below grade or underslab
blowing agent has lowest GWP of rigid foams.
most commonly use for commercial roof assemblies; used foam can sometimes be sourced.
High Availability / Low Medium Initial Cost / Low GWP
GOOD

HIGH DENSITY MINERAL WOOL
highly vapor permeable / hygrophobic (repels water)
yellow gold color
approx R-4 / inch. maintains R value at cold temperatures
now suitable for below grade or underslab
8lb per ft3 density / Roxul is most common manufacturer
low GWP but uses steel mill byproduct / energy intensive
Readily Available / Medium Cost / Low GWP
BEST

CORK
highly vapor permeable / hygrophobic (repels water)
can be used as exterior finish material if well protected
approx R-4 / inch. maintains R value at cold temperatures
not suitable for below grade or underslab
low GWP, from rapidly renewable resource,
imported from Portugal
Medium Availability / Medium to High Cost / Low GWP

WOOD FIBER BOARD
highly vapor permeable / paraffin wax provides weather resistance
doubles as WRB when used on walls
approx R-3.5 / inch. maintains R value at cold temperatures
not suitable for below grade or underslab
very low GWP but currently imported from Europe
Medium Availability / Medium to High Cost / Very Low GWP
More Cheat Sheets coming. Check back soon or subscribe for updates.