
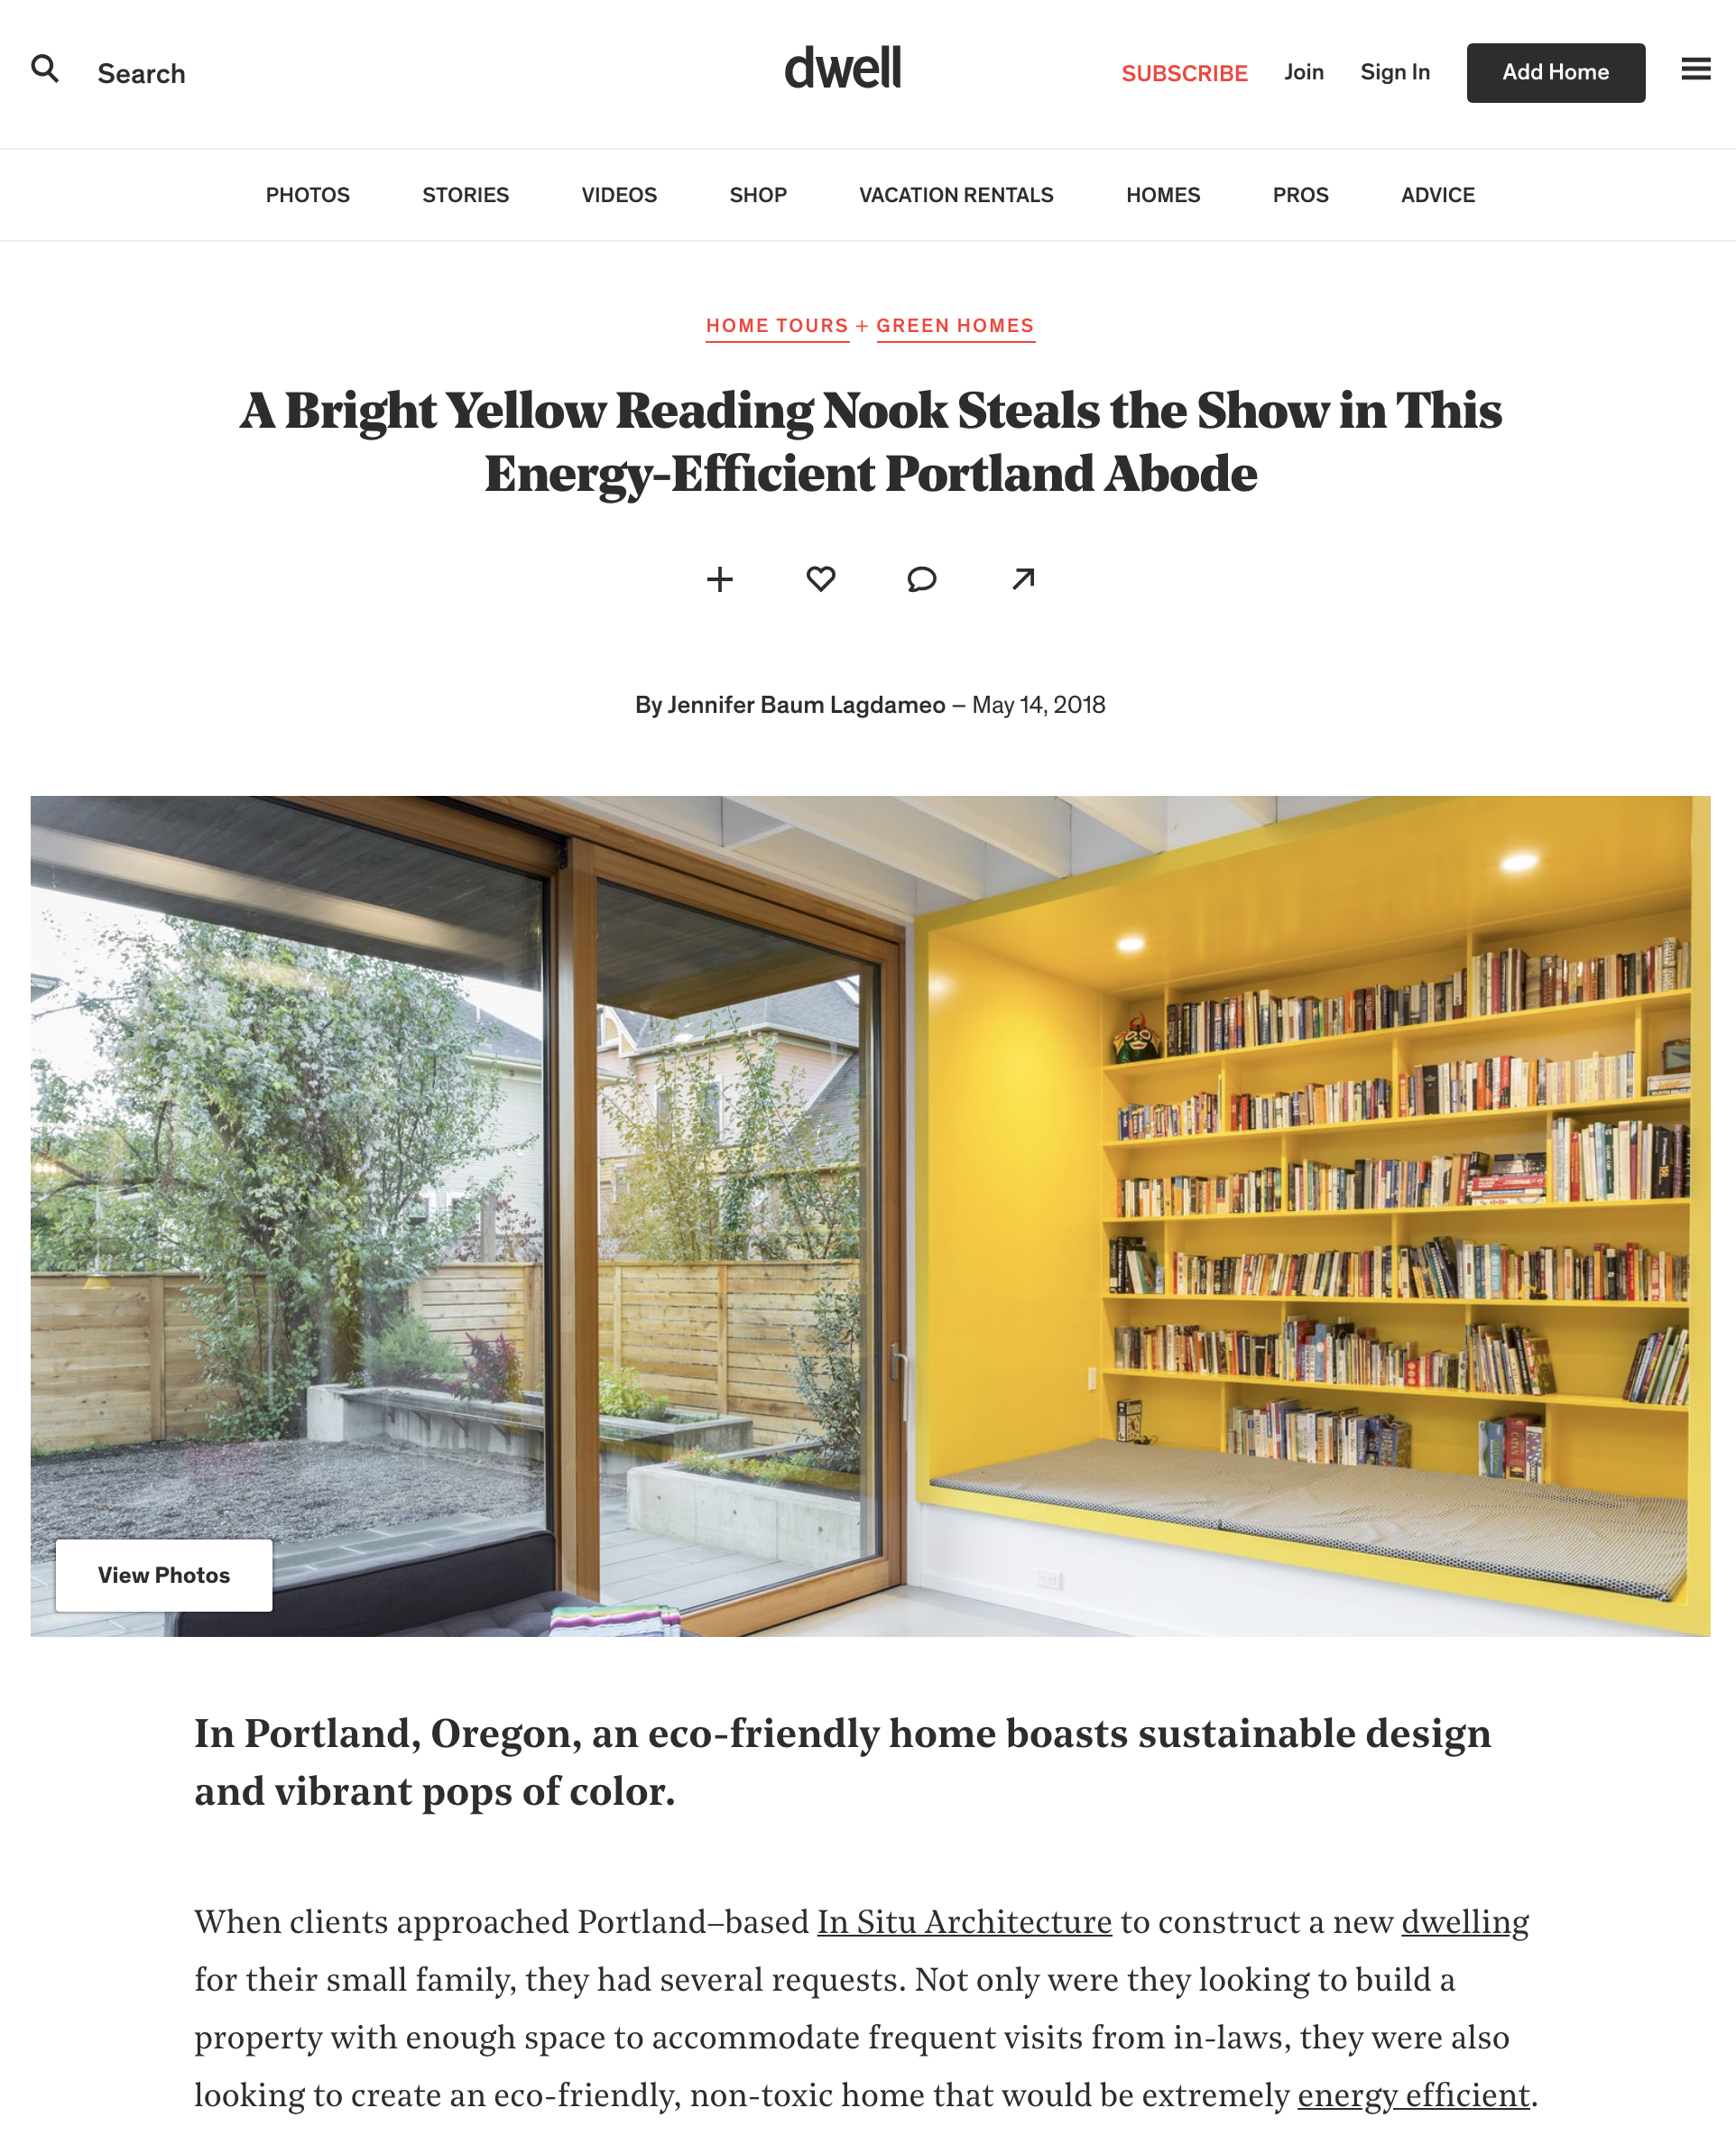
18th Ave House is featured on Dwell. Check it out here.
10 Mistakes When Designing an Energy Efficient Home
While they may be designed with the best of intentions, most so called energy efficient homes (and buildings of all types) designed and built today make many of the same mistakes:
1. Focusing on Technology First
The simplest, most reliable, and most effective approach to energy efficiency is to focus first on the building envelope. This means starting not with a more efficient furnace or water heater, or the addition of a photovoltaic solar array, but instead focusing on airtightness, minimizing thermal bridging, and providing thick continuous insulation. Not only will you save energy and lower your utility bills, if done correctly you will be more comfortable and your building will be more durable. Once you've made a great building envelope and significantly reduced your energy loads, technology can then be used on a more limited basis to complement your design.

2. Focusing on Insulation before (or without) Air Sealing
Probably the single most effective strategy to achieving energy efficiency is to provide exceptional airtightness. An airtight building minimizes energy losses (when heating or cooling), ensures even stable temperatures throughout a building, and prevents moisture laden air from entering the building assembly. Exceptional airtightness starts with good design, and relies on proper execution of that design in the field. A suitable ventilation strategy goes hand in hand with an airtight building. Fresh air should come from an intentional controlled source (filtered fresh air rather than leaks in the building envelope) and the temperature be moderated; usually achieved by the use of a Heat Recovery Ventilator.

3. Failing to do a Blower Door Test
This simple inexpensive test is the only way to determine the airtightness of a building. A blower door is essentially a fan that is used to pressurize and depressurize a building to determine where there are leaks and how big. Unfortunately very few buildings use a blower door test during construction.

4. Ignoring Solar Orientation
While good design must respond to the immediate context, it's also important to recognize and respond appropriately to solar orientation. If done correctly, the sun can be used effectively to help heat our buildings for free (assuming the climate and building type desires heating) without contributing to overheating. Effective design means appropriately sizing glass area for different orientations and providing the right type of shading.
5. Failing to do a Shading Study
Most sites are shaded at certain times of the year and day by buildings and trees. It's important to correctly identify this information to predict the effect of shading on the building. There are simple tools and software to provide this information.

6. Specifying the Wrong Type of Glass
Windows (and doors) are one of the most important components of a building. They provide views, daylight, ventilation, and have a huge impact on the experience of a place. The selection of windows and glass can be complicated and overwhelming, and selecting the wrong glass can have huge consequences. The right windows and glass can mean exceptional comfort and performance, and can make a building sing.

7. Ignoring Material Sourcing and Impact
In the quest to make an energy efficient building, it's important to have a complete understanding about the source and impact of our material selections. Many so called high efficiency materials actually have a much larger negative impact on the environment than the benefit they provide.
8. Not Setting Proper Goals
Without setting proper goals at the outset, it can be easy to compromise when facing a challenge during the process (there are many). While rating systems and certifications aren't always perfect, they can help to appropriately guide a project in the face of adversity.
9. Failing to do an Energy Model
Without a real energy model, it's all just guesswork. The best way to understand the effect of design decisions is to have an energy model as part of the design process. Effectively used an energy model can be another tool used as part of the design process.

10. Forgetting about the Architecture
It could be argued that a beautiful architectural space that is thermally uncomfortable and not energy efficient does not make great Architecture. Likewise, the focus can't be on energy efficiency alone. The challenge is to create beautiful spaces that are thermally comfortable and energy efficient - less than that can no longer be acceptable.

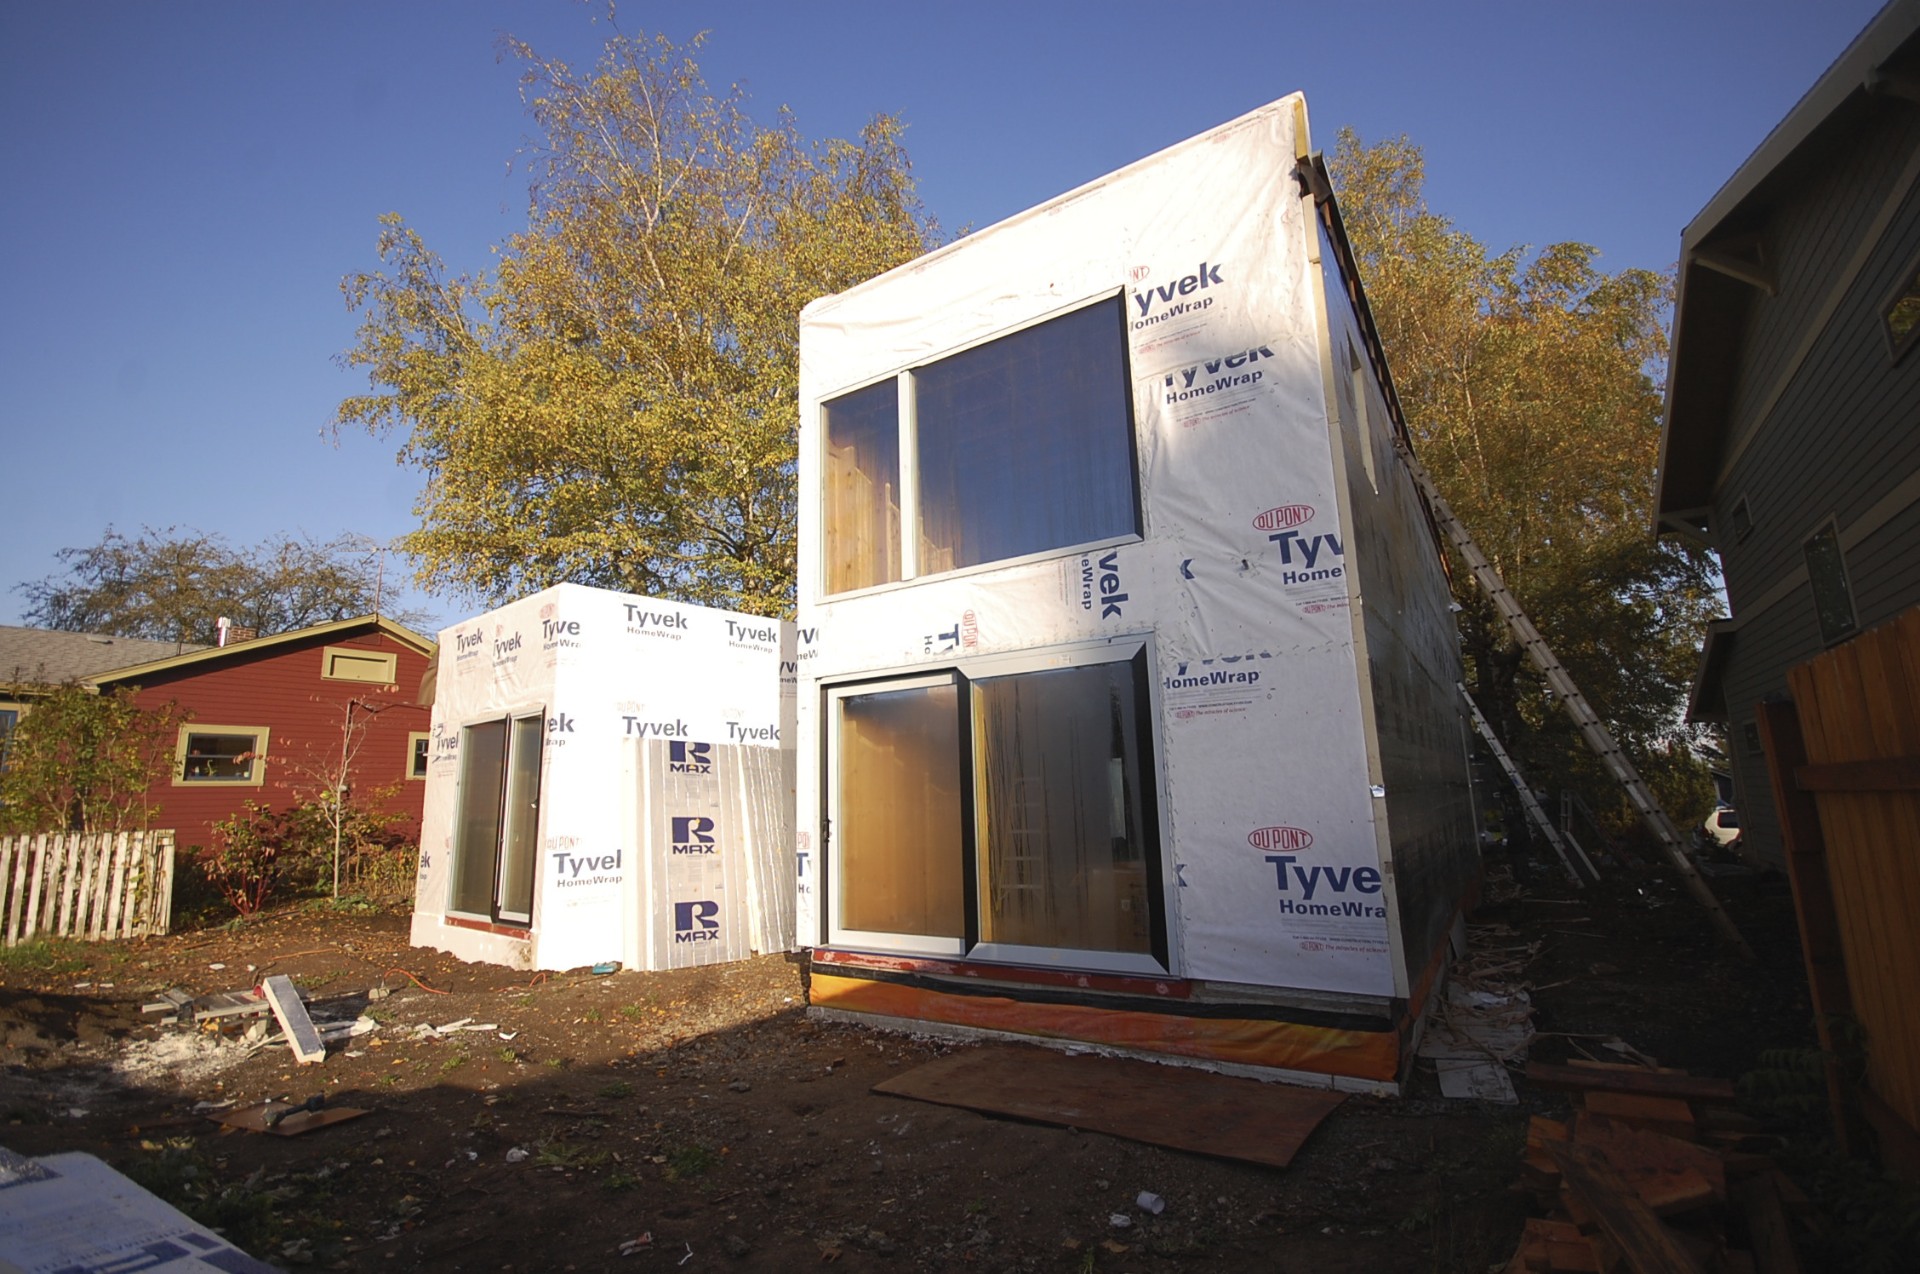
fast forward
we've been too busy to post for quite awhile, but work has been progressing nicely on the skidmore house. here's a quick look around:


we hope to be putting the final touches on in the next few weeks. lots of catching up to do. check back soon for more on this project and others.
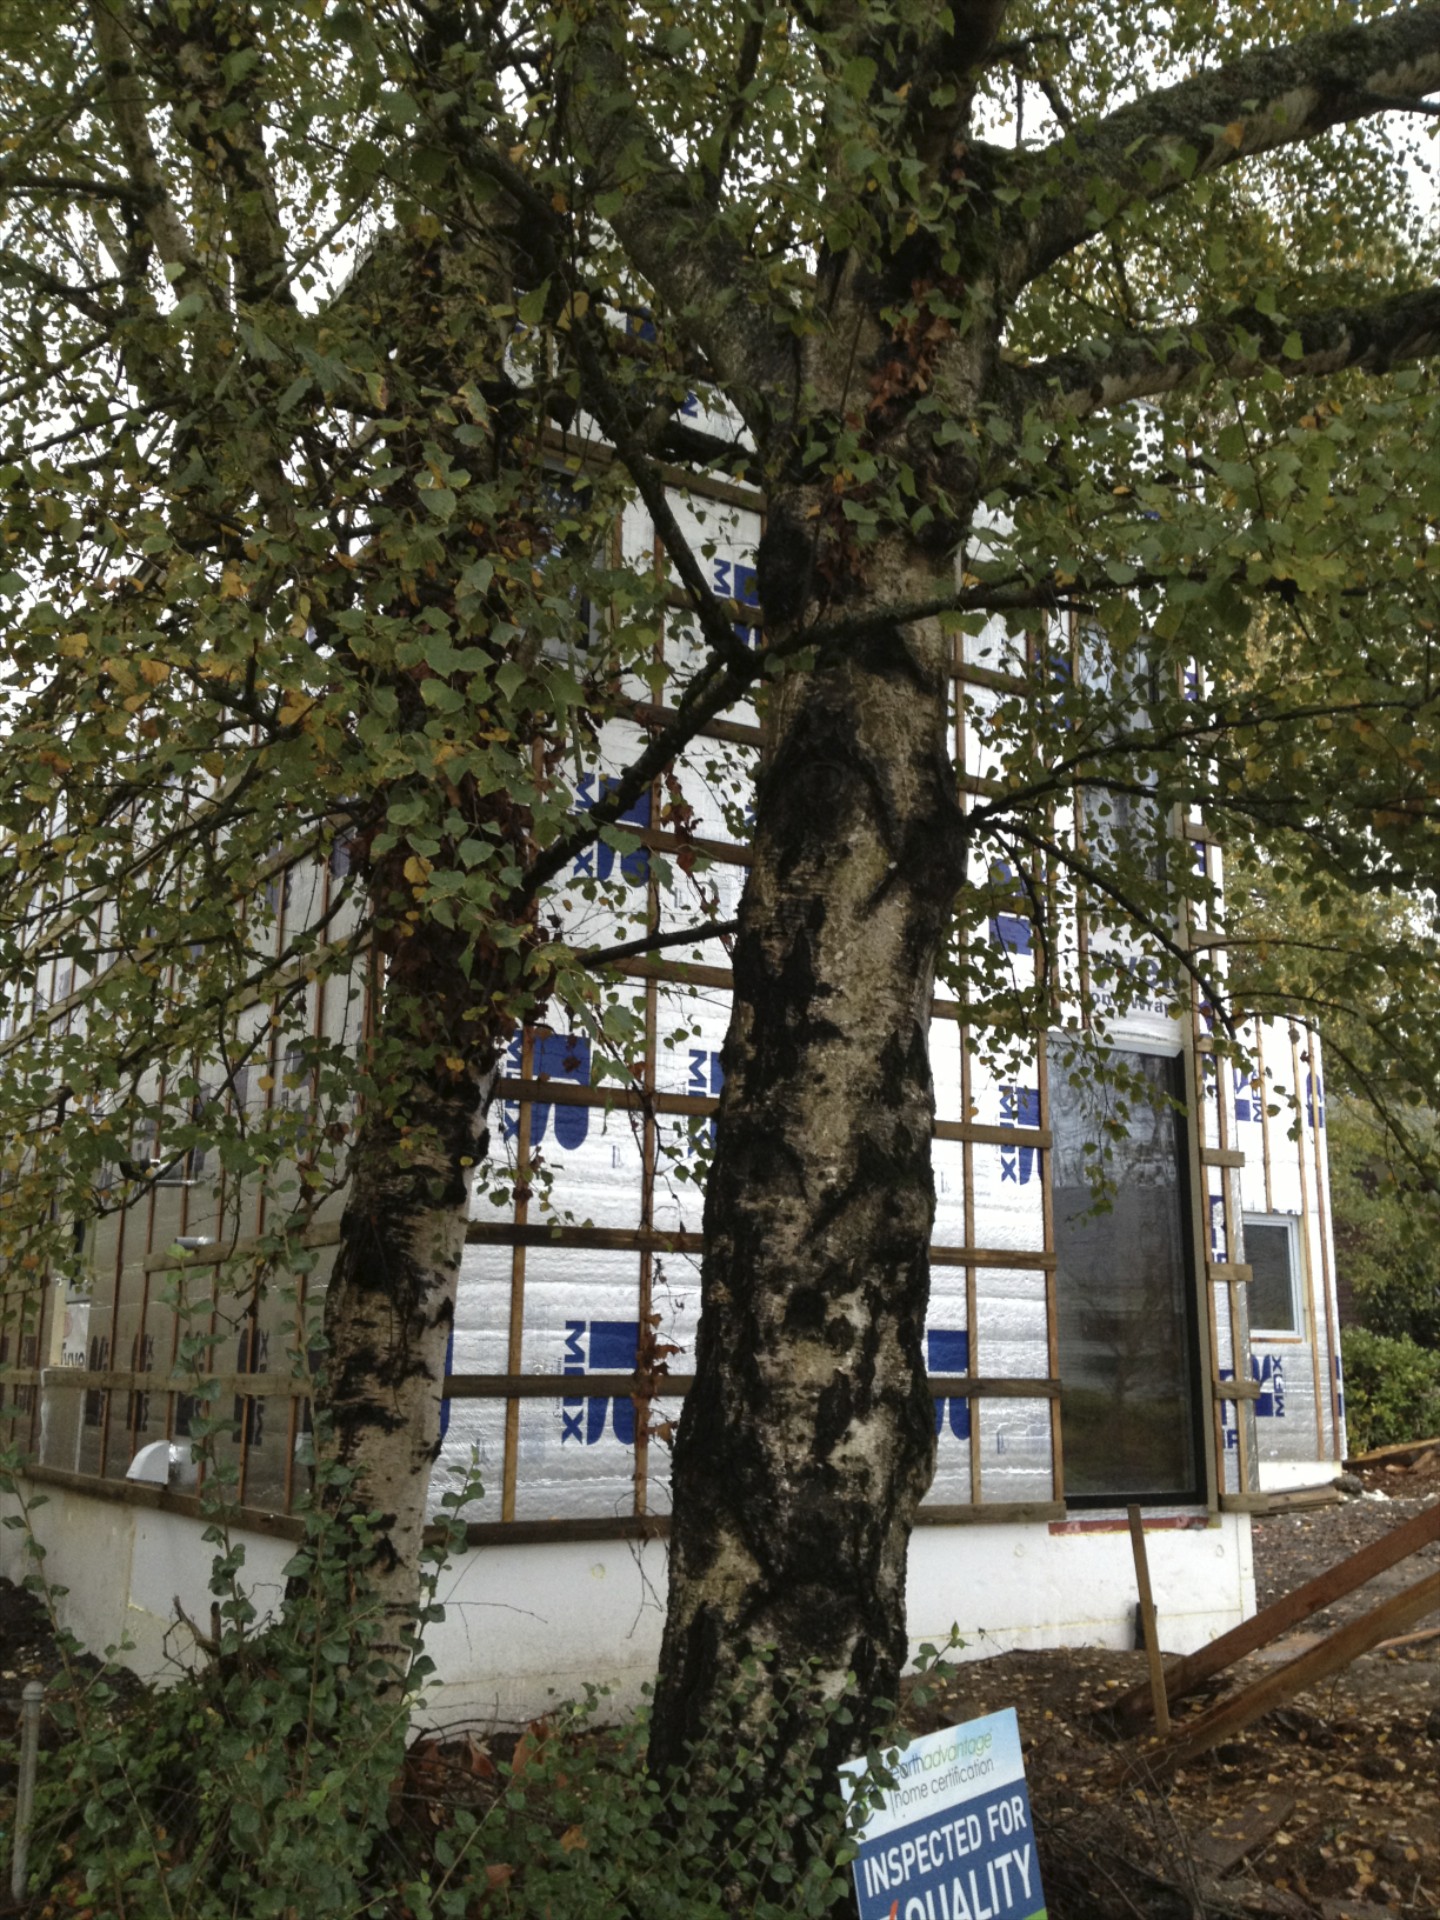
thermal bridge free exterior
next up on skidmore passivhaus is installing the outsulation on the walls along with the rainscreen furring.
the plywood sheathing was first covered by a weather resistive barrier with metal head flashings at the windows and doors.
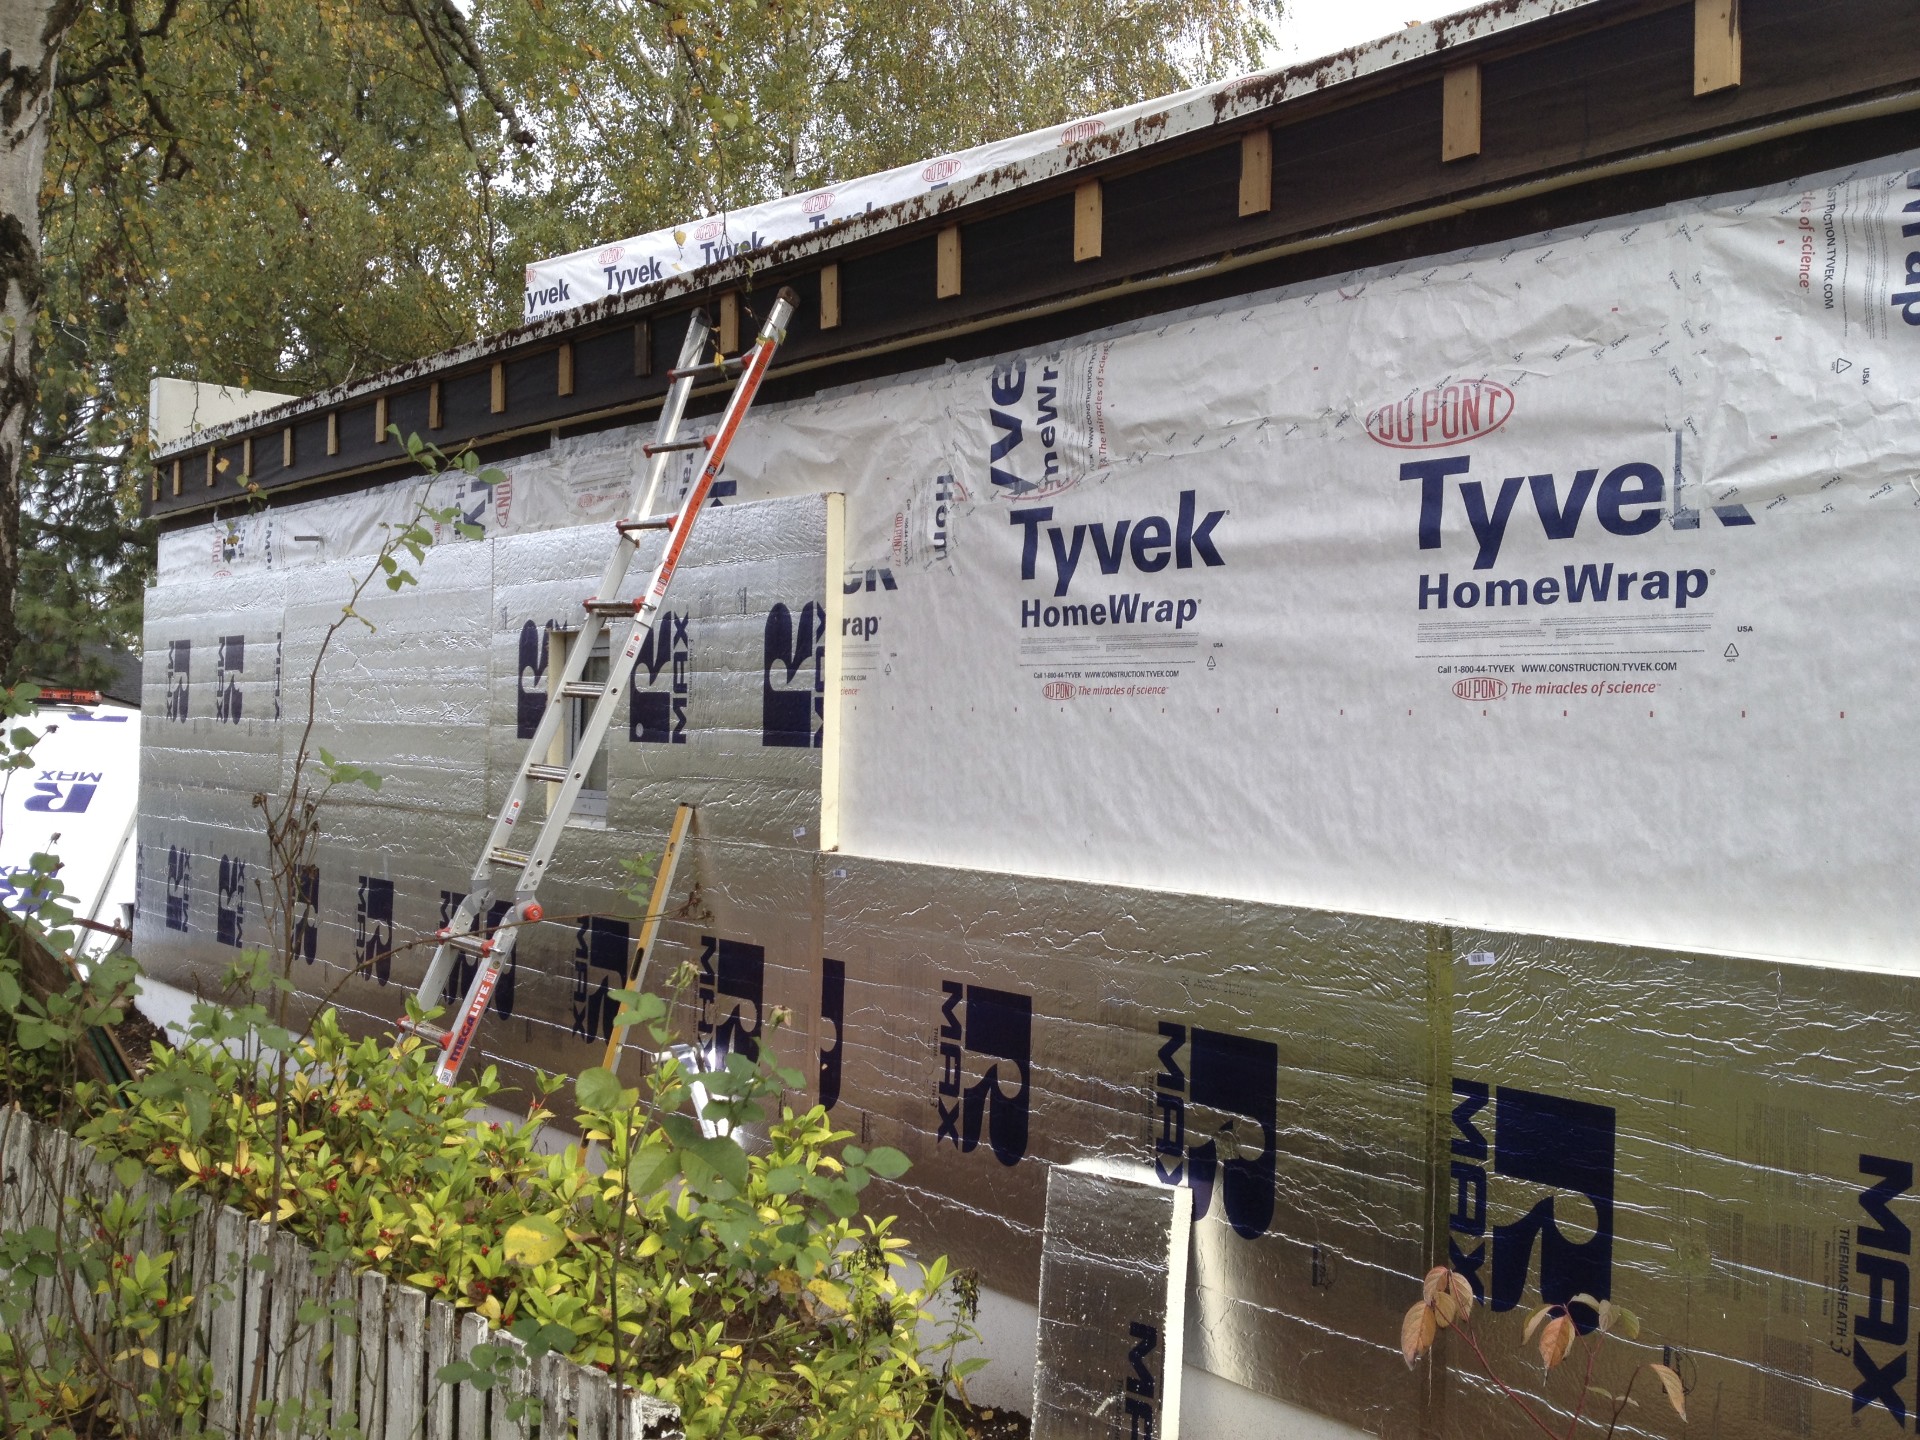
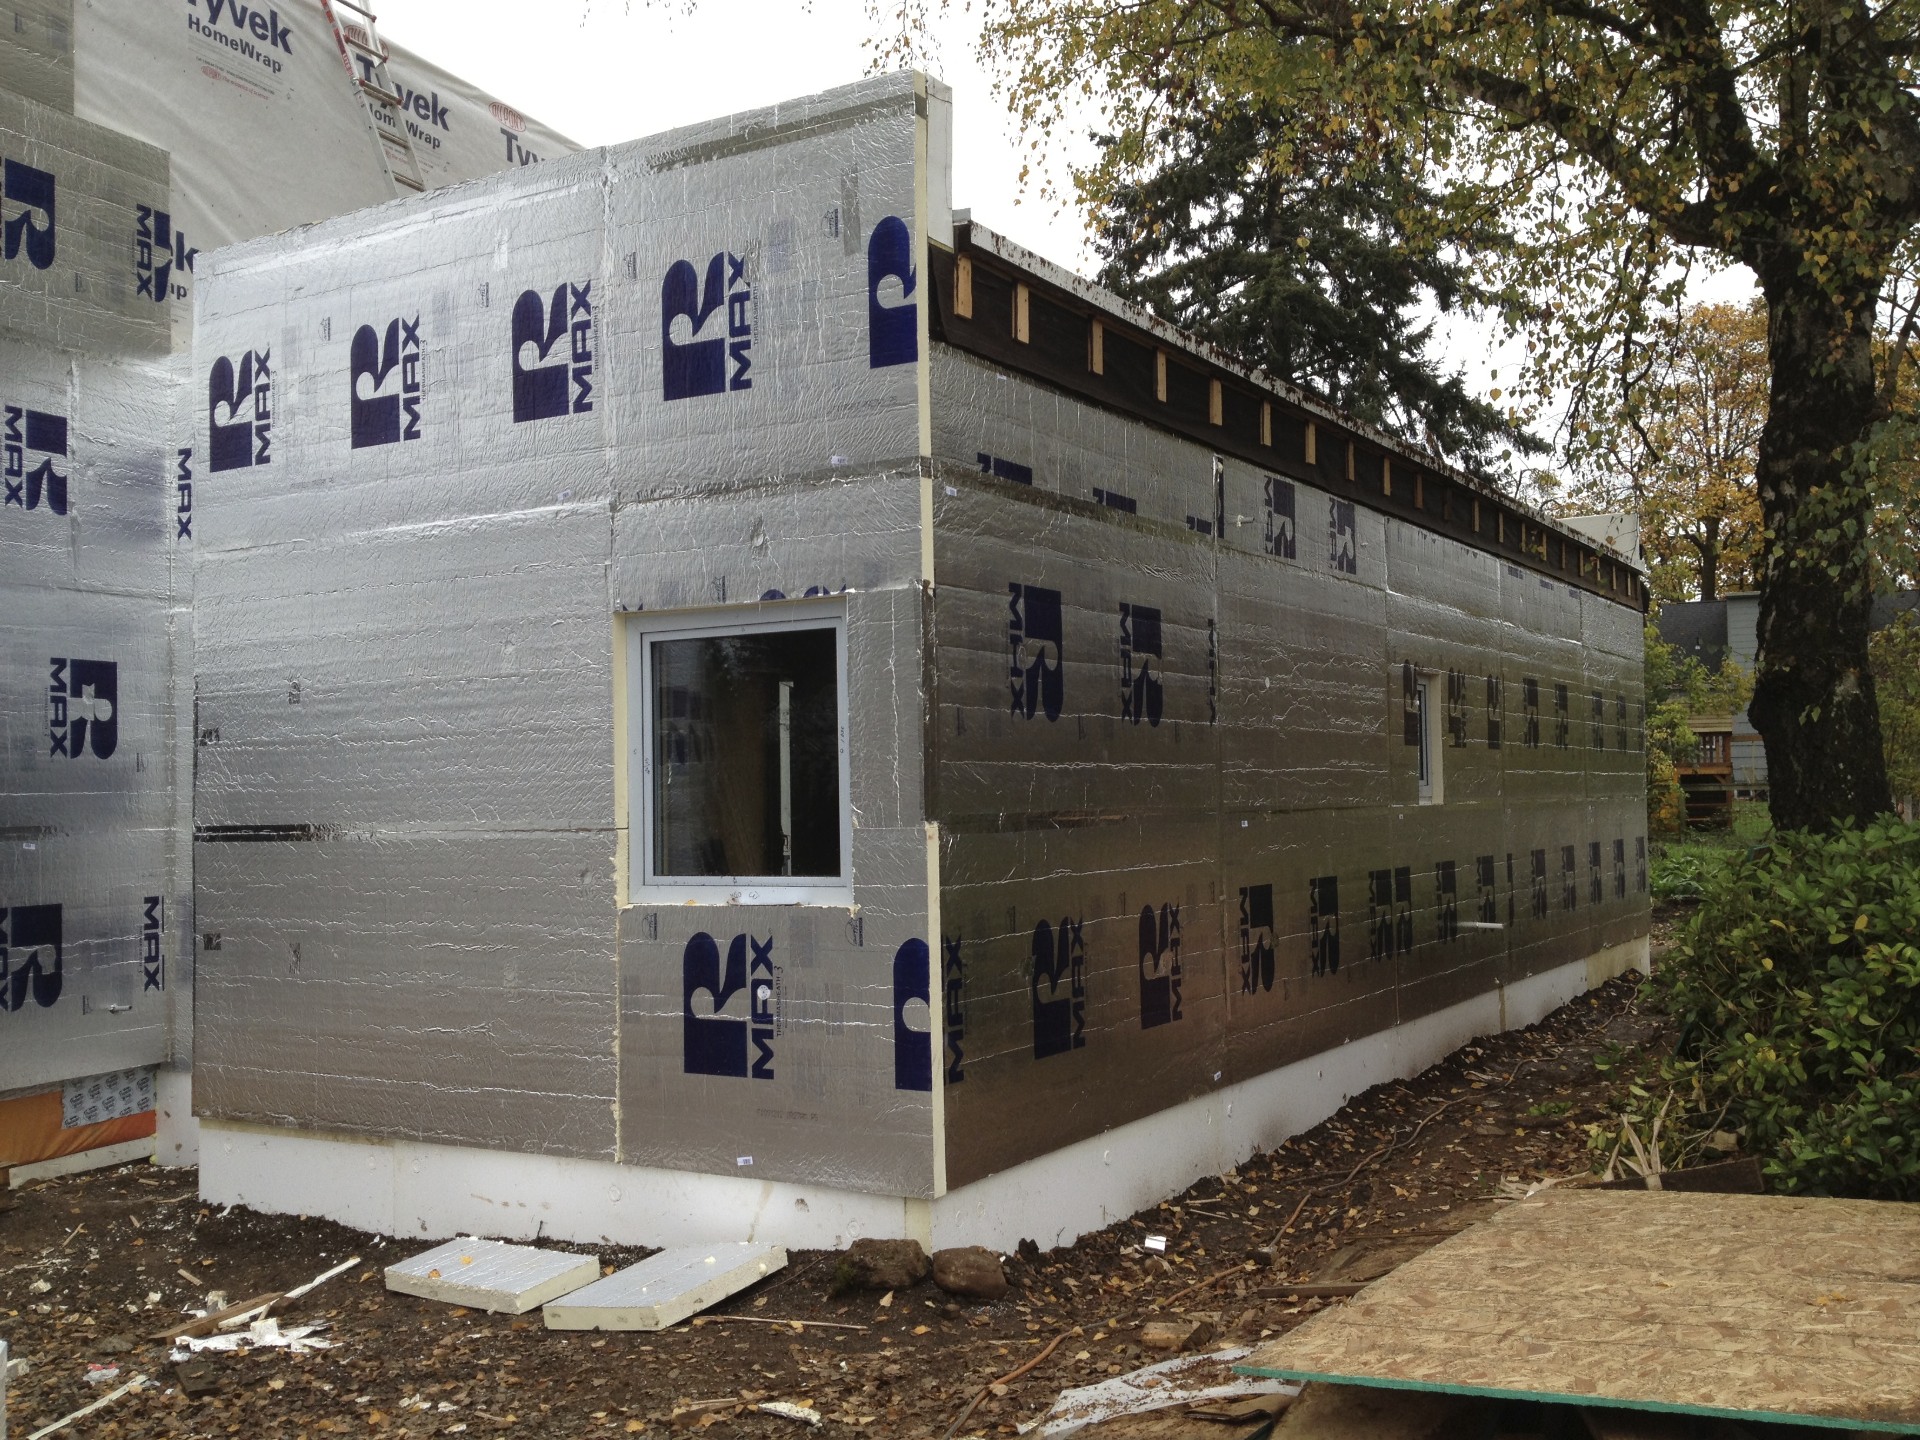
most walls get a layer of 3" poly-iso, while the south wall will get 4" to match the recessed pocket for the exterior shades.

2 screws (with plastic washer) per 4x8 sheet hold it in place until the furring strips are installed.
all seams and fasteners are taped. the face of the insulation is treated as a second weather resistive barrier.
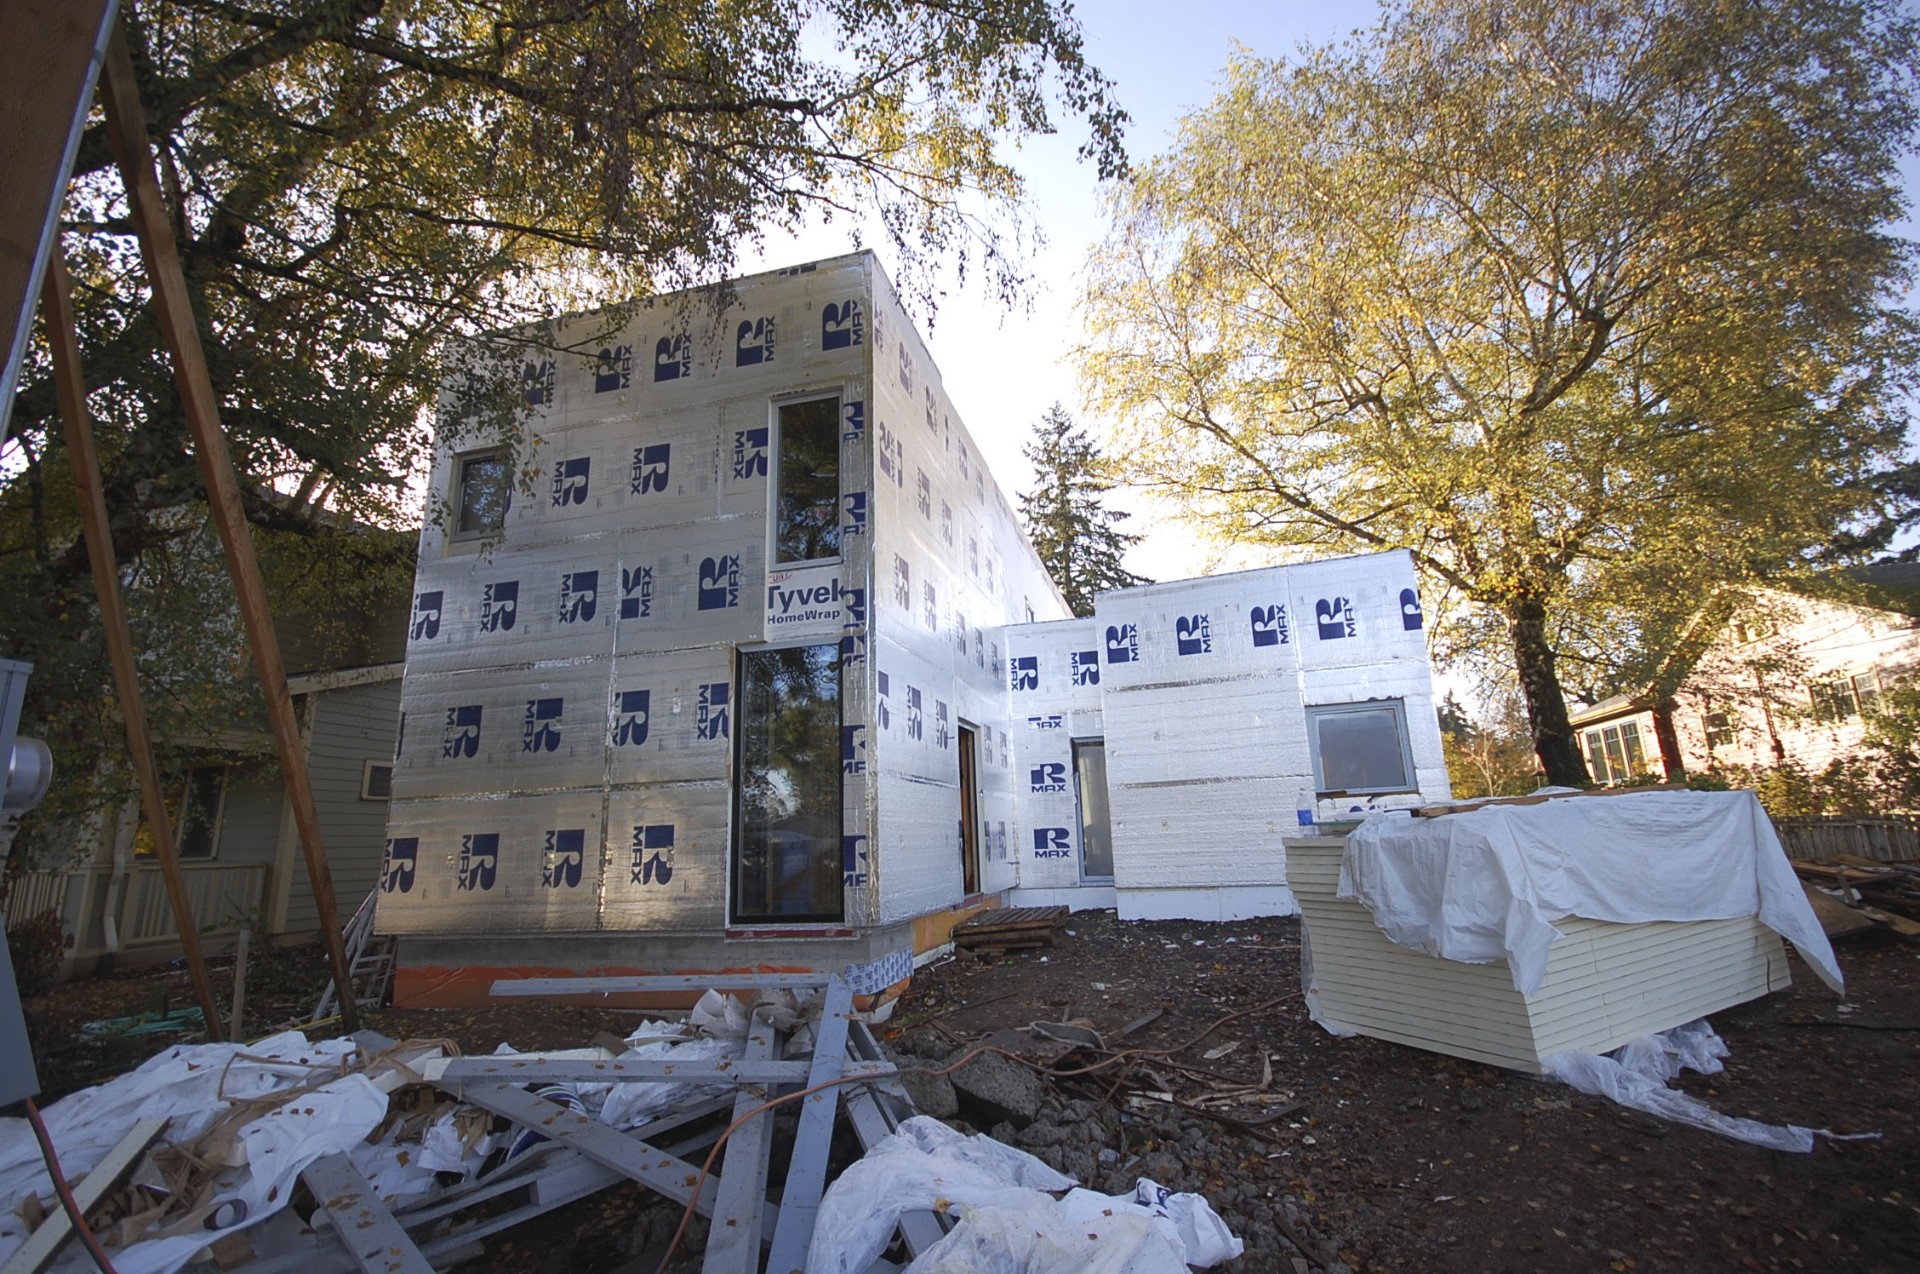
additional flashings at all doors and windows will be taped to the insulation as the wood trim is installed.
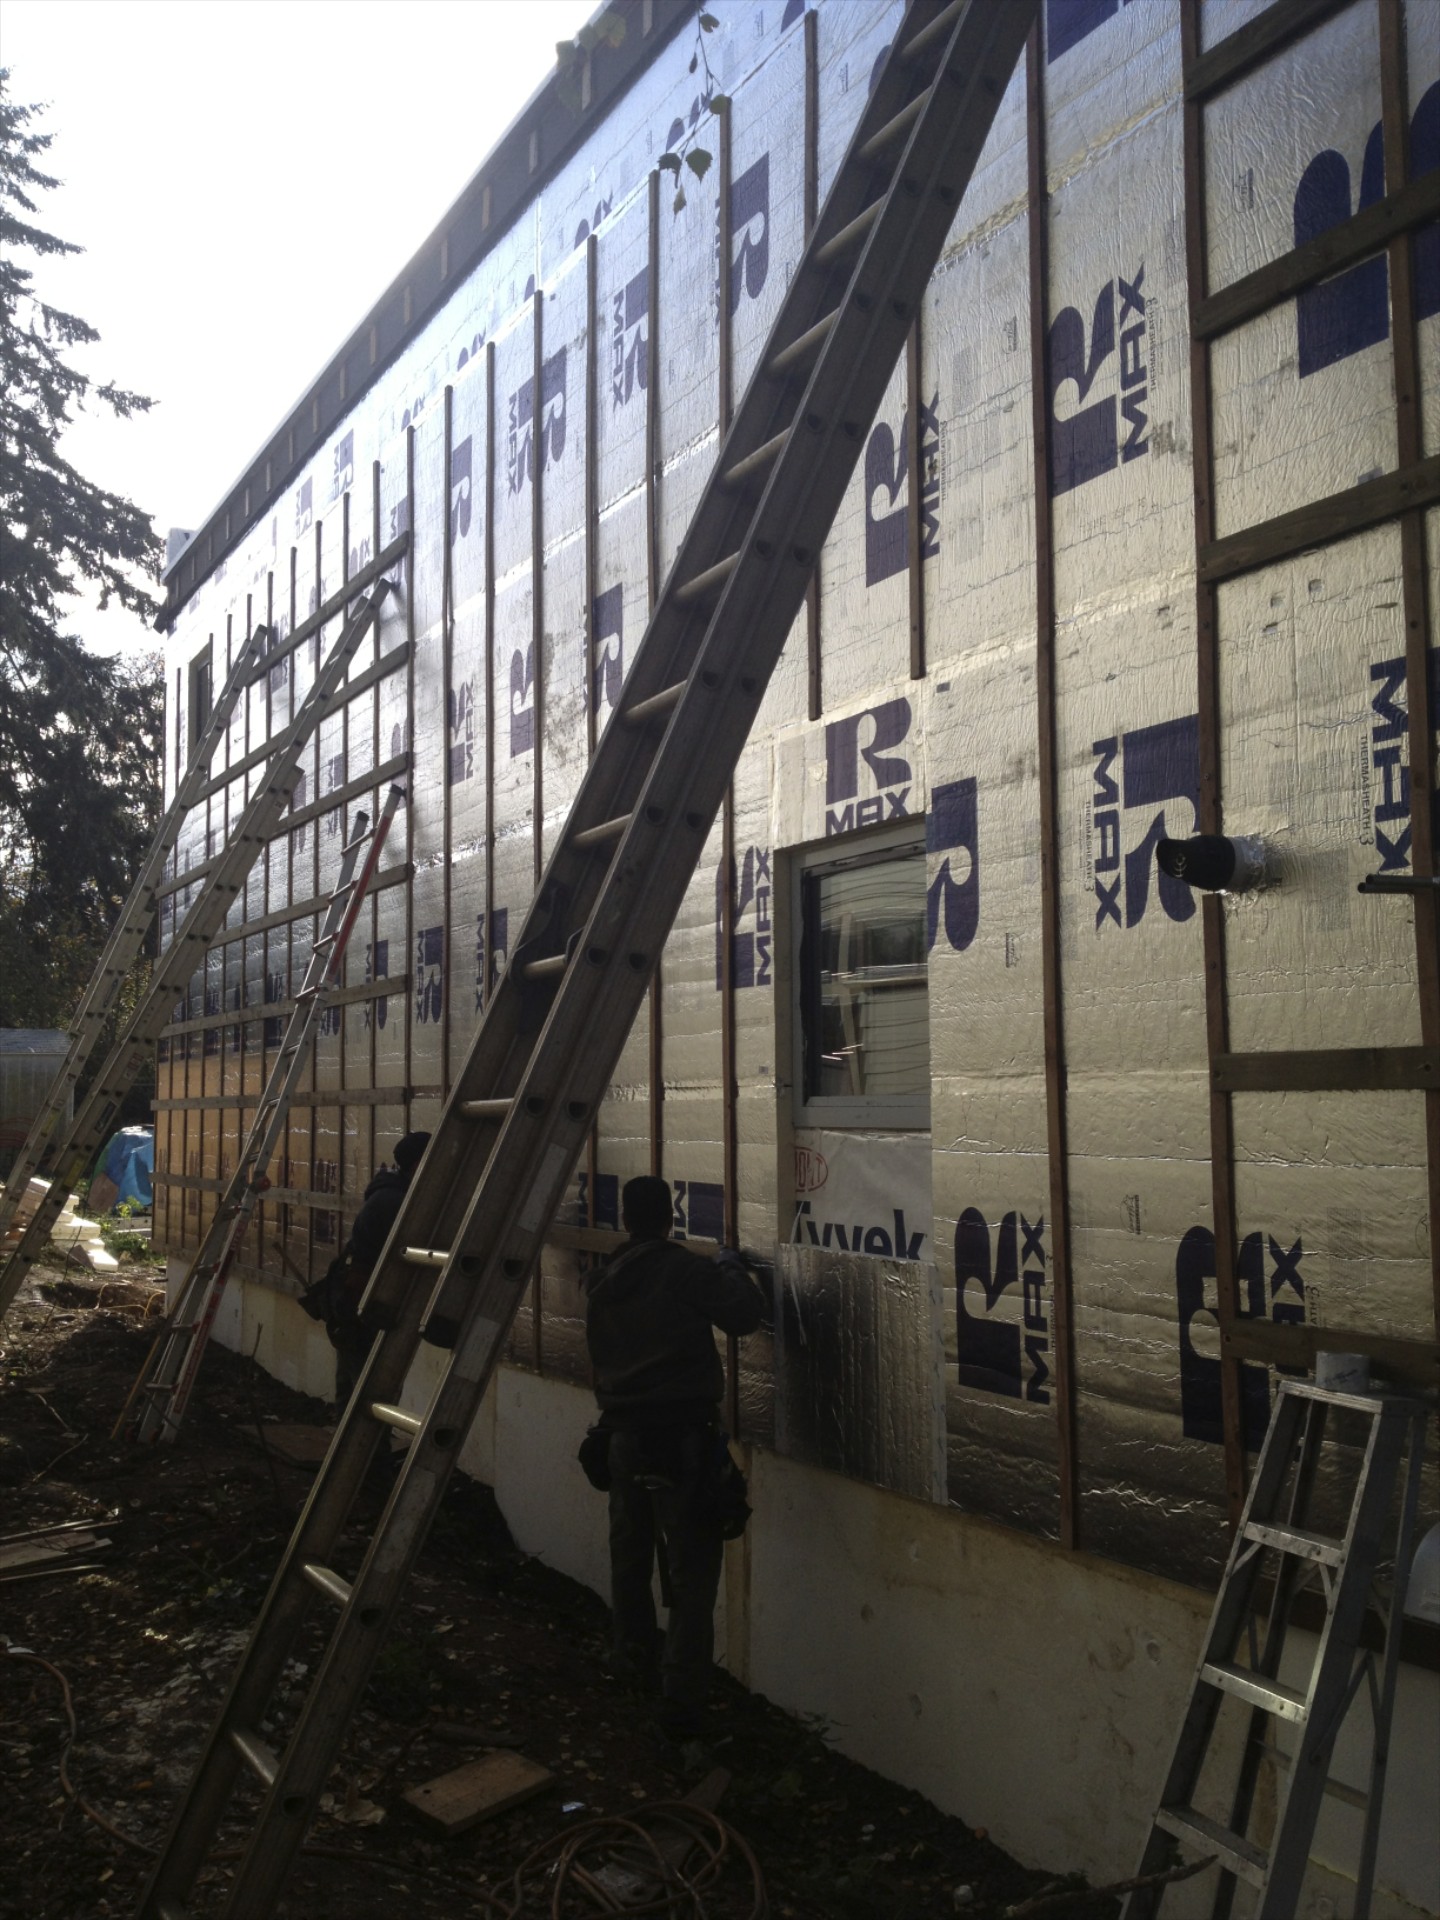
1/2" x 2" pt plywood furring strips run vertically to create the drainage plane. they are held in place by just a few fasteners until the next layer is installed.
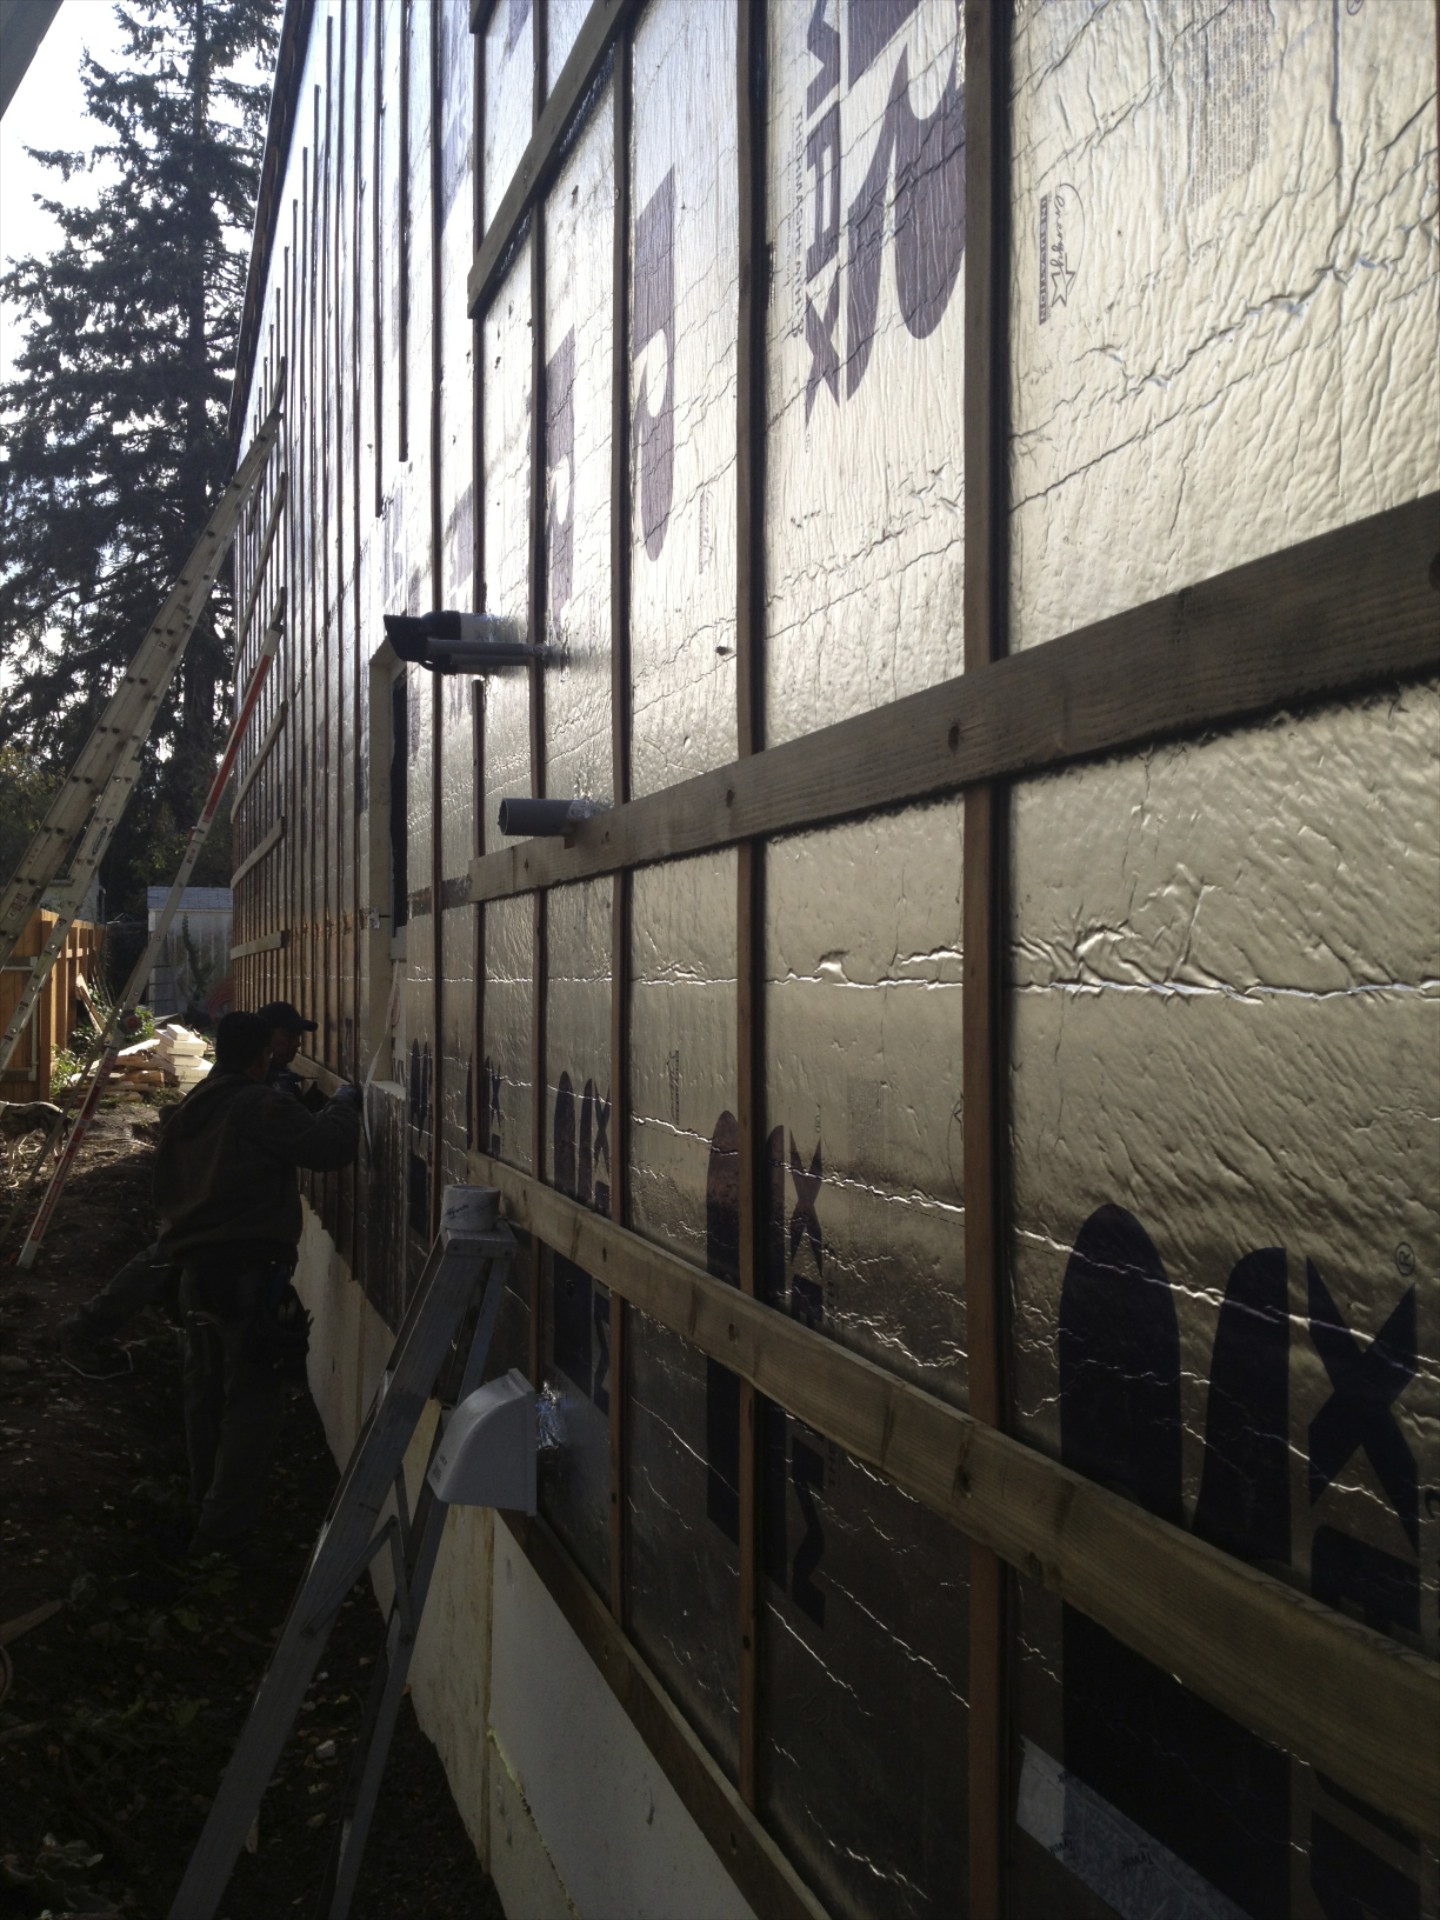
since we are using vertical siding, a second layer of furring runs horizontally. we used pt 1x4 as a solid nailing base for the siding.
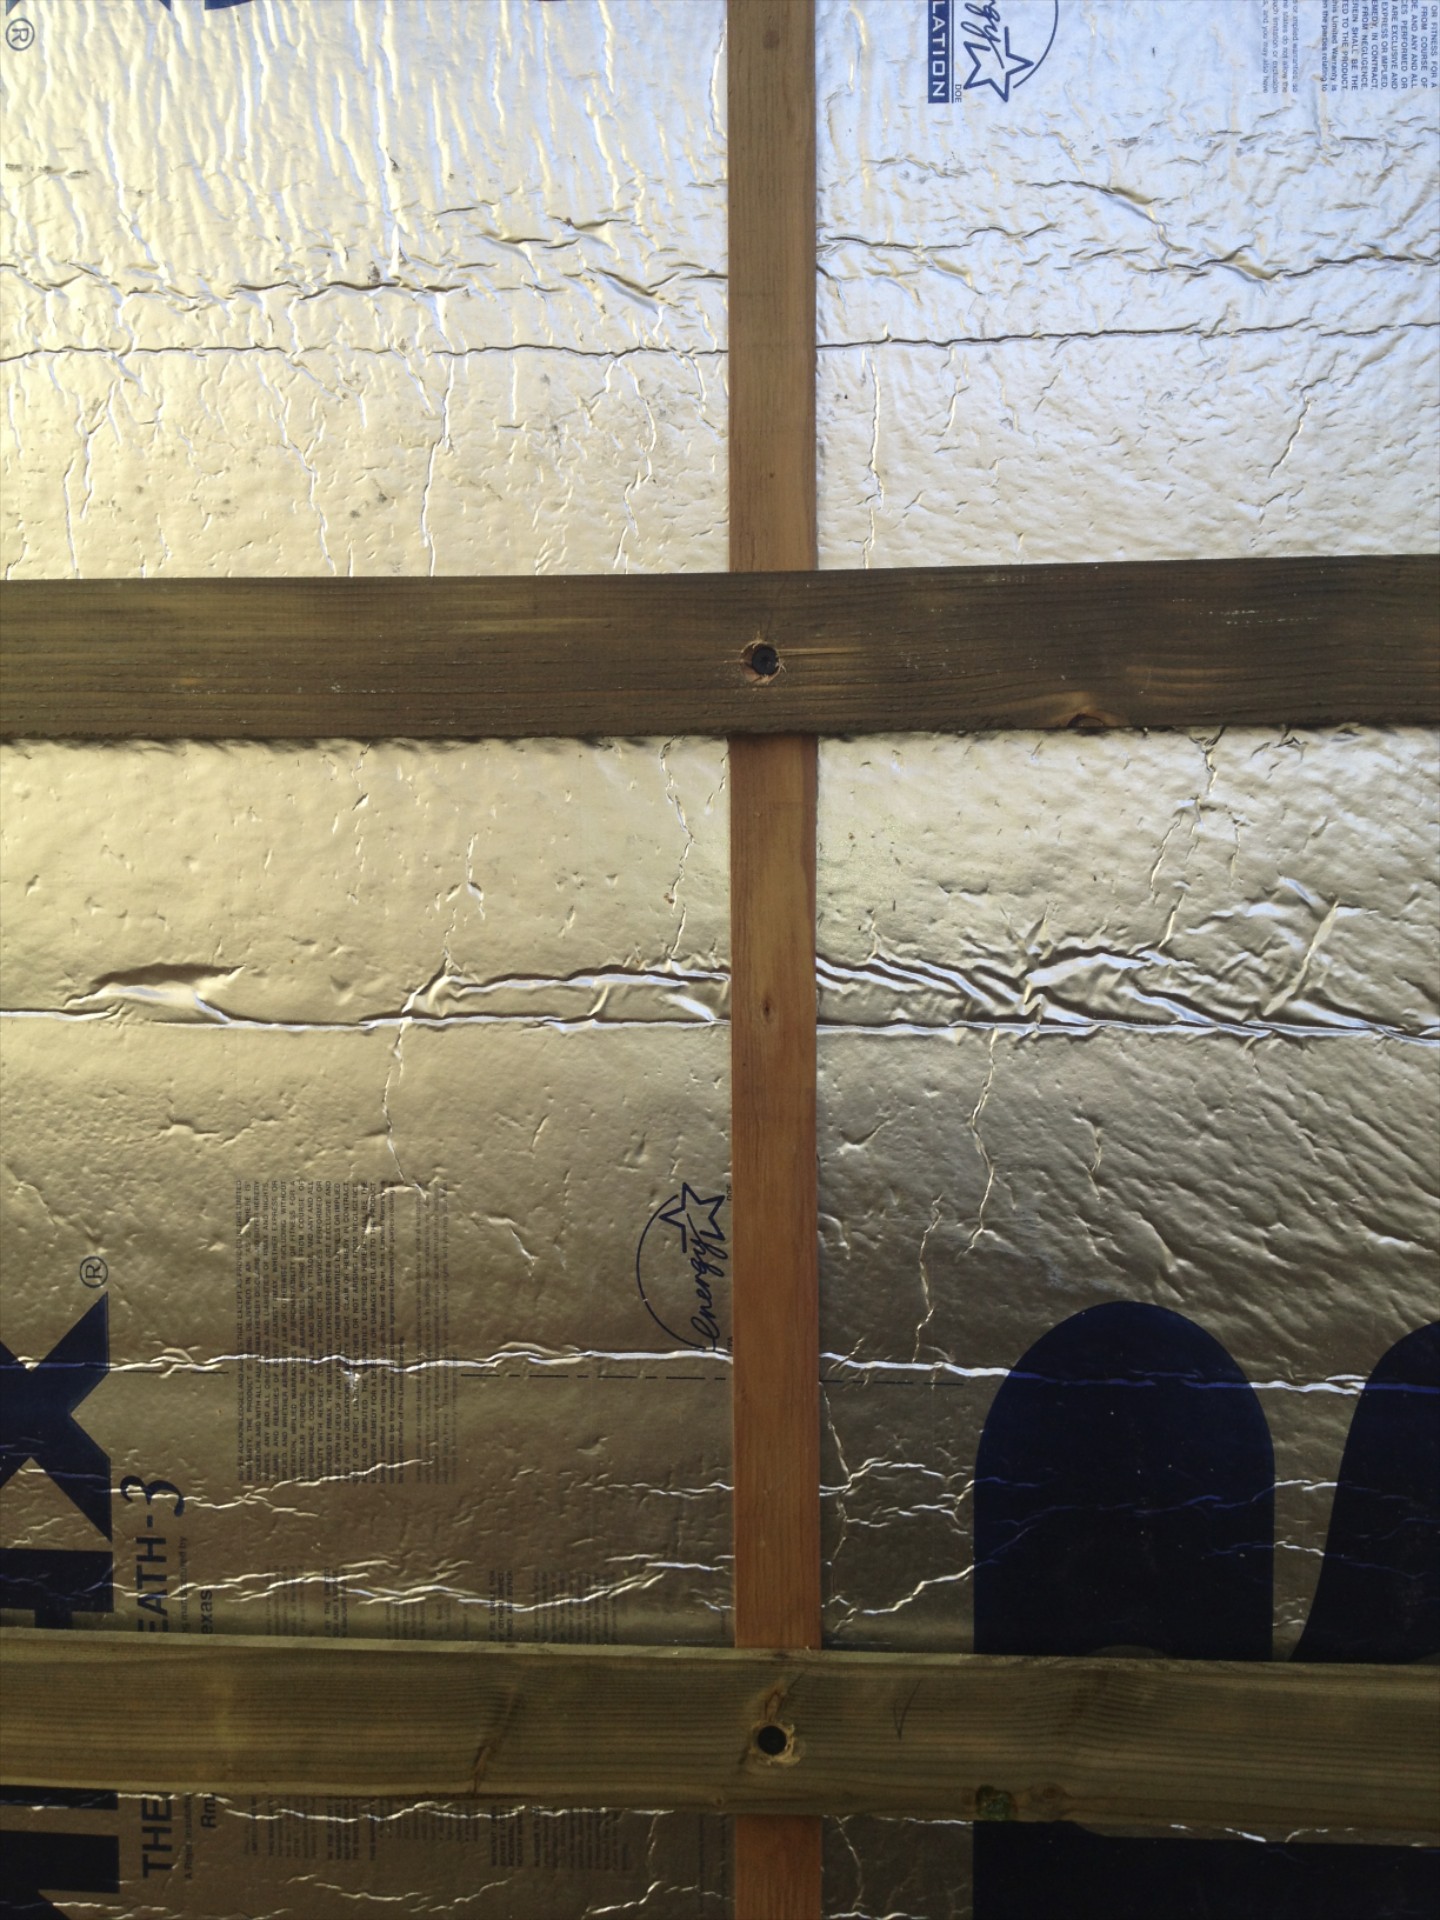
long fasteners secure the second layer of furring strips running horizontally through the foam to the studs. the straightforward framing layout makes the studs much easier to locate.
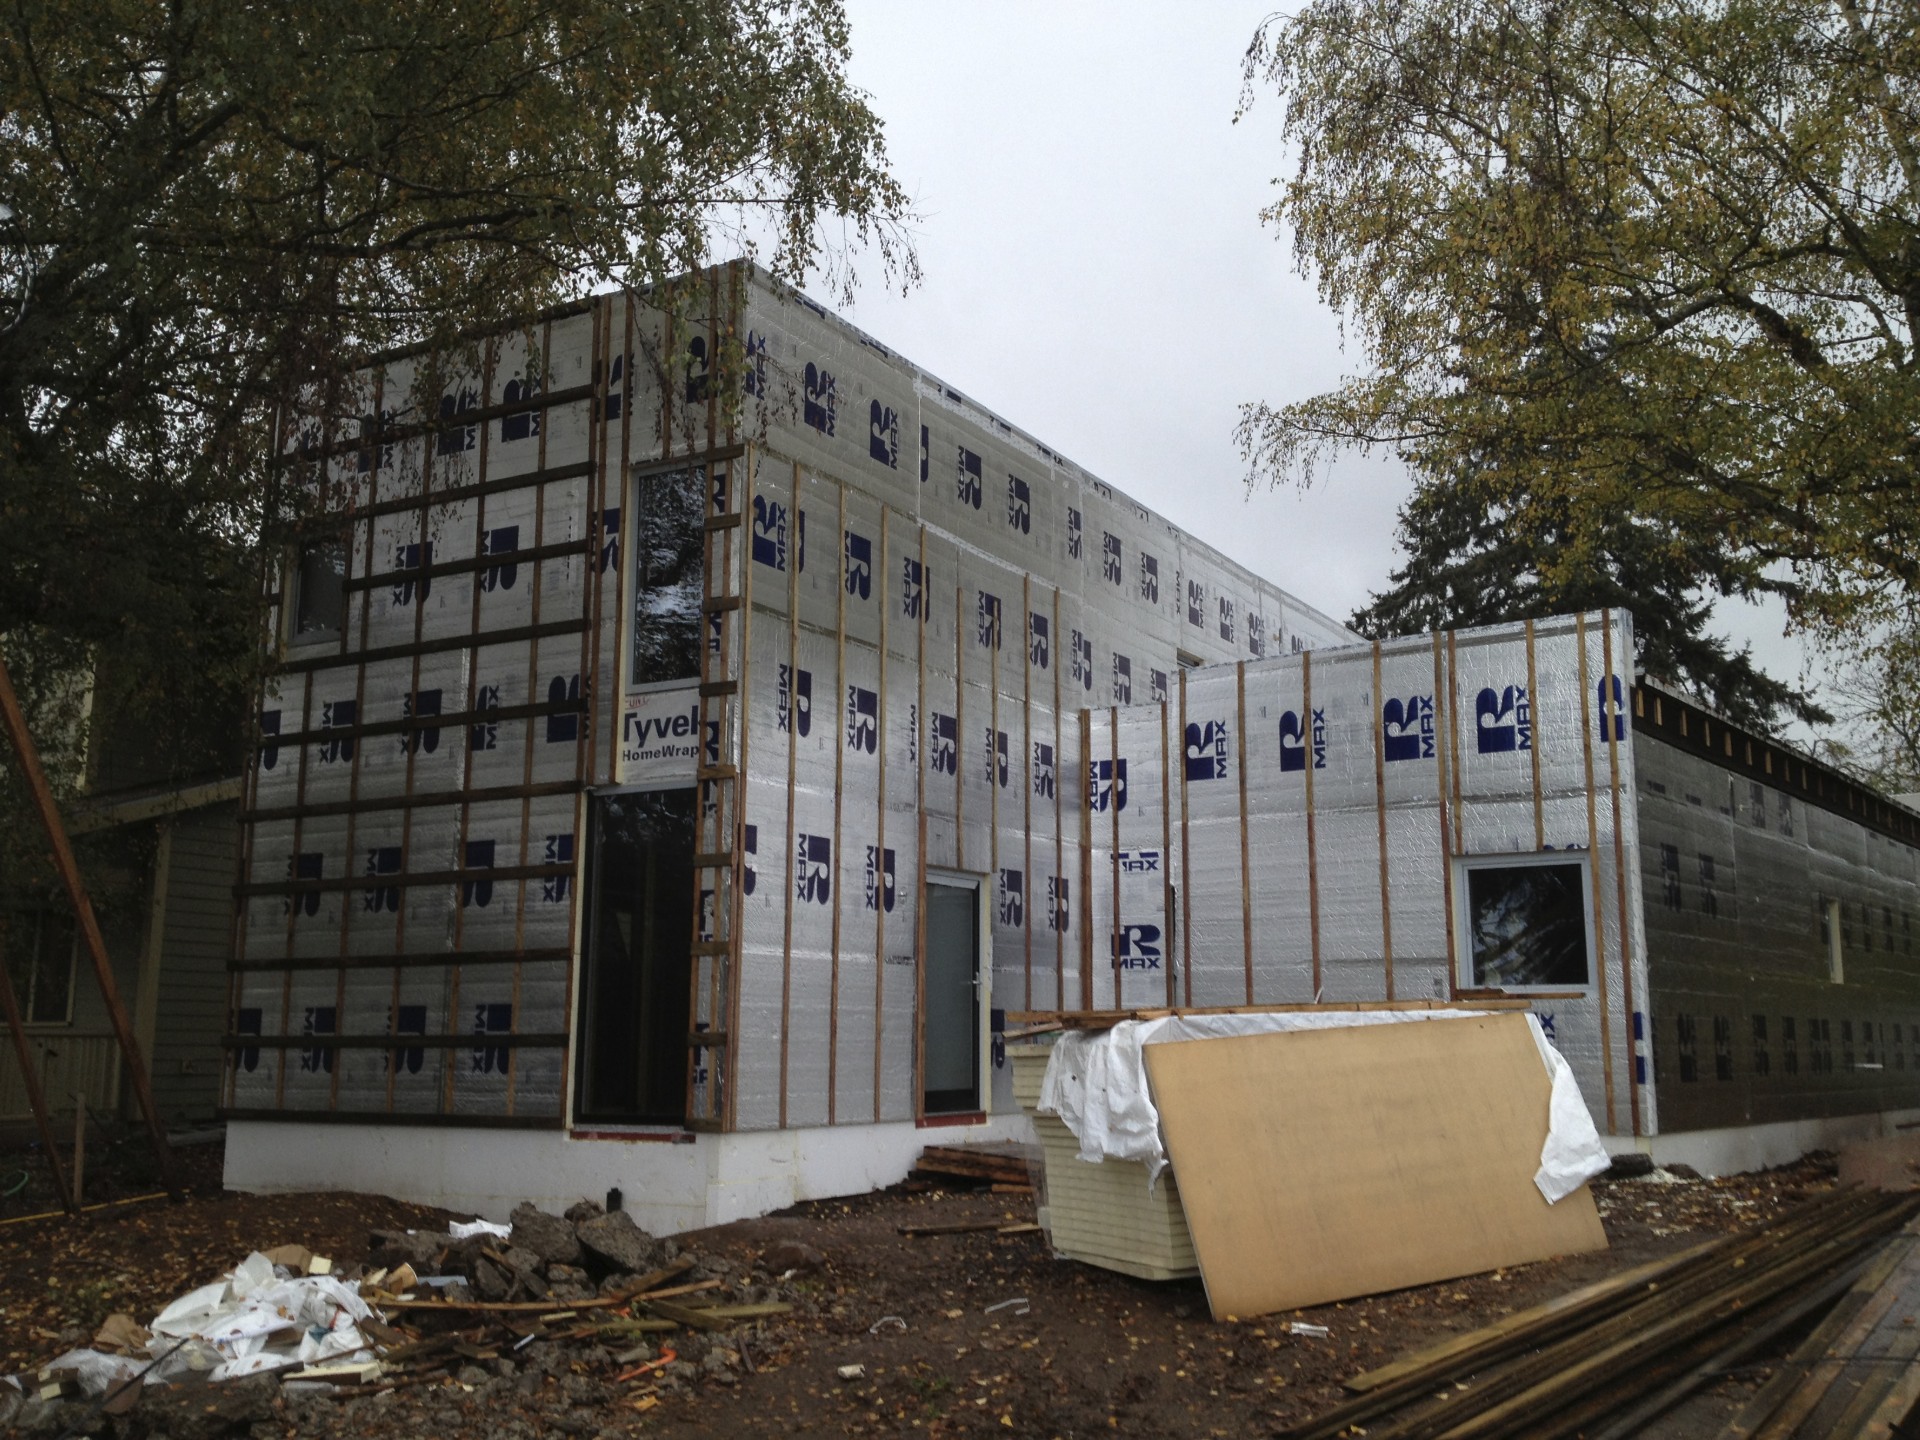
keep in mind that long fasteners get expensive. we settled on grabber #10 x 6" square drive coated screws (from nw staple).
next up on the exterior is trimming windows and installing siding.
stop by again soon.
framing for efficiency
framing has been moving along at skidmore passivhaus since we placed our slab on grade. the house is quickly taking shape thanks to dam framers (doug marshak and crew).


there are a few things that make the framing on this house just a little different from the typical house:
- untreated bottom plates on 30lb building paper
- 2x8 wall studs at 24" o.c. (roof trusses align)
- balloon framed 2 story walls
- upper floor hung from ledgers
- single top plates that interlock at the splices
- open corners with minimal blocking
- open web trusses with sloped top and level bottom
- header free openings (except for the living room doors)
- long walls on plywood module
All of this results in more space for insulation!
Plus there's less wood used and less material cost.


Some of the many next steps include:
- taping the plywood with SIGA to create the air barrier
- installing the single ply membrane roof
- prepping the rough openings with Prosoco Fast Flash
- roughing in plumbing, HRV, and electrical
Check back soon for updates.
beach house
we recently made a visit to the coast to have a look at the oceanside beach house.


designed in 2010, the owners have been completing the house in their spare time.
forest lane residence
we recently whipped up a design proposal for a new residence in the northwest hills of portland. we had a great time with it but unfortunately it looks like this one will be staying on the shelf. let us know if you want to take it for a spin.


small project update
we recently shared some drawings and photos of a small bathroom remodel inspired by the japanese bath house. the work is complete and it turned out quite nicely (thanks to right arm construction). here are some photos of the completed project:


a quick reminder of what it once was.

passivhaus progression
as we inch closer to getting started on our project, we continue to scrutinize our current plans in an effort to create a house that is fine tuned for our needs. as an architect, i want a house that is inspiring and beautiful, and embodies what is important to us. as the owner with a very limited budget, we want to make sure that our cost expectations are realistic. since i'll be playing general contractor, i want an easy to construct and problem free building. we've taken another pass at redesigning the house with an eye toward efficiency and simplicity - both in terms of square footage and energy. we felt there were a few redundancies, tricky details, and program pieces that we are better off without. here's a quick snapshot of the progression of the plans.

as always, there are a few ideas though that we refuse to give up.
requirement #1: warm, comfortable, and extremely energy efficient
we want to live simply and in a beautiful inspiring place that is warm and comfortable regardless of the time of year. we also want to minimize our footprint and our energy costs. although we will most likely pursue passivhaus certification, the path we take isn't really as important as the end result. for us, passivhaus is just a means to a better end. our generous friends at brute force collaborative have been providing the expertise to help us get there.

meeting passivhaus requirements means the house will use no more than 4.75 kBTU / ft2 annually for space heating. for the main house, this translates to about 5.27 mBTU or 1544 kWh annually for space heating (we are planning to use electricity to heat the house). at our current rate of around $.09 / kWh, our annual heating bill would be no more than $139.
although we know that the studios will see far less use than the main house, using the same formula yields an annual heating bill for the studios of no more than $51.
requirement #2: wood windows and doors

since we want wood windows and doors, and they need to be extremely high performing to achieve requirement #1, we have been looking at manufacturers based in germany and austria. this is our largest single expense and perhaps an easy target for criticism, as these beauties will need to be shipped overseas. we would love to use a locally produced product, but unfortunately no wood windows made in the US come even close in terms of performance. it's a bit of a quandary, but brute force collaborative has performed an interesting analysis (based on our previous design) that has us feeling more comfortable with our decision: Can European windows actually save carbon?

requirement #3: separate work from home
an important part of our program is space to do work and make things. we know we could make a more cost effective and thermally efficient house if we combined our work space with our home, but we like the idea of some separation. we think we can make this simple idea a huge asset.

requirement #4: create positive outdoor space
our intention has always been to use the form of the house to shape outdoor space. again, this may contradict requirement #1 but we don't just want a box sitting in the landscape. we want two boxes sitting in the landscape creating positive space between!

requirement #5: keep it modest and make it beautiful
many people may not agree, but we think these two wood clad boxes with concrete floors, white sheetrock walls, natural wood doors and windows, and flooded with light will be quite beautiful.

on the boards: BUG
 Beech Urban Gardens is a new mixed-use building designed to meet passivhaus standards and substantially raise the bar on energy efficiency. Located at the heart of the burgeoning N Williams corridor, BUG sits on an empty south facing 50' x 120' corner lot. Seven residential units occupy the top two floors, while six creative offices are situated above three ground floor retail spaces.

BUG features a fully glazed south facade utilizing a high-performance window system to maximize direct solar gain, minimize heat loss, and provide exceptional views and daylight. A system of sliding wood shutters is incorporated into the facade to provide complete external shading in the summer and eliminate overheating, while still allowing views and daylight.

The roof features a community garden with raised beds and a potting shed, a huge terrace with views to the neighborhood and the city, and photovoltaic panels making the roof's south guardrail and providing the building's minimal electrical needs. A greywater recycling storage tank provides gravity fed water for the rooftop gardens and the building below.

interior of typical residential unit

southwest view with wooden shutters in closed position


a break from the rain
yesterday we took advantage of the recent stretch of dry weather to visit our project under construction at the coast.

the exterior siding is installed and awaits a few final details and paint. the body and trim will be painted a dark warm grey and should recede nicely into the landscape.

the open stair is flooded with south light and draws you up from the entry into the main volume of the house.


the spectacular view to the west required a nice long deck to take it all in after a hard day of playing on the beach (insert drink in hand).


the tiny east elevation.

the cozy bedroom tucked into the east end.

the future 3-star ping pong room on the lower level.

a small taste of the main living room - more on this space later.

the bathroom with soaking tub and skylight above.

the west elevation in its partially finished state.

the north entry elevation from the road.
for more on the construction process so far, see the previous posts here, here, and here.
for more on the design, see the previous posts here and here.
context
the software is free and the skills are rudimentary. but i still enjoy seeing some context.

more after the break.
passivehaus planning
we're planning a passivehaus. for a quick intro see the previous post. our desire is to create a modern sustainable house that suits our modest needs and lifestyle. our site is a 50' x 140' flat lot with the street to the north, and great south exposure to the back. we want a 2 bedroom house for us, our animals, and the occasional guest. in addition, we need a small architecture office with direct client access, a small art studio with internal access, and a workshop with storage. living and working all in one.
our solution:
![]()
the plan takes a simple rectangle composed of the three primary program pieces, pulls it apart into two volumes, and shifts the smaller volume to form south facing outdoor space on grade and a roof terrace accessed from the second floor. the gap between serves to break down the mass from the street by allowing views through to the back, while providing separate access to the office. although the simple shifts in plan create more surface area and a less efficient envelope, we feel the spatial effect is important and justifies the added effort and cost.

service functions such as bathrooms, laundry, storage, and kitchen are placed to the north (shown in gray). a two-story living room and architecture office are placed to the south on the ground floor; each with direct access to the south yard. the art studio is placed to the south on the upper floor with direct access to a roof terrace.

openings are primarily located to the south to maximize solar gain, while openings on the north are sized to satisfy the code minimum for street side glazing. east and west openings are limited to minimize heat loss, while providing a balance of light and natural ventilation. exterior roll down shades will be outfitted on the south facing openings to prevent overheating during the hottest days. exterior materials include aluminum clad wood windows, charred juniper siding, and cement stucco.

view from the south (back)

interior looking south through living room
with our preliminary design in hand, our generous friends at brute force collaborative crunched the numbers using the passive house planning package, and have verified that we can achieve the passivhaus standard. check back soon for a first look at the assemblies and details that will make it all possible.
small project update
we recently completed work on a small bathroom remodel with some pleasing results.

the existing dropped sheetrock ceiling was removed to expose the original wood decking. a carbonized bamboo cabinet provides a nice complement to the wood ceiling.

the existing shower compartment was replaced with a curbless all glass shower surround outfitted with a linear slot drain.

a duravit wall hung dual flush toilet is mounted on a background of simple white 3x6 tile in a stacked bond pattern.

a linear glass tile backsplash above the white quart countertop provides a hint of color. trimless mirrored doors conceal a wall to wall medicine cabinet.

linear porcelain tile provides a beautiful cost effective floor. a perimeter soffit conceals new piping and accommodates uplighting.
another bathroom remodel project is in the works. check back soon for the next small project update.
van evera bailey


richard martin house | van evera bailey architect | 1952