is it working?

after more than 2 years living in skidmore passivhaus, i'm frequently asked is it working?  let's take a look at the numbers from the last year: IMG_6877

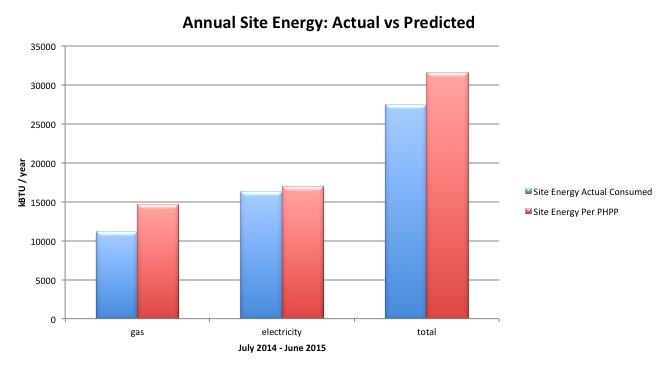
it's interesting to compare our actual annual consumption to the predicted consumption per the PHPP model.  this project was modeled in PHPP 2007, and there has been some criticism in the passive house community suggesting that the German default values for electrical consumption built into PHPP are far too low for the US culture.  (PHIUS has gone so far as to radically change the default values for electrical consumption).  given the data on our project, i'm not so sure there is a problem.

Site Energy Actual v Predicted

occupant behavior of course plays a significant role in energy consumption, and there are a number of conditions to note for this building.  PHPP assumes 4 occupants for a house of this size, when in reality there are only 2 of us (plus 1 dog and 2 cats) which should result in lower overall energy consumption.  with fewer occupants, there will be lower internal gains which presumably would increase slightly the heating demand and heat load.  Because we both work from home much of the week with computers and other devices running all day, it could be assumed that while there are only 2 of us, our consumption includes both home and work and would therefore be higher.  I also should note (somewhat sheepishly) that we have 3 cables boxes that stay on all the time, including one DVR, which draw a steady amount of electricity and generate some heat.  This is all somewhat anecdotal, but it shows the inherent complexity in accurately predicting energy consumption.

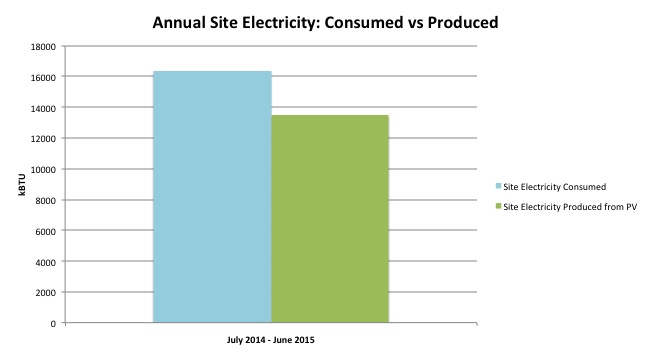
an annual summary of our site electricity consumption and site energy production (from our roof mounted 4.32 kW array) shows that we generated 82% of the electricity we consumed.

Site Electricity v Produced

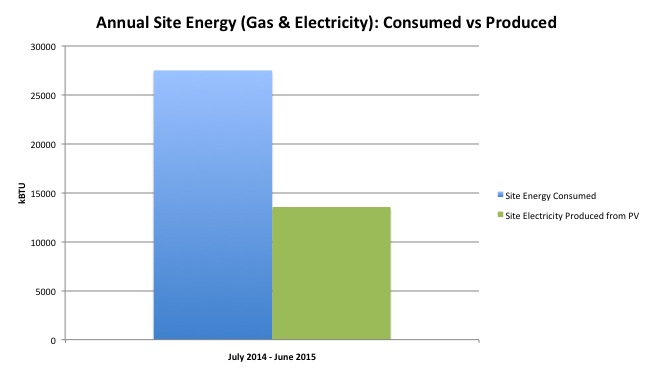
an annual summary of our site energy consumption (gas and electric) and site energy production shows that we generated 49% of the total energy we consumed.

Site Energy v Produced

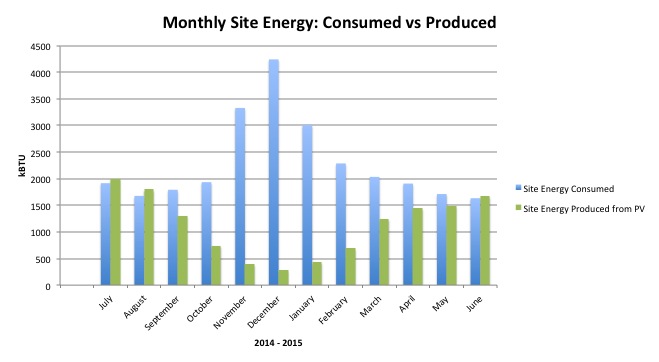
a monthly summary of our site energy consumption (gas and electric) and site energy production (from our roof mounted 4.32 kW array) shows the large deficit during the winter months as expected.  more efficient equipment for our space heat and hot water would certainly help to offset some of this deficit.  while a larger PV array would get us closer to net zero on an annual basis, it wouldn't solve this deficit and demonstrates one of the problems with an approach that focuses solely on annual net zero energy.  elrond burrell has written an excellent blog post covering this topic.

Monthly Site Energy

a monthly summary of our annual gas and electric bills demonstrates our consistently low monthly utility costs.  our average monthly cost for both gas and electricity over the last year was $36.53.

Monthly Bills

note that for most of the year we pay our electricity provider the minimum monthly charge even though we are generating more electricity than we are using.  our only gas appliance is our hot water heater, and a significant portion of our small monthly gas bill is for fees and taxes regardless of our consumption.  if we were to change our gas water heater to electric even without a change in energy consumption, our monthly utility cost would be even lower by eliminating the minimum gas charges.

aside from reducing our CO2 emissions and our consistently tiny utility bills, we're staying extremely comfortable year round - warm in the winter while barely using our heating system, and cool in the summer without any air conditioning.  so the answer is unequivocally yes, it is definitely working.


form factor and passivhaus

HH front render It is well known that compactness is an important aspect of a well designed and cost effective Passivhaus as it has a considerable impact on the overall heat demand.  Having now modeled a number of projects in PHPP (Passive House Planning Package), I decided to do a quick comparison of the ratio of envelope to floor area (known as the form factor) as well as the average R-value of the entire envelope.  Here are a few examples:

Emerson

envelope to treated floor area:  3.8

average R-value:  39.4

_

Skidmore

envelope to treated floor area:  3.7

average R-value:  29.7

_

18th Ave Residence

envelope to treated floor area: 3.2

average R-value:  24.1

_

Haig Haus

envelope to treated floor area:  2.7

average R-value:  25.9

_

Ankeny Apts

envelope to treated floor area:  1.5

average R-value:  19.7


While there are many variables at play that make each project distinct, it is clear that form factor has a huge impact.  Remember boxy can be beautiful!


pre-certified

after 6 months of hard work, persistence and a bit of cash, skidmore passivhaus is officially pre-certified. PHIUS+ pre-cert letter

(next time i will do a more accurate solar shading report BEFORE the start of construction)

solar pathfinder

here are the latest results of the PHPP model:

phpp

more photos soon.

waiting for guffman (or looking through windows - part 8)

when we began this process, we only had a few rules.  one of them was real wood high performance windows. at the conception of this project, we were thinking about making a pretty good house.  Super insulated, airtight, with triple glazed windows and a heat recovery ventilator, but not necessarily passivhaus.  since we ruled out plastic or fiberglass, US built windows were at the top of the list.  once we decided to build to passivhaus, it quickly became clear that we had to look overseas.

our initial pricing was from optiwin, internorn, and pazen.  optiwin was very appealing aesthetically but super expensive.  internorn provided fantastic pricing, but there was no rep in the US meaning distant communications and pretty much zero support. pazen offers a slightly different product with a fiberglass exterior cladding and more minimal frame profiles, but they only offered a stainless steel clad door.  because we had lots of doors, the price jump was huge and they were way out of our budget.

about the same time, our local loewen rep started offering unilux.  we visited another local passivhaus project to see them installed, and we were impressed.  the pricing was strong, and we felt most comfortable having a rep locally, although they only had a limited understanding of passivhaus.  we thought we'd made up our mind, until we stumbled onto zola windows.  nearly identical to the german and austrian made passivhaus windows, zola windows are manufactured in poland and offered at a much more competitive price point.  we worked through all the options, input the data into PHPP, and scrutinized the sample window section that we got our hands on.  it seemed like a good balance between quality, aesthetics, and price point.  decision made.

one of the biggest challenges of using european windows is the long lead time (for our order the lead time was estimated at 12-16 weeks).  we worked hard to have our window order ready to go by the time we were breaking ground.  once we placed the order, the race was on to make sure the house was ready when the windows finally arrived.  18 WEEKS LATER they finally arrived. when we finally opened the container door to check them out, 2 of the biggest units had broken free from their braces and had fallen over at somepoint during shipping.  while nothing was catastrophic, there were issues both functional and aesthetic.

fast forward 6 weeks.  zola has been super responsive and we're confident that in the end everything will be as good as new.  the windows and doors are installed and are beautiful.  the house is dry, the first blower door test went well (.44ach at 50pa), and we are steadily moving toward insulation and sheetrock.

here's a quick look at some of the process. first, prepping the rough openings:

DSC_0814

step 1 - use pink prosoco joint and seam filler at corners and joints of rough opening.

DSC_0807

DSC_0818

step 2 - use red prosoco fast flash to coat rough opening and extend approx. 6" out onto sheathing.

DSC_0808

DSC_0817

to apply these prosoco products, simply lay down a bead from a caulking gun and spread with a cheap plastic spreader.  the result is a waterproof, airtight, and vapor permeable flashing without the usual complications of peel and stick flashings.  of course no through wall metal flashings on a passivhaus.

DSC_0825

DSC_0823

next, windows arrive and are unloaded.

DSC_8881

not what you want to see when you open the door of the container.  i think they forgot to do the ACTUAL bracing at the factory.

DSC_8901

some of these units are HEAVY!  thank to Doug Marshak and his Awesome Framing Crew for doing the very heavy lifting.

IMG_1366

small tilt/turn unit for the kitchen.

IMG_1358

Doug and Jesus installing the small window in the 2 story living room.

IMG_1371

the big units waiting to be installed.

DSC_0848

after a few nervous hours, the biggest unit finally goes in.  thanks to Graeme Thomson for the smart hoisting method.

IMG_1404

the large fixed unit installed above the lift/slide door.

DSC_0826

front door with translucent glass and large window to the street.

DSC_0847

breezeway with tilt/turn terrace door and fixed sidelite.

DSC_0846

studio with tilt/turn door and fixed sidelite.

DSC_0842

IMG_1388

check back soon for more as we try to catch up with construction: HRV rough-in, steel stair installation, flashing the windows, installing the exterior insulation, and rainscreen furring.

framing for efficiency

framing has been moving along at skidmore passivhaus since we placed our slab on grade. the house is quickly taking shape thanks to dam framers (doug marshak and crew).

there are a few things that make the framing on this house just a little different from the typical house:

  • untreated bottom plates on 30lb building paper
  • 2x8 wall studs at 24" o.c. (roof trusses align)
  • balloon framed 2 story walls
  • upper floor hung from ledgers
  • single top plates that interlock at the splices
  • open corners with minimal blocking
  • open web trusses with sloped top and level bottom
  • header free openings (except for the living room doors)
  • long walls on plywood module

All of this results in more space for insulation!

Plus there's less wood used and less material cost.

Some of the many next steps include:

  • taping the plywood with SIGA to create the air barrier
  • installing the single ply membrane roof
  • prepping the rough openings with Prosoco Fast Flash
  • roughing in plumbing, HRV, and electrical

Check back soon for updates.

in situ architecture

testing

last week i successfully passed part 1 of the Certified Passive House Consultant exam, and in the next few weeks i'll be wrapping up the take home design portion. with a little luck in the new year i will be a Certified Passive House Consultant!