
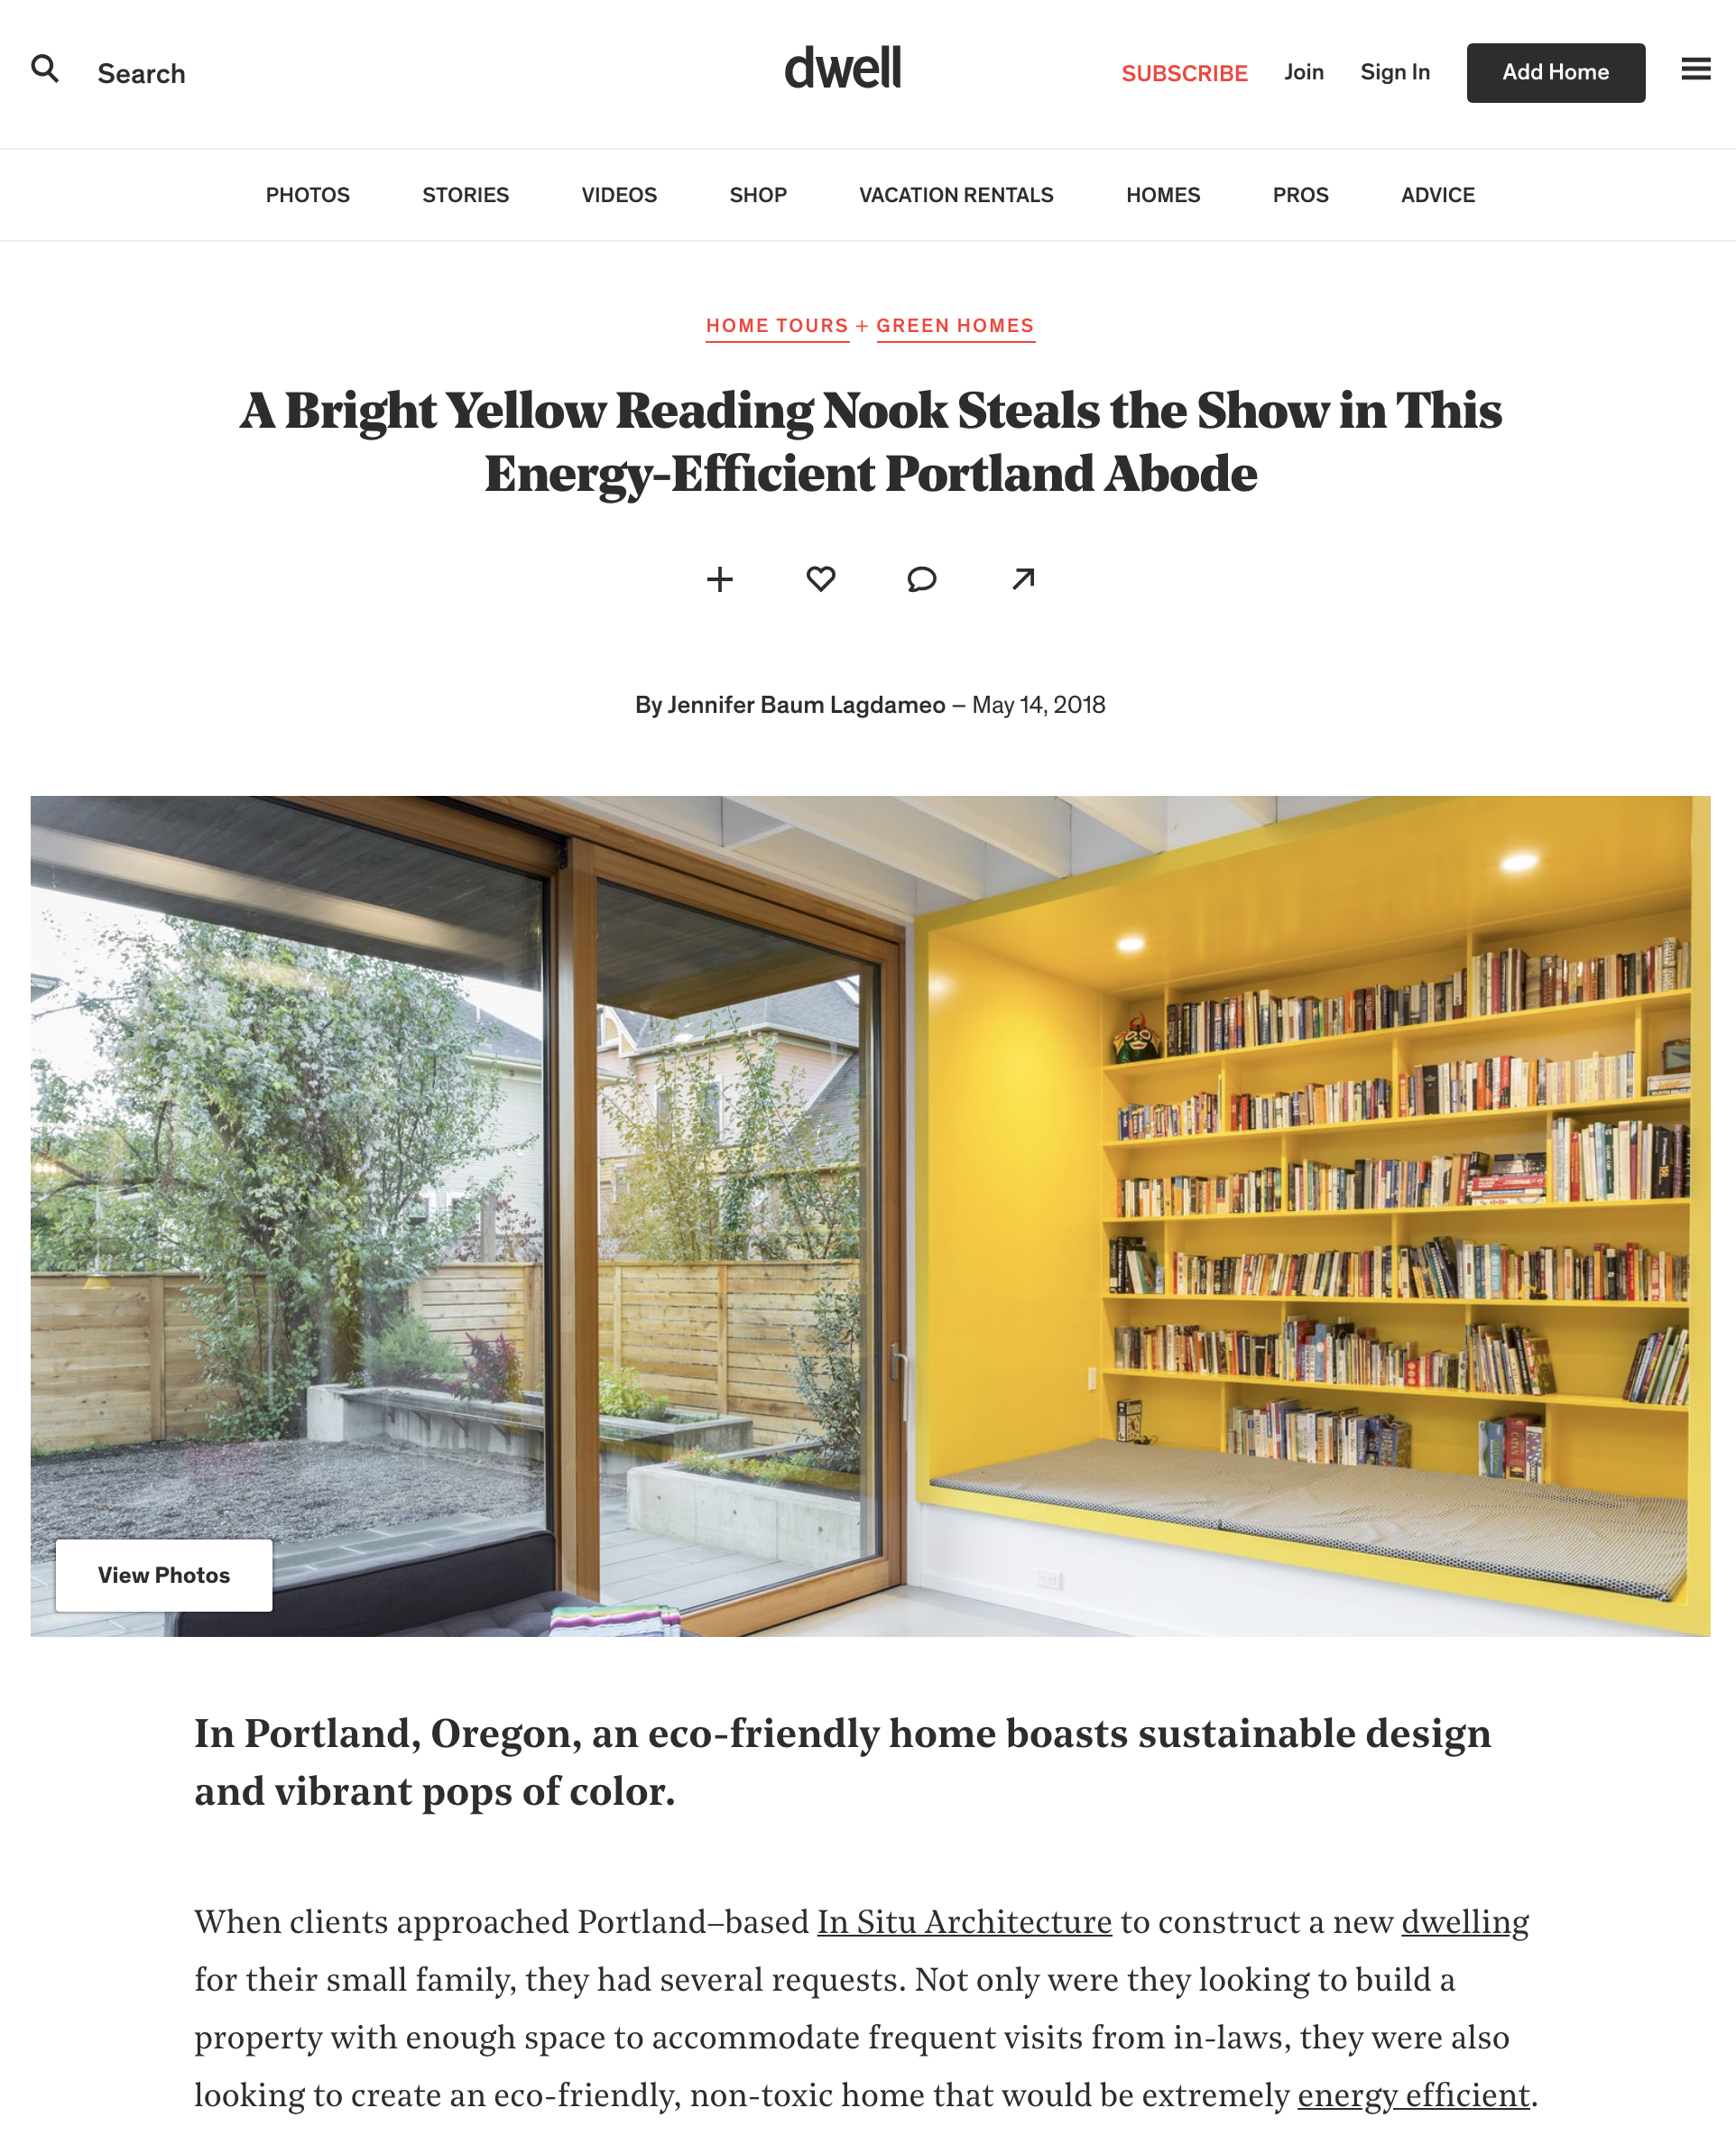
18th Ave House is featured on Dwell. Check it out here.
10 Mistakes When Designing an Energy Efficient Home
While they may be designed with the best of intentions, most so called energy efficient homes (and buildings of all types) designed and built today make many of the same mistakes:
1. Focusing on Technology First
The simplest, most reliable, and most effective approach to energy efficiency is to focus first on the building envelope. This means starting not with a more efficient furnace or water heater, or the addition of a photovoltaic solar array, but instead focusing on airtightness, minimizing thermal bridging, and providing thick continuous insulation. Not only will you save energy and lower your utility bills, if done correctly you will be more comfortable and your building will be more durable. Once you've made a great building envelope and significantly reduced your energy loads, technology can then be used on a more limited basis to complement your design.

2. Focusing on Insulation before (or without) Air Sealing
Probably the single most effective strategy to achieving energy efficiency is to provide exceptional airtightness. An airtight building minimizes energy losses (when heating or cooling), ensures even stable temperatures throughout a building, and prevents moisture laden air from entering the building assembly. Exceptional airtightness starts with good design, and relies on proper execution of that design in the field. A suitable ventilation strategy goes hand in hand with an airtight building. Fresh air should come from an intentional controlled source (filtered fresh air rather than leaks in the building envelope) and the temperature be moderated; usually achieved by the use of a Heat Recovery Ventilator.

3. Failing to do a Blower Door Test
This simple inexpensive test is the only way to determine the airtightness of a building. A blower door is essentially a fan that is used to pressurize and depressurize a building to determine where there are leaks and how big. Unfortunately very few buildings use a blower door test during construction.

4. Ignoring Solar Orientation
While good design must respond to the immediate context, it's also important to recognize and respond appropriately to solar orientation. If done correctly, the sun can be used effectively to help heat our buildings for free (assuming the climate and building type desires heating) without contributing to overheating. Effective design means appropriately sizing glass area for different orientations and providing the right type of shading.
5. Failing to do a Shading Study
Most sites are shaded at certain times of the year and day by buildings and trees. It's important to correctly identify this information to predict the effect of shading on the building. There are simple tools and software to provide this information.

6. Specifying the Wrong Type of Glass
Windows (and doors) are one of the most important components of a building. They provide views, daylight, ventilation, and have a huge impact on the experience of a place. The selection of windows and glass can be complicated and overwhelming, and selecting the wrong glass can have huge consequences. The right windows and glass can mean exceptional comfort and performance, and can make a building sing.

7. Ignoring Material Sourcing and Impact
In the quest to make an energy efficient building, it's important to have a complete understanding about the source and impact of our material selections. Many so called high efficiency materials actually have a much larger negative impact on the environment than the benefit they provide.
8. Not Setting Proper Goals
Without setting proper goals at the outset, it can be easy to compromise when facing a challenge during the process (there are many). While rating systems and certifications aren't always perfect, they can help to appropriately guide a project in the face of adversity.
9. Failing to do an Energy Model
Without a real energy model, it's all just guesswork. The best way to understand the effect of design decisions is to have an energy model as part of the design process. Effectively used an energy model can be another tool used as part of the design process.

10. Forgetting about the Architecture
It could be argued that a beautiful architectural space that is thermally uncomfortable and not energy efficient does not make great Architecture. Likewise, the focus can't be on energy efficiency alone. The challenge is to create beautiful spaces that are thermally comfortable and energy efficient - less than that can no longer be acceptable.

form factor and passivhaus
 It is well known that compactness is an important aspect of a well designed and cost effective Passivhaus as it has a considerable impact on the overall heat demand. Having now modeled a number of projects in PHPP (Passive House Planning Package), I decided to do a quick comparison of the ratio of envelope to floor area (known as the form factor) as well as the average R-value of the entire envelope. Here are a few examples:
Emerson
envelope to treated floor area: 3.8
average R-value: 39.4
_
Skidmore
envelope to treated floor area: 3.7
average R-value: 29.7
_
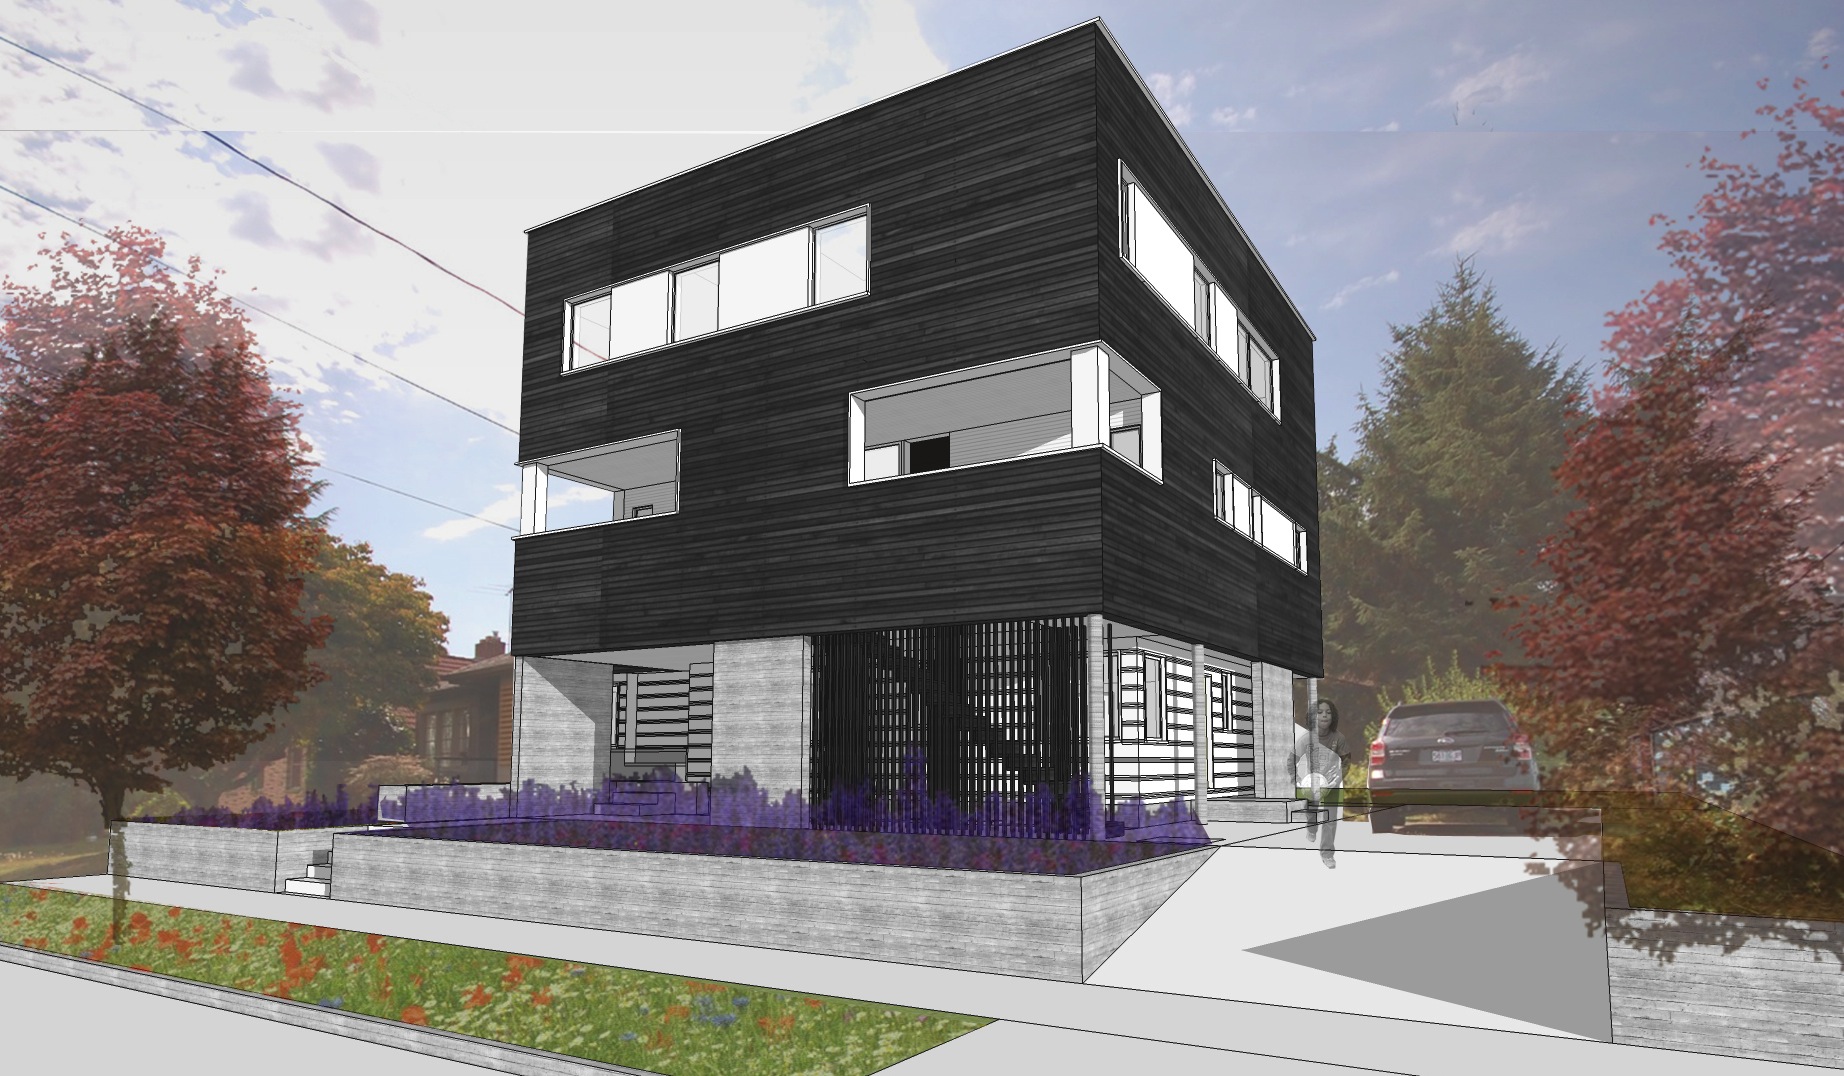
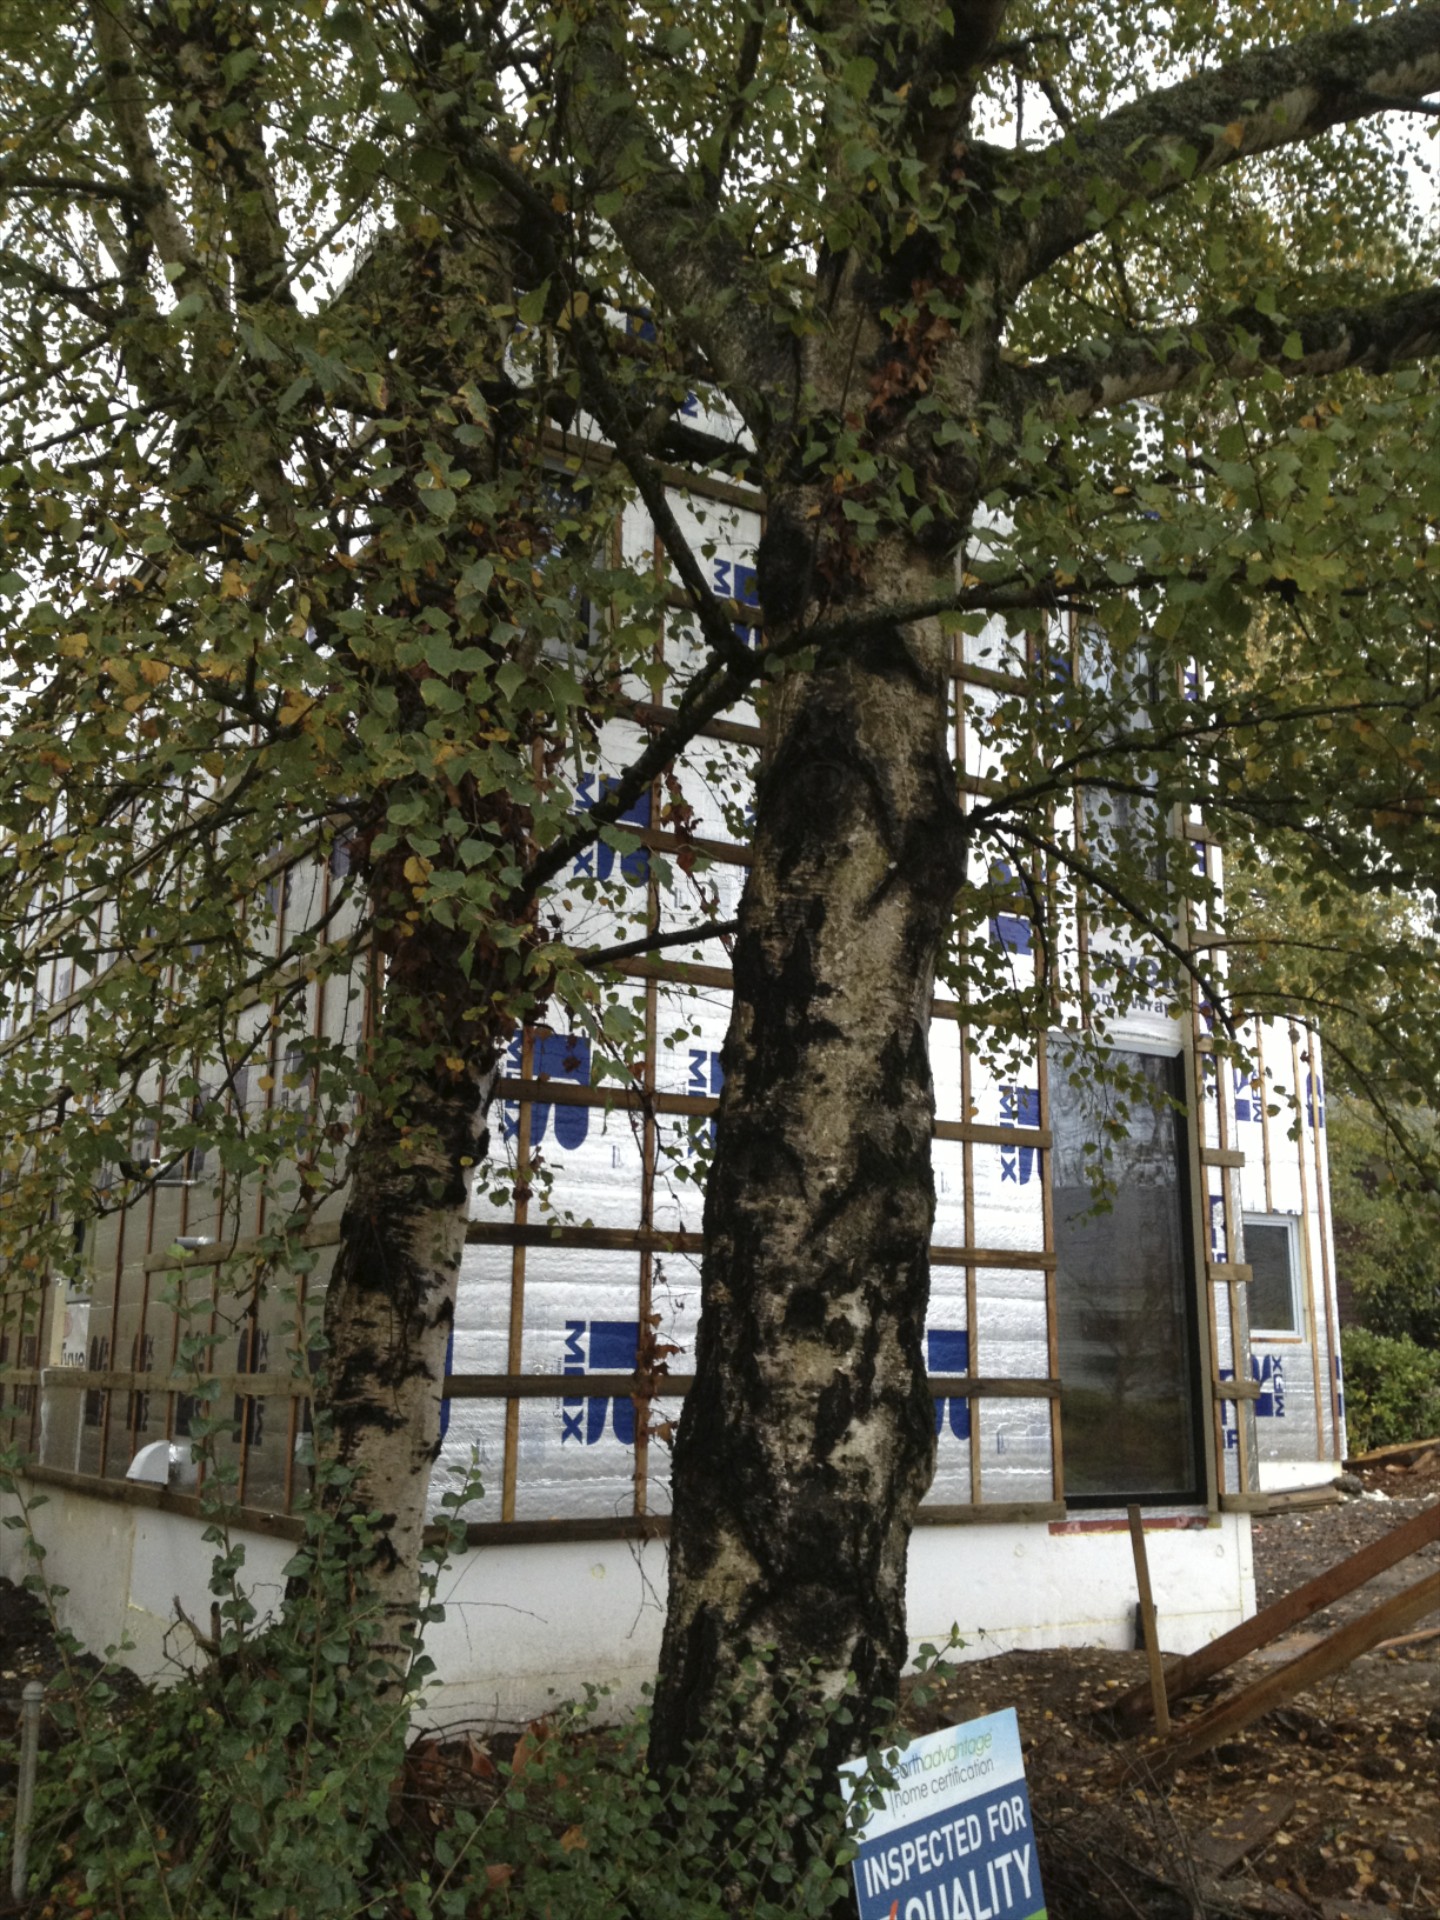
18th Ave Residence
envelope to treated floor area: 3.2
average R-value: 24.1
_
Haig Haus
envelope to treated floor area: 2.7
average R-value: 25.9
_
Ankeny Apts
envelope to treated floor area: 1.5
average R-value: 19.7
While there are many variables at play that make each project distinct, it is clear that form factor has a huge impact. Remember boxy can be beautiful!
help wanted
In Situ Architecture is looking for some part-time contract help. Excellent rendering and graphics skills a must. Interest in low energy building and passivhaus is helpful. If you are interested please email a brief description of yourself with a few examples of your best work. Info at insituarchitecture dot net
thermos
 we're excited to share that skidmore passivhaus is featured in the january 2014 issue of portland monthly magazine!
pick it up at your nearest newsstand.
you can also see an excerpt here:
if you want more info visit us at:
fast forward
we've been too busy to post for quite awhile, but work has been progressing nicely on the skidmore house. here's a quick look around:


we hope to be putting the final touches on in the next few weeks. lots of catching up to do. check back soon for more on this project and others.
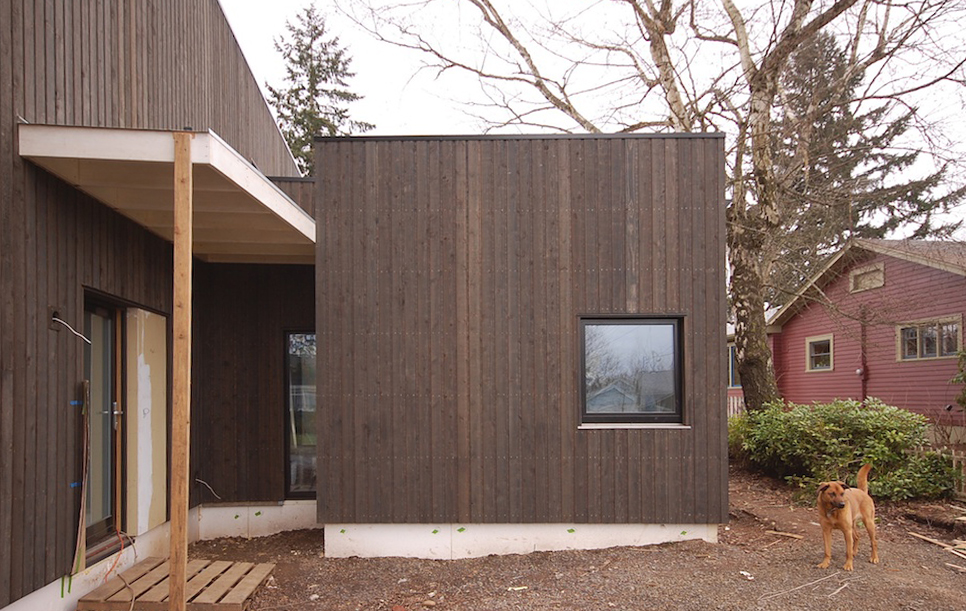
stained cedar siding
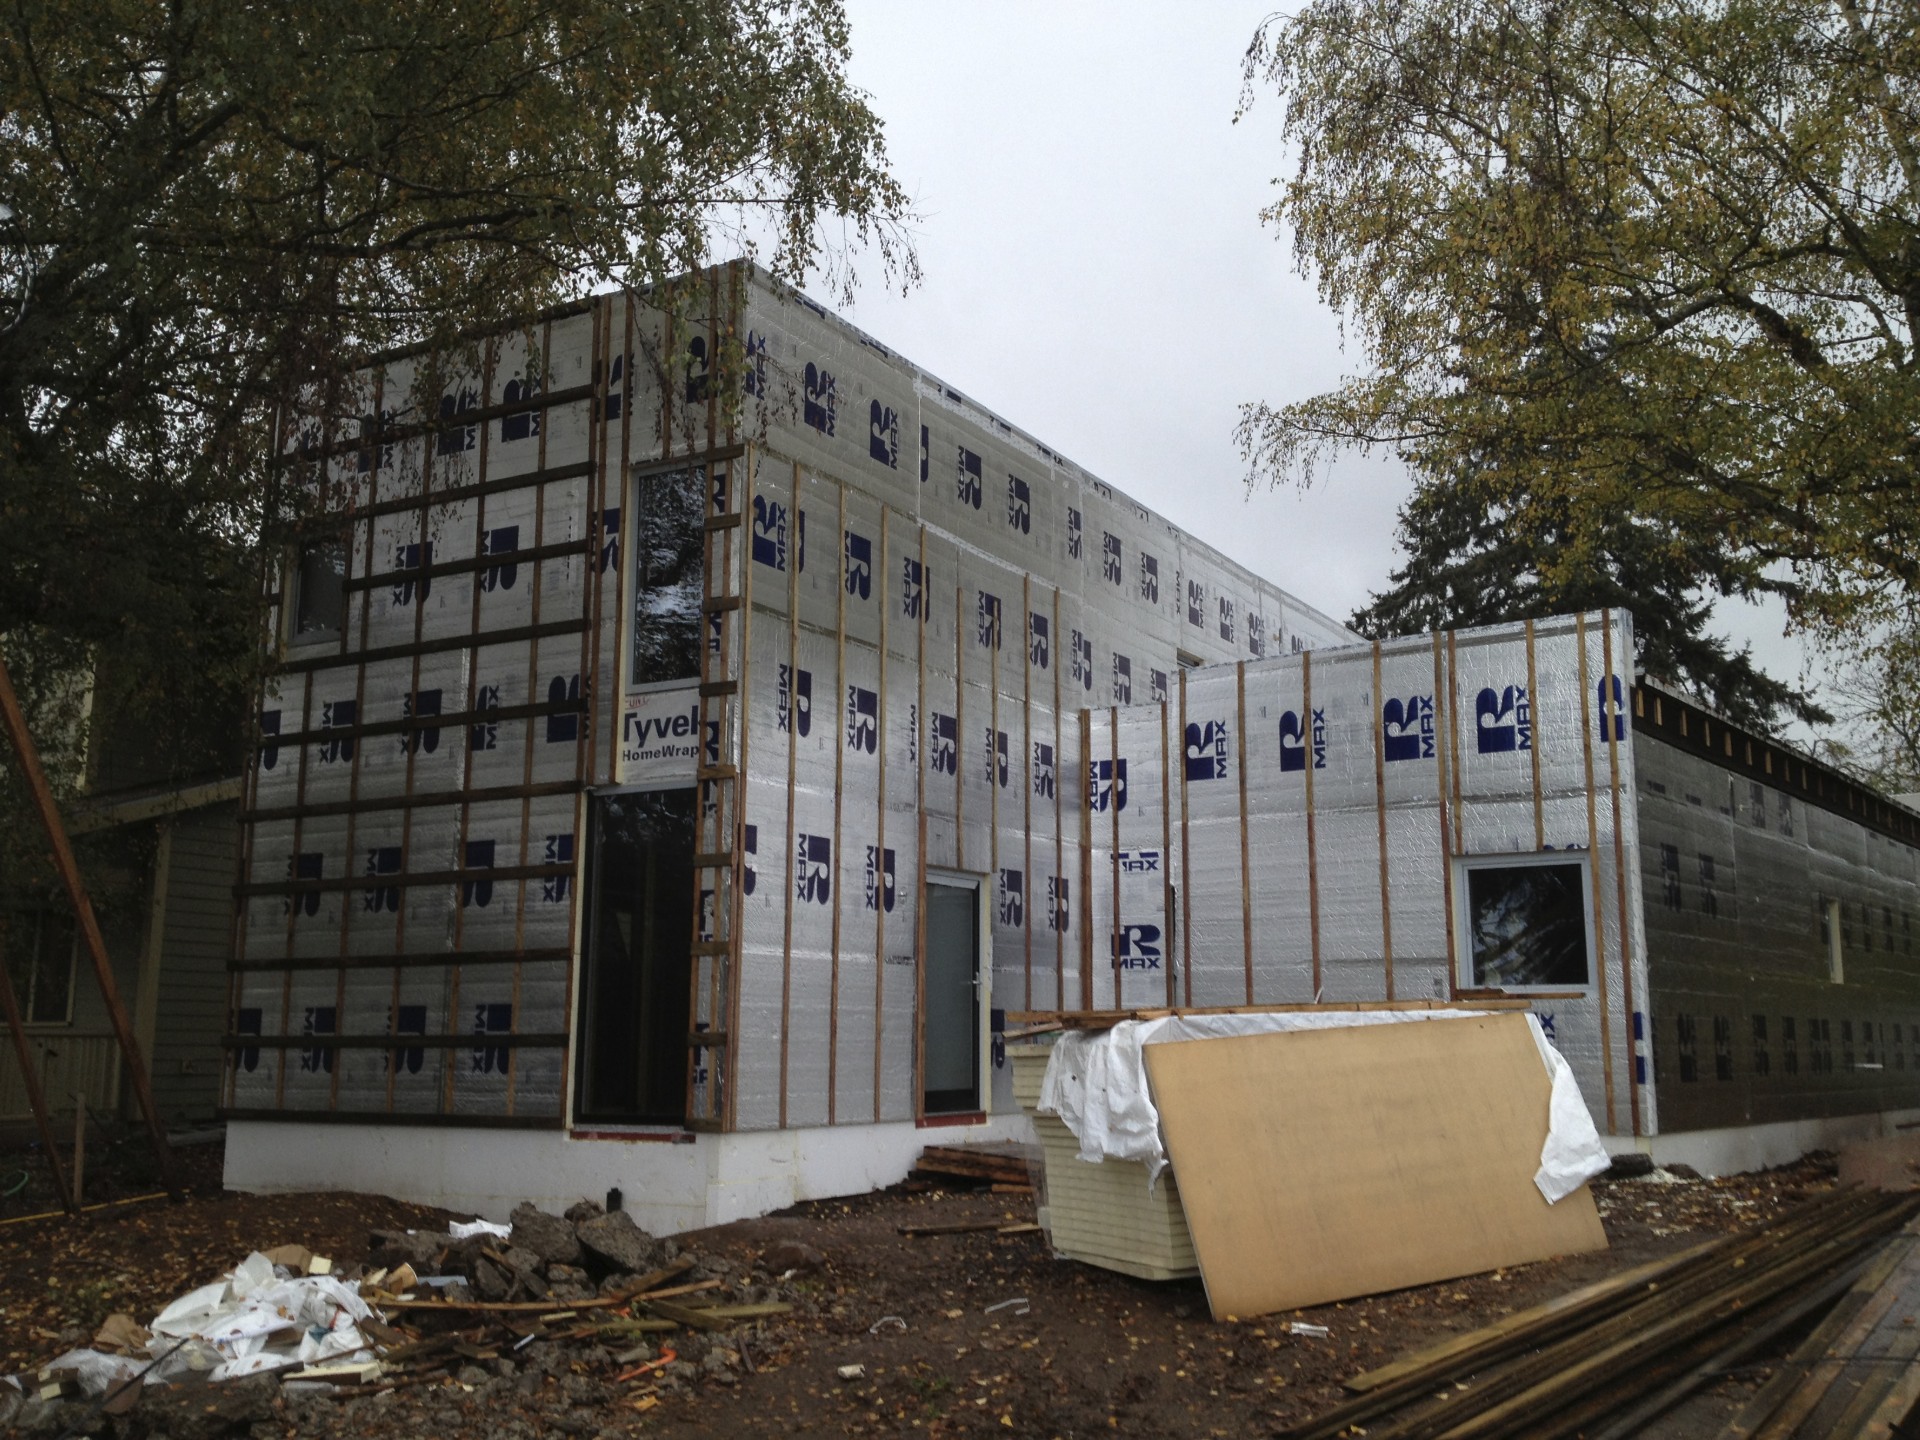
siding work has mostly wrapped up. the vertical siding is installed on rainscreen over rigid exterior insulation. see this past post for more info on the assembly. here's a first look at the siding pretty much completed.

the siding is off the shelf 1x6 channel made from tight knot cedar. it's stained with 1 coat of olympic semi-transparent stain in ebony.

the large south windows (and doors) have exterior motorized aluminum sun shades supplied by hella. the siding has been detailed to allow the shades to stack in recessed pockets. in this photo the shades are down about 9 inches and just visible on the 2 living room units (lift / slide door and fixed upper unit). more on the shading later.

the "breezeway" features a south facing door / window with a wood canopy (to be painted black) topped with clear tempered glass.
the entry door at left features acid etched glass for privacy and has a smooth accent panel adjacent that will be painted a deep red. the wood canopy will painted black and features a simple galvanized metal pan roof. steel rod will be used to hang the canopy from a bracket mounted to the wall above. a mahogany deck will eventually complete the front porch.

the north street facade also features a narrow smooth accent panel that will be painted with the same deep red. the same siding runs horizontally to form an accent between floors.
check back soon for more.
pre-certified
after 6 months of hard work, persistence and a bit of cash, skidmore passivhaus is officially pre-certified.

(next time i will do a more accurate solar shading report BEFORE the start of construction)

here are the latest results of the PHPP model:

more photos soon.
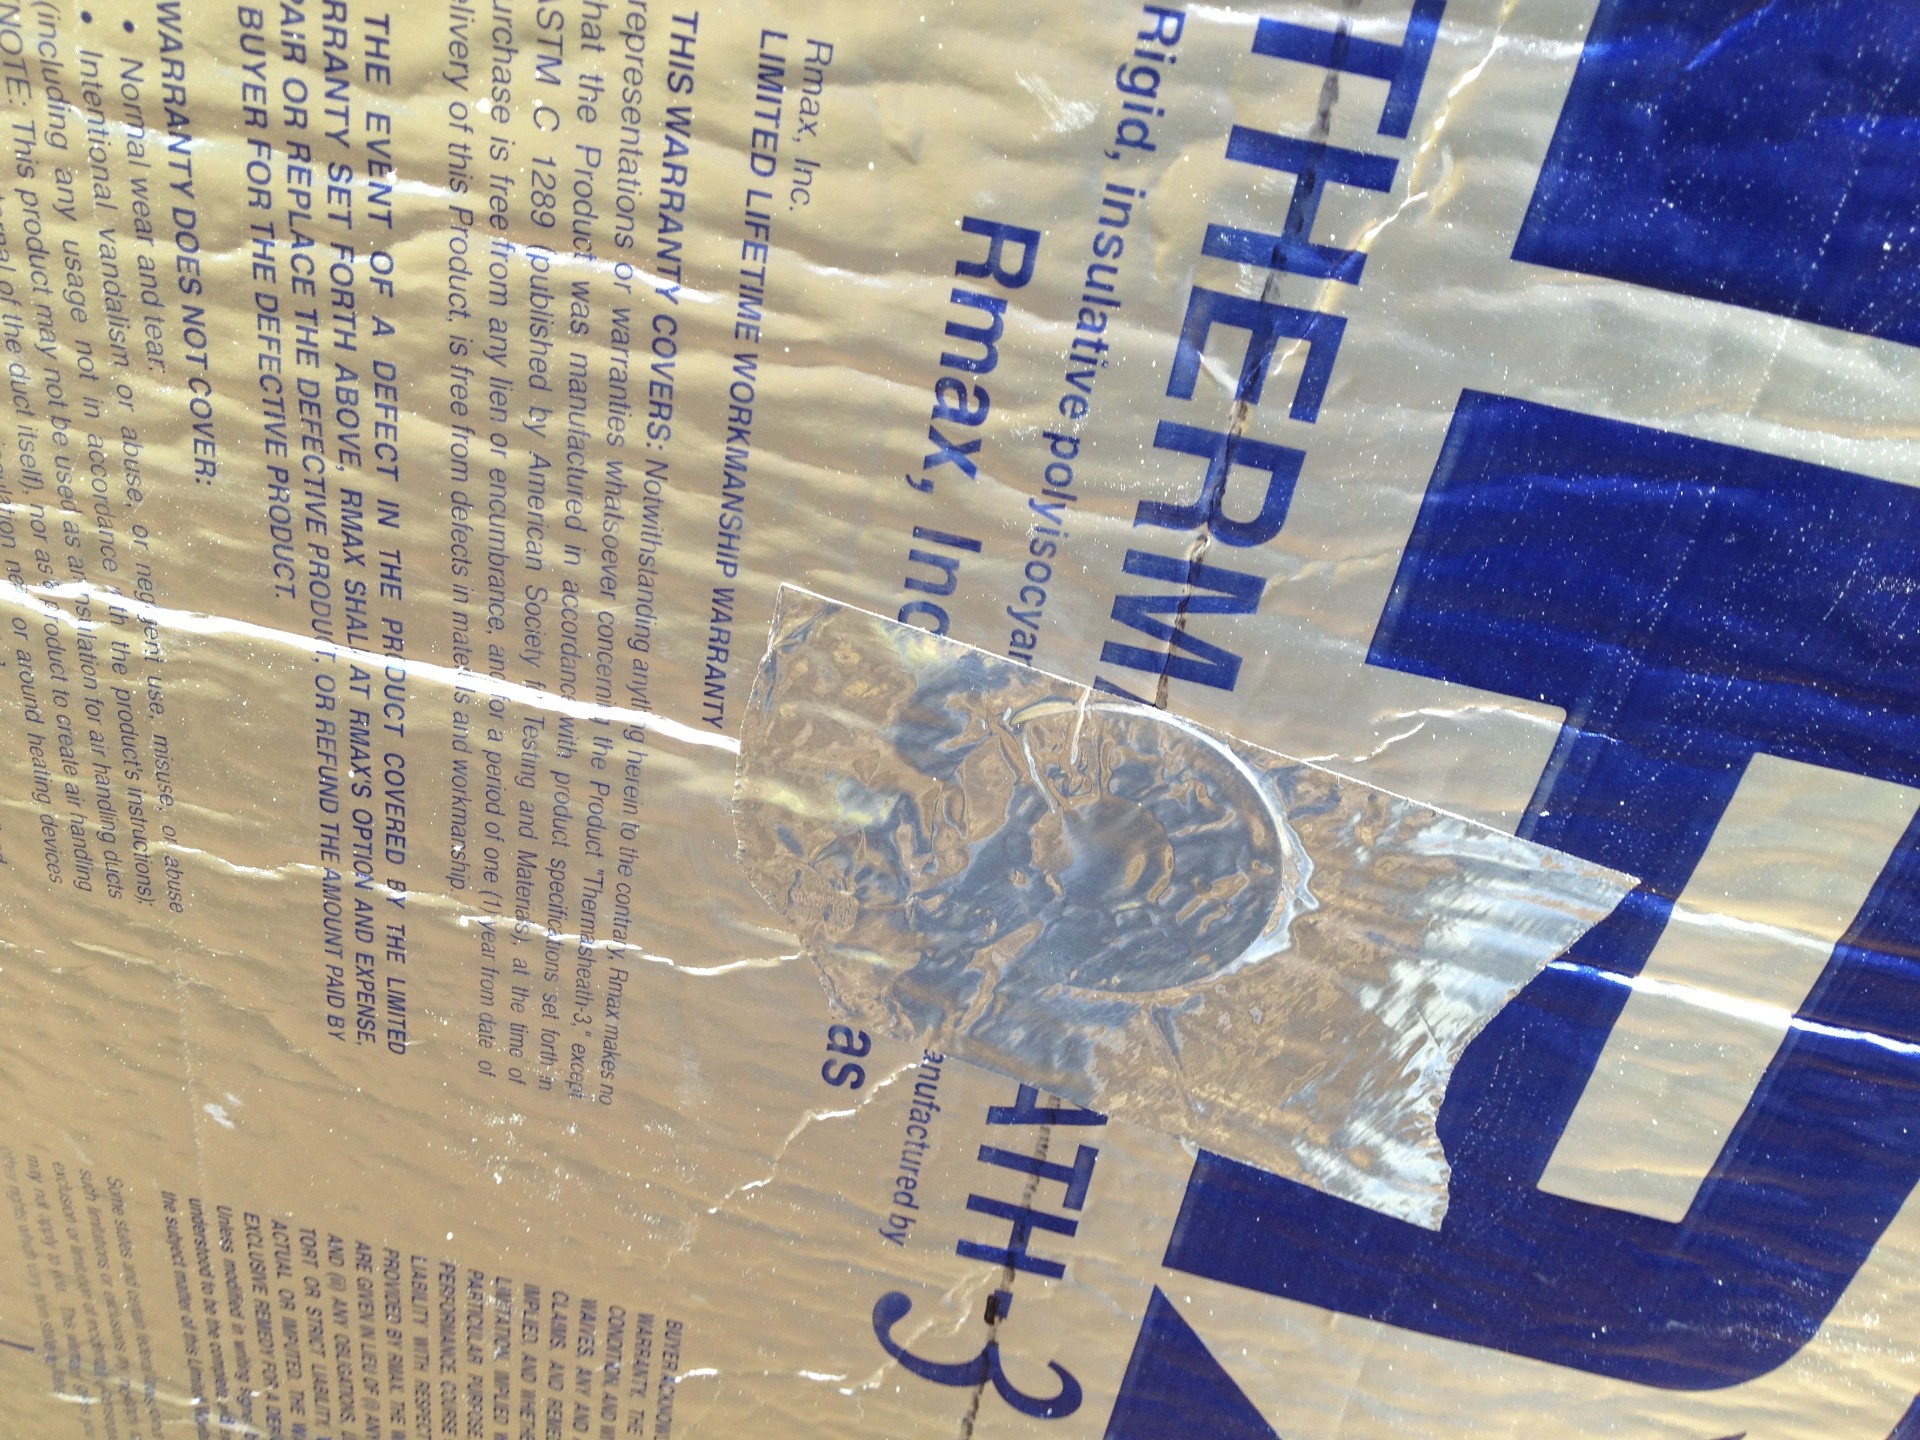
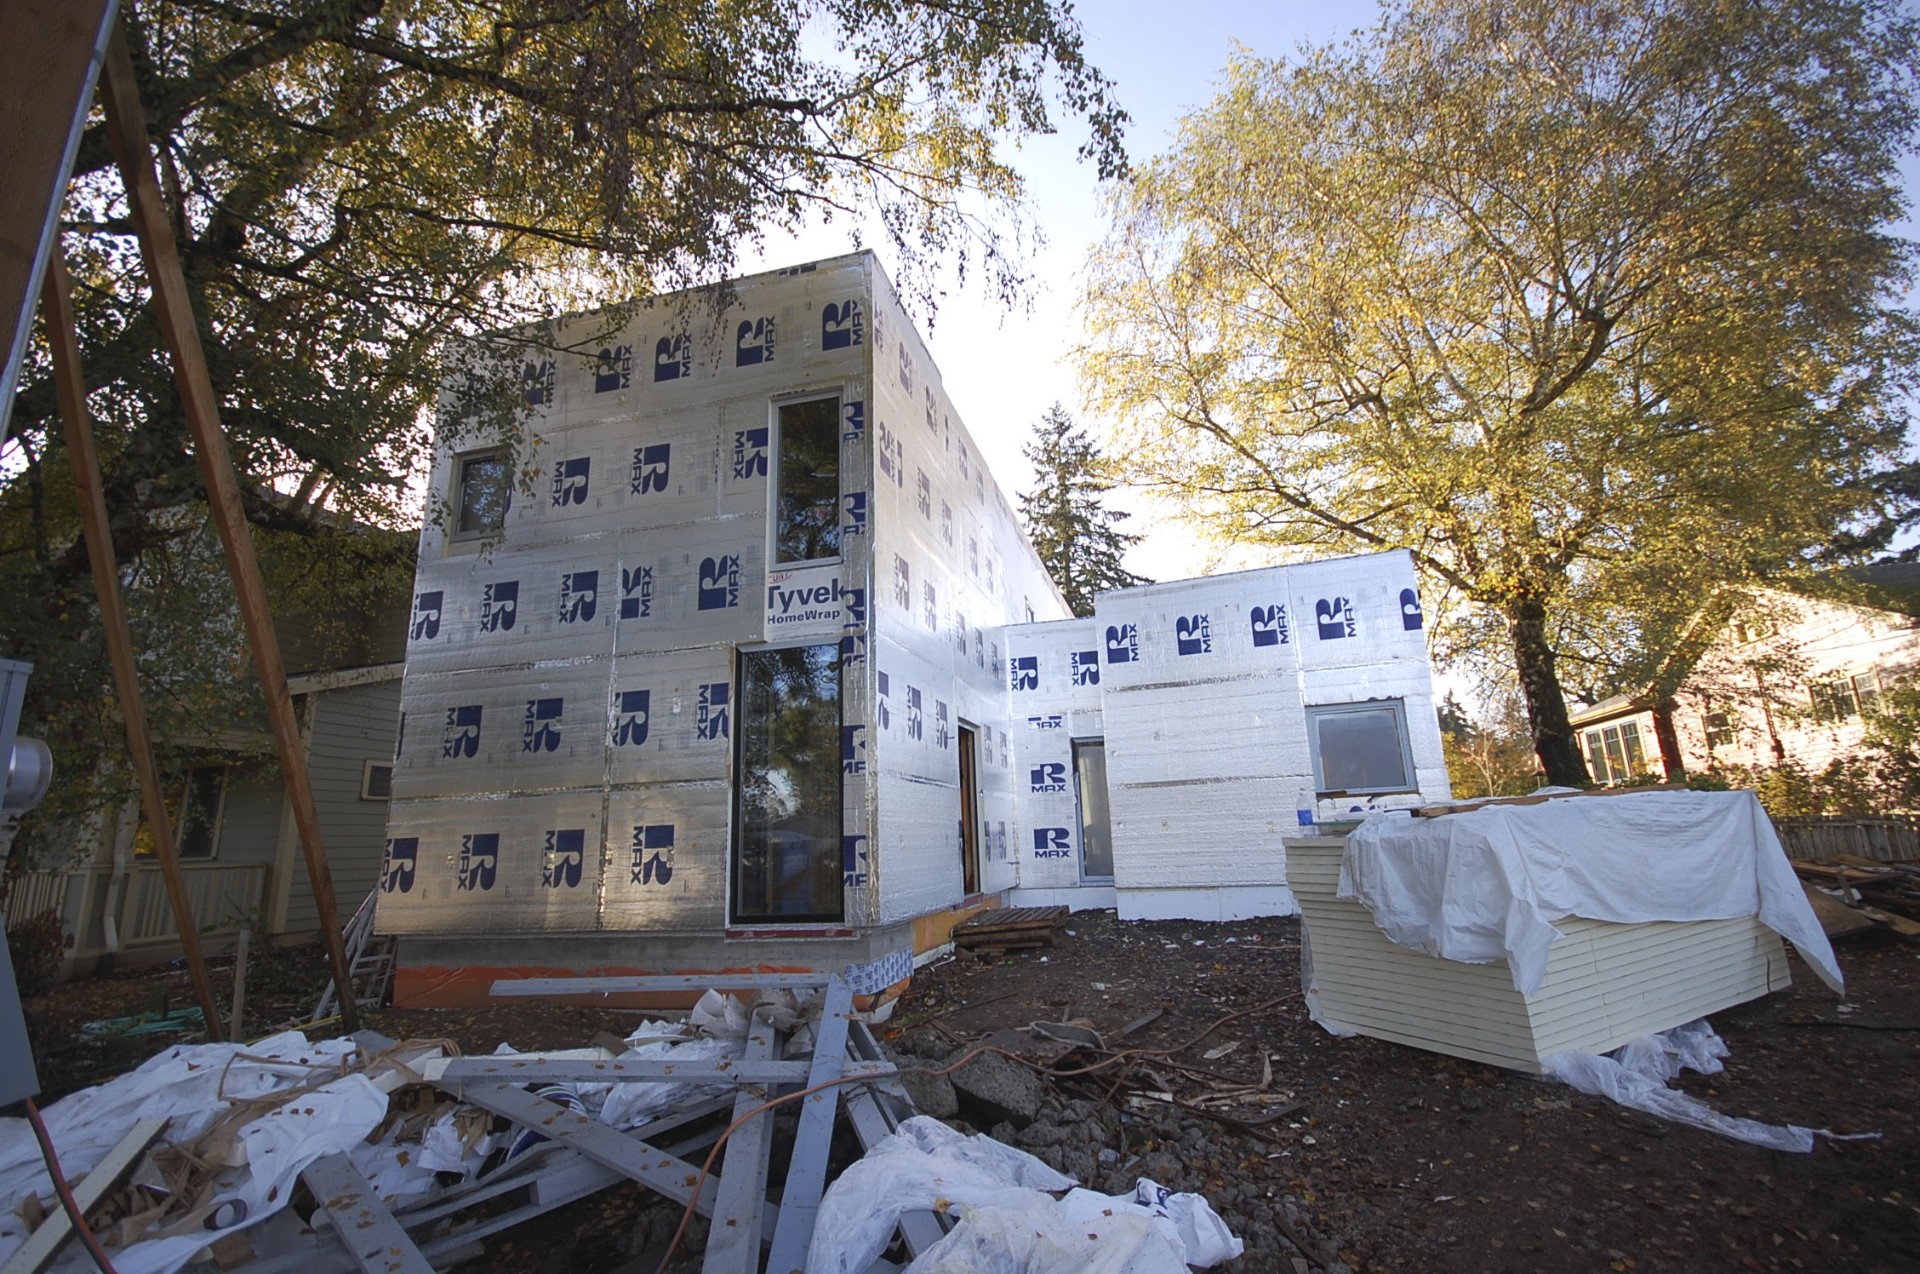
thermal bridge free exterior
next up on skidmore passivhaus is installing the outsulation on the walls along with the rainscreen furring.
the plywood sheathing was first covered by a weather resistive barrier with metal head flashings at the windows and doors.
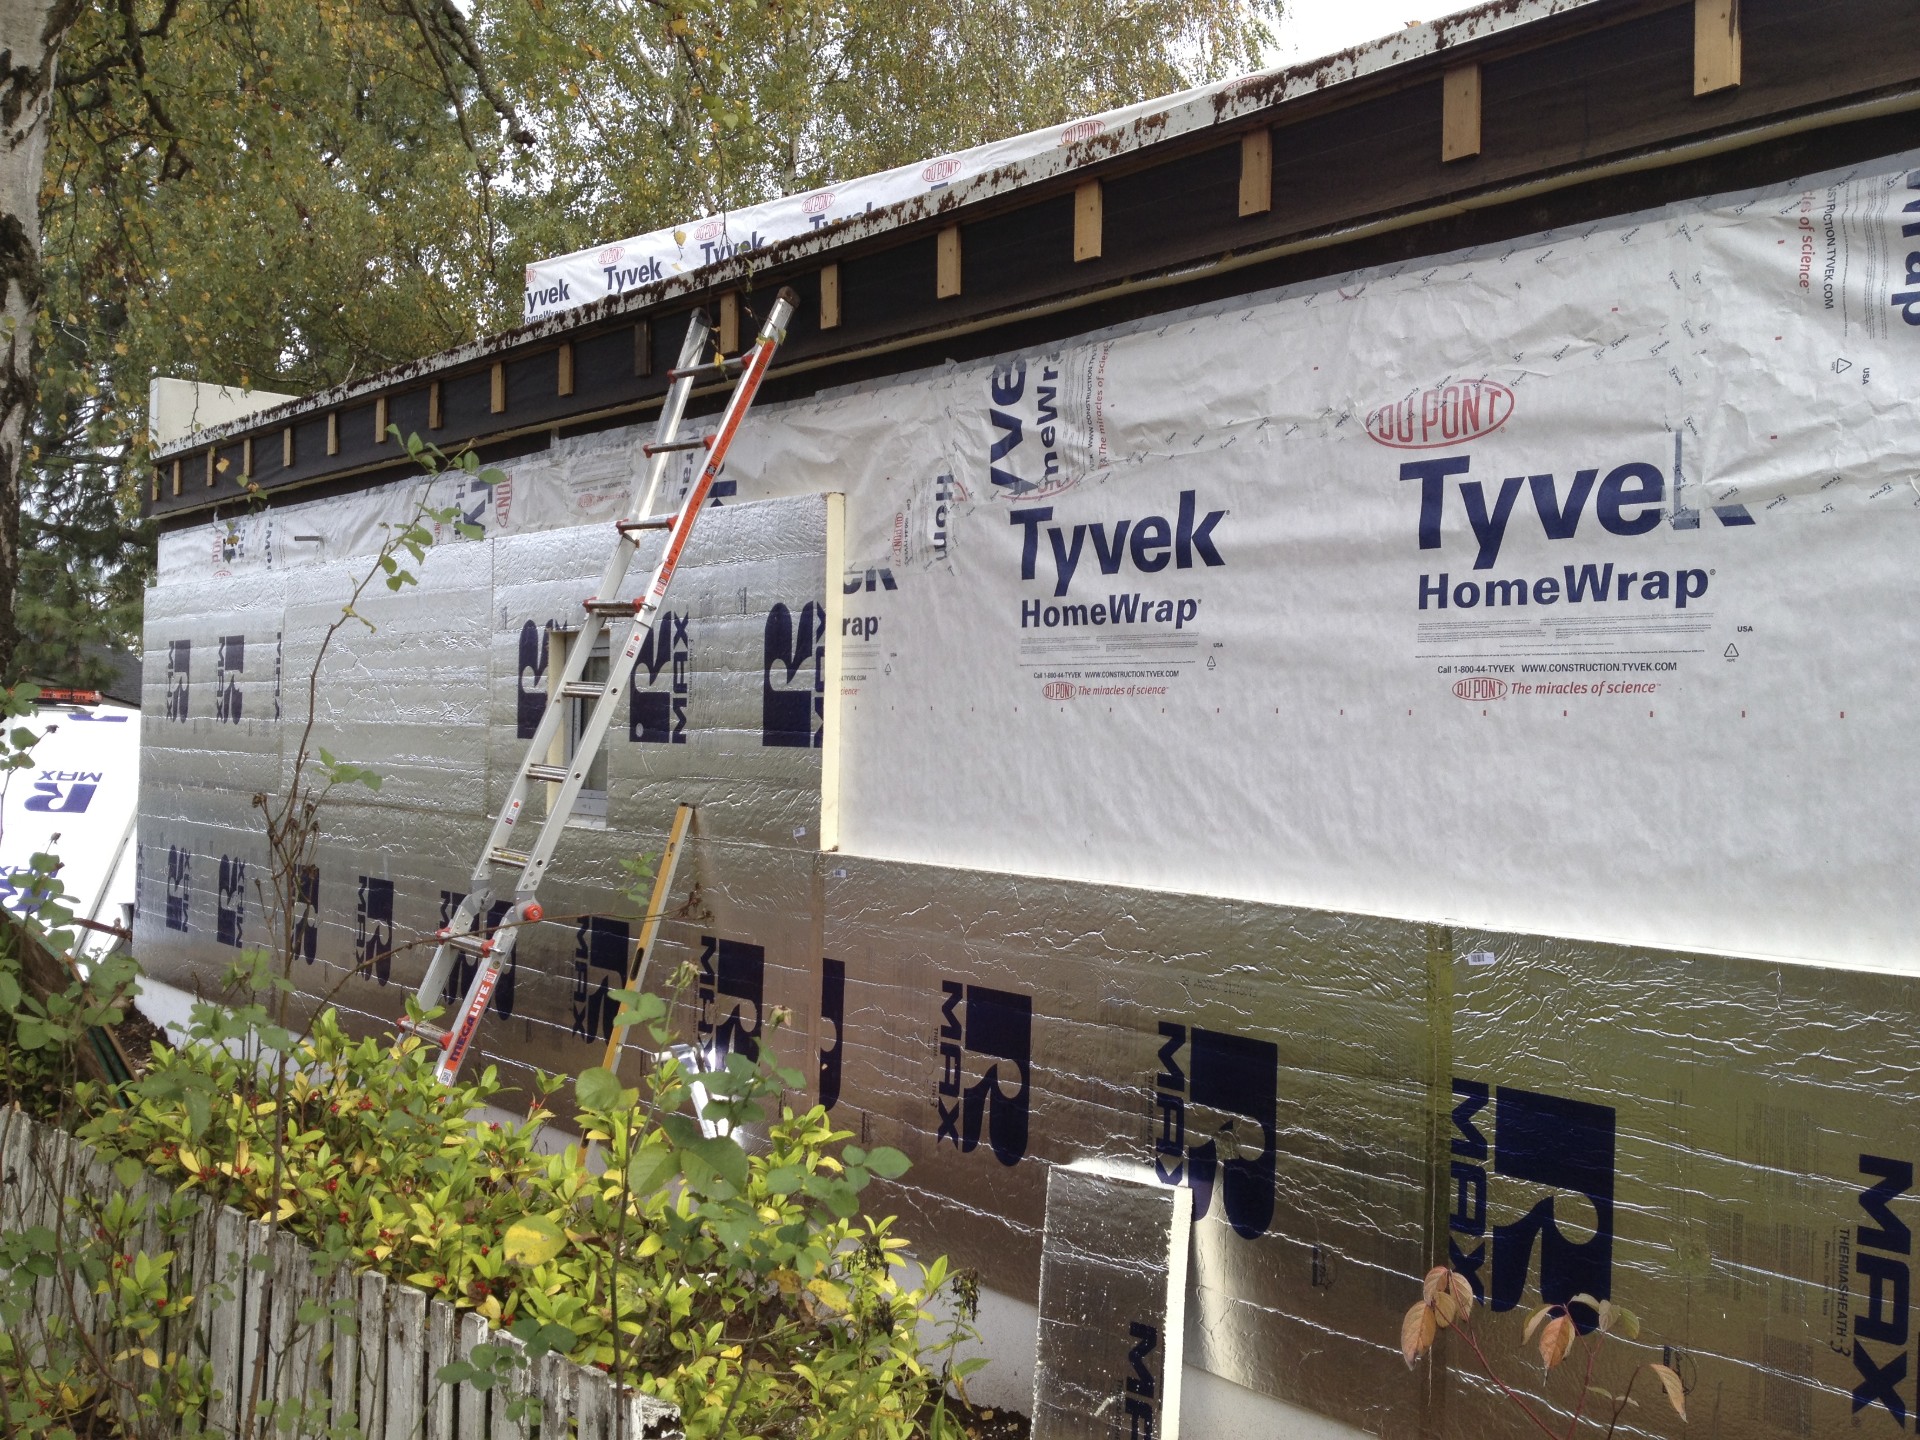
most walls get a layer of 3" poly-iso, while the south wall will get 4" to match the recessed pocket for the exterior shades.
2 screws (with plastic washer) per 4x8 sheet hold it in place until the furring strips are installed.
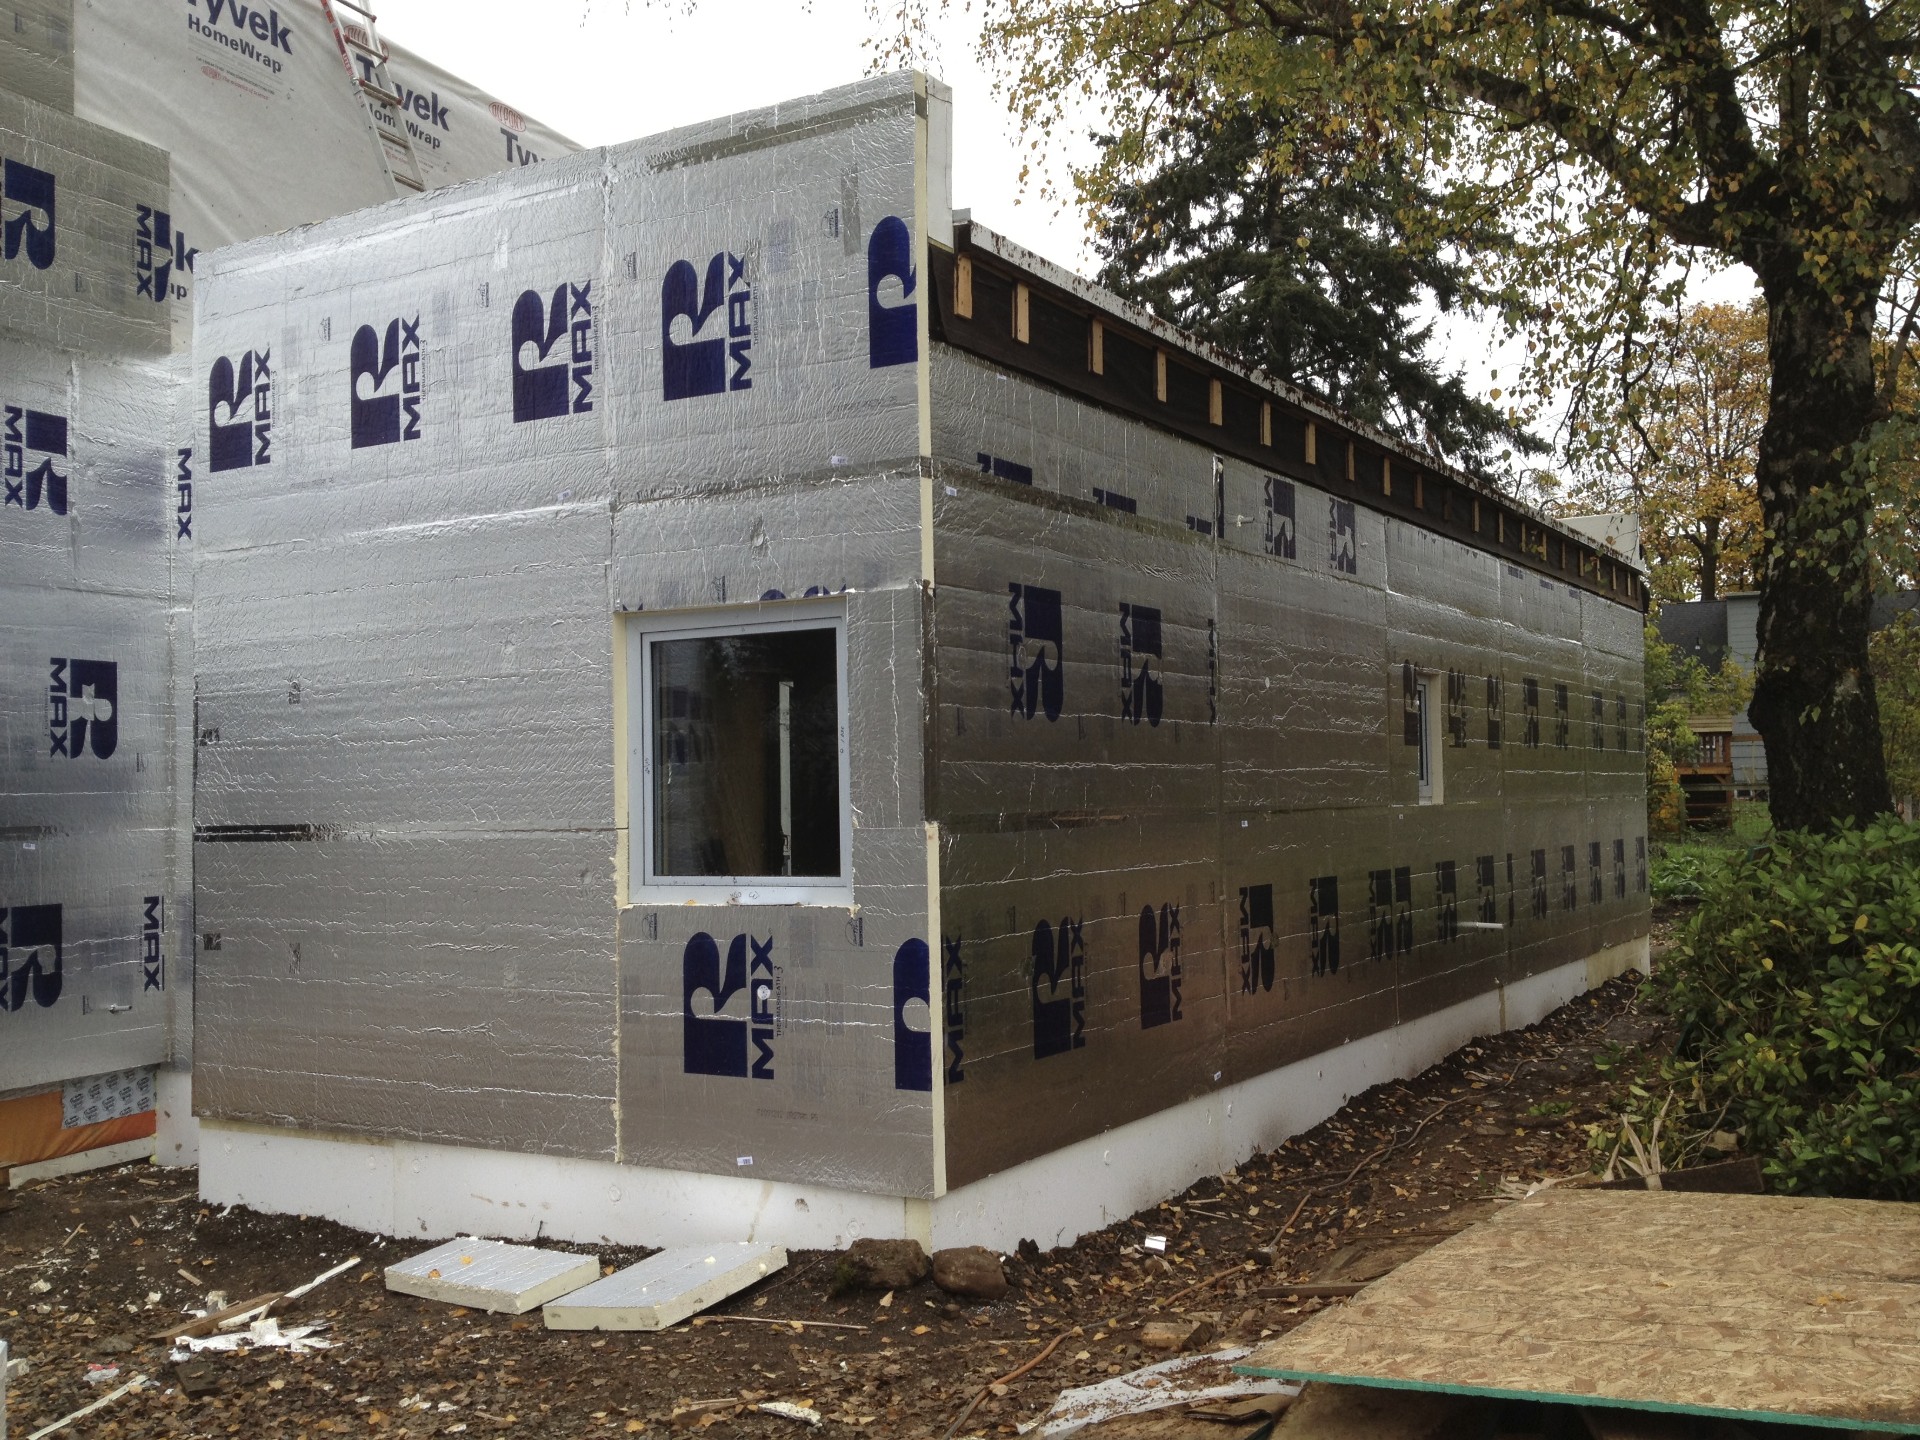
all seams and fasteners are taped. the face of the insulation is treated as a second weather resistive barrier.
additional flashings at all doors and windows will be taped to the insulation as the wood trim is installed.
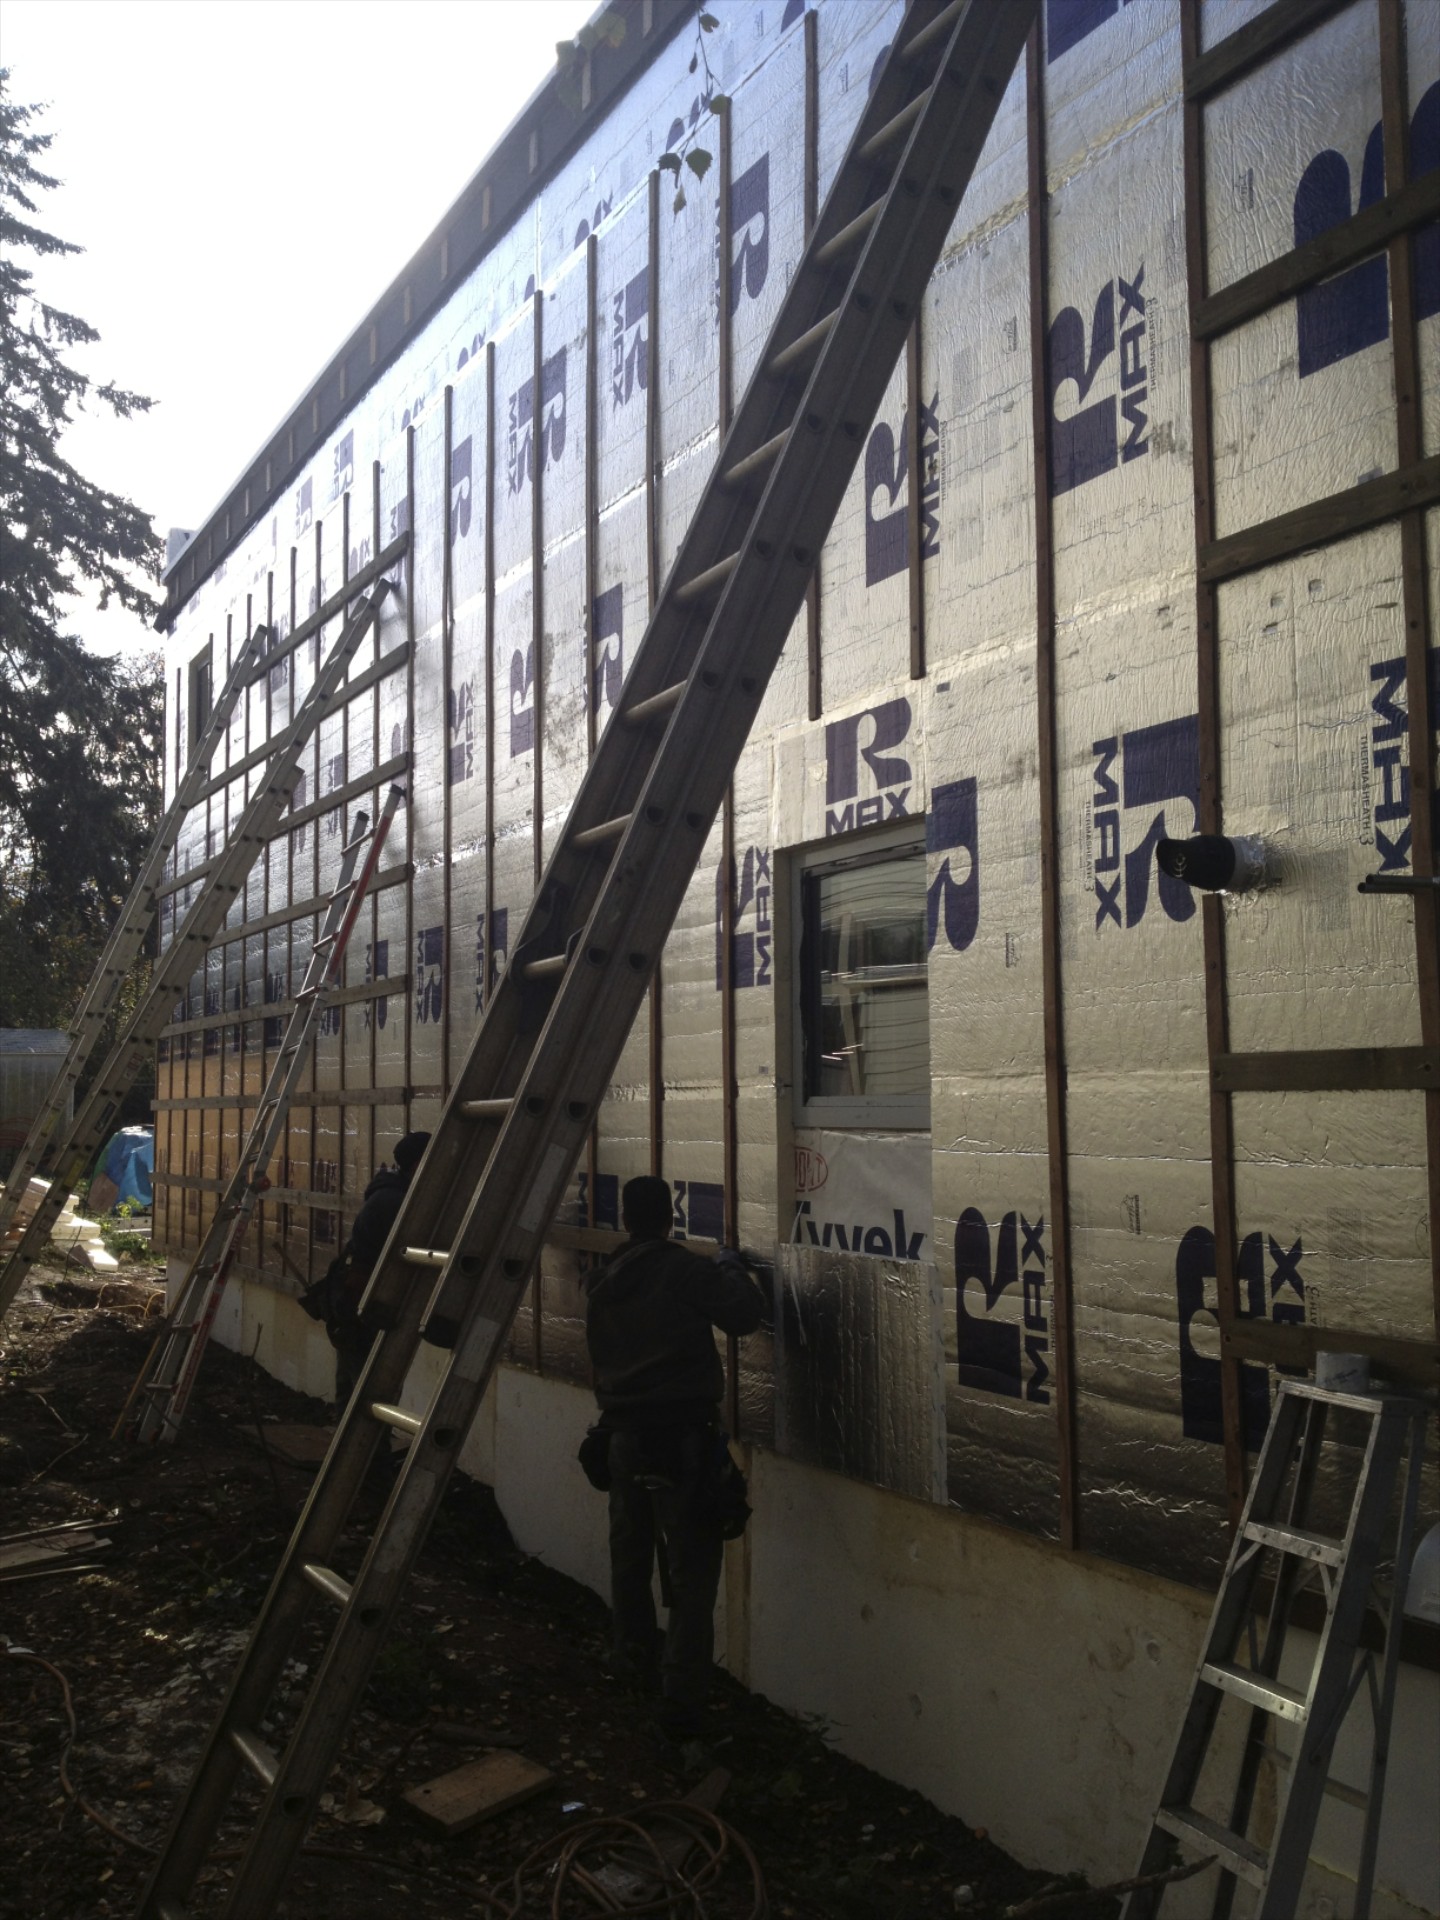
1/2" x 2" pt plywood furring strips run vertically to create the drainage plane. they are held in place by just a few fasteners until the next layer is installed.
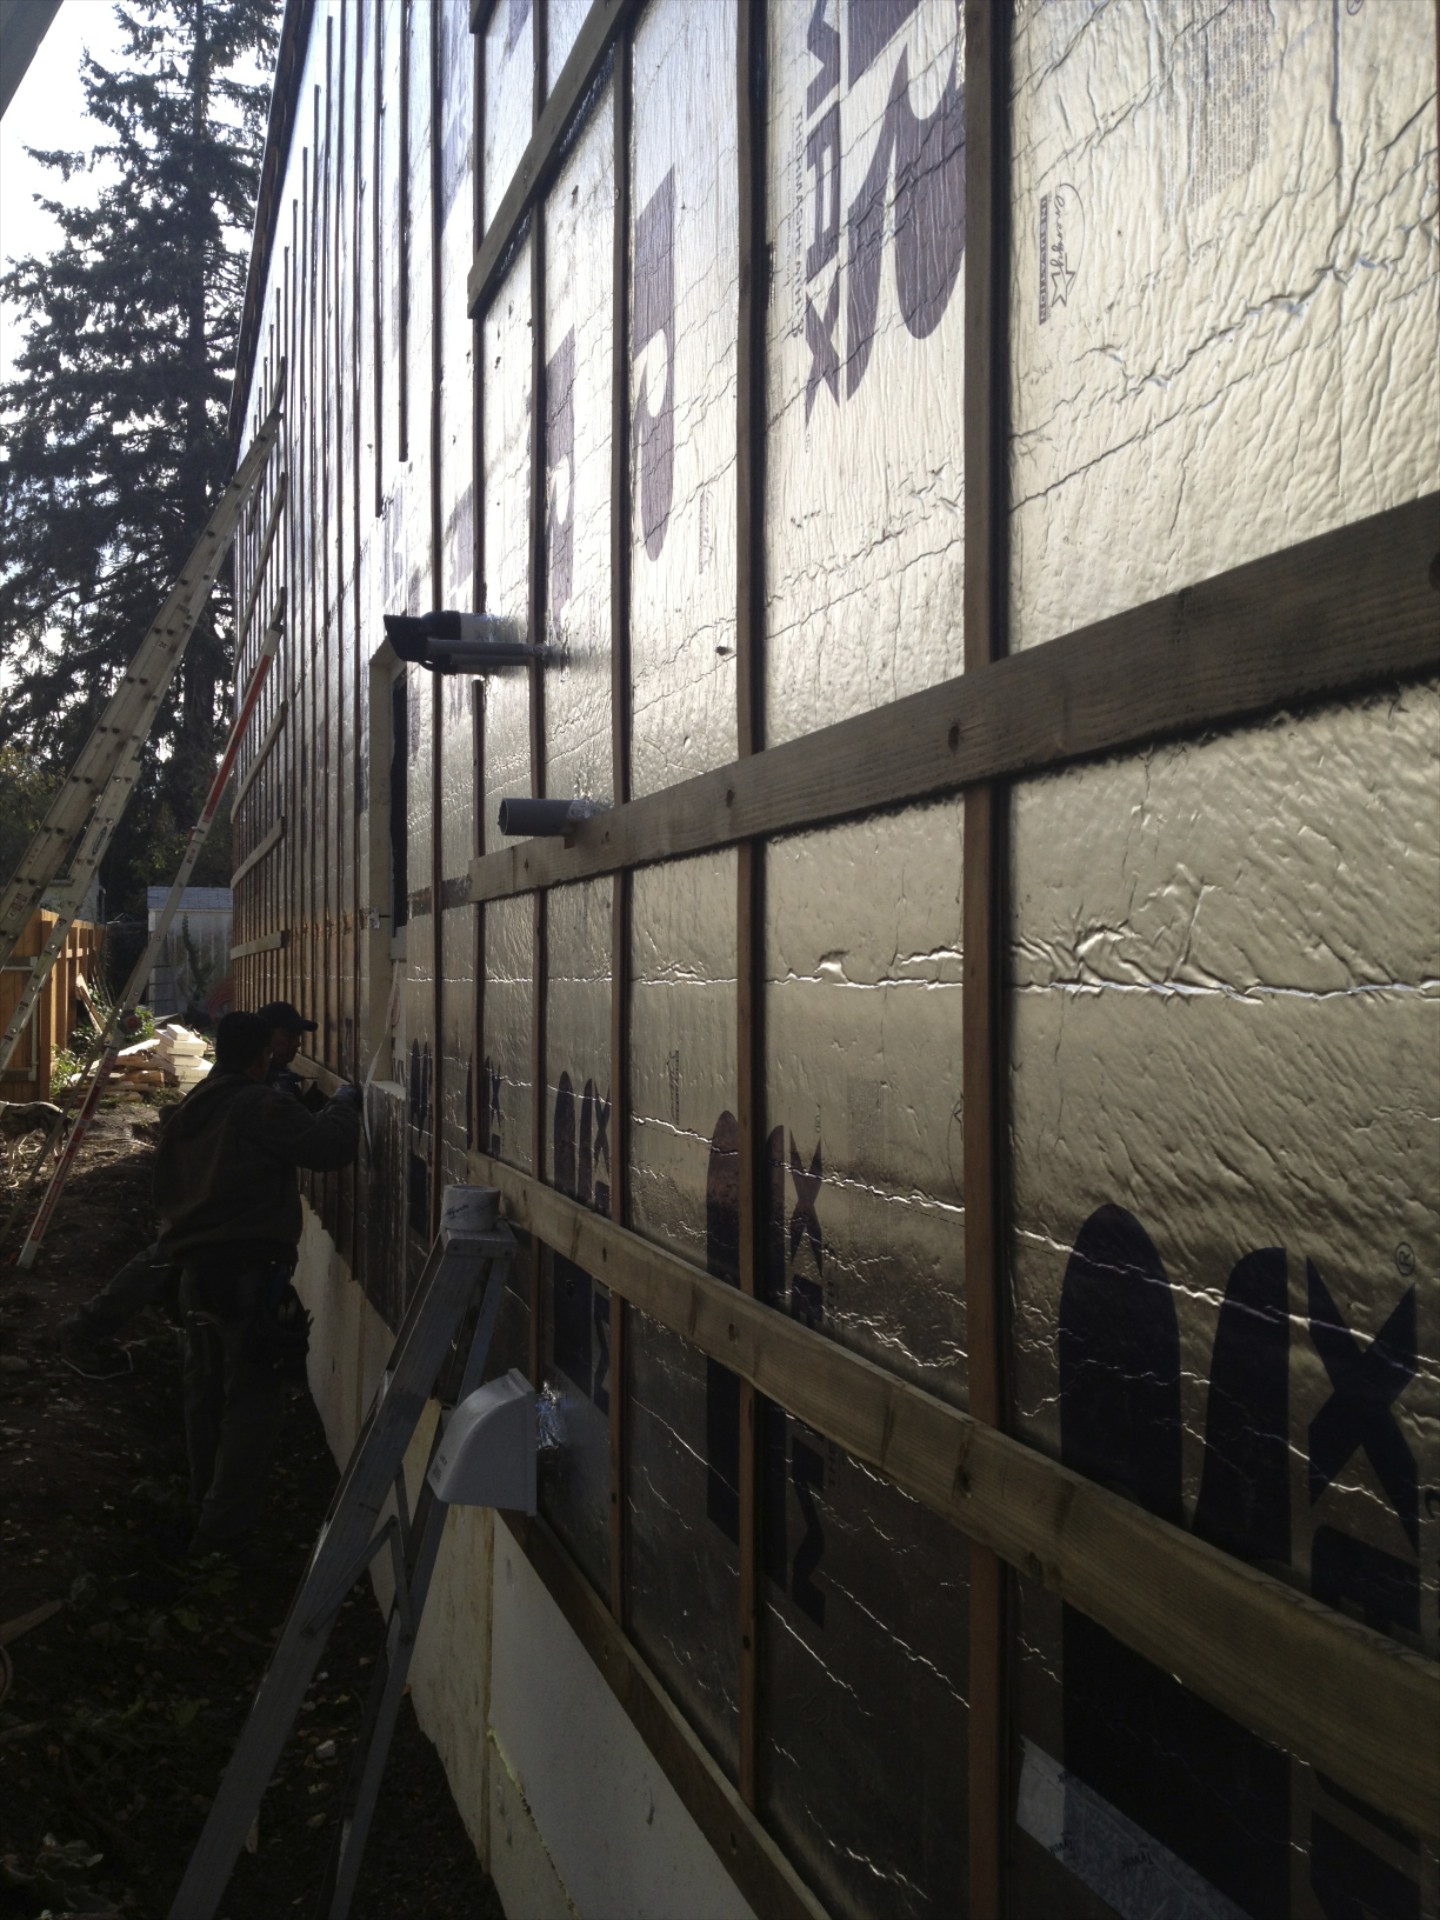
since we are using vertical siding, a second layer of furring runs horizontally. we used pt 1x4 as a solid nailing base for the siding.
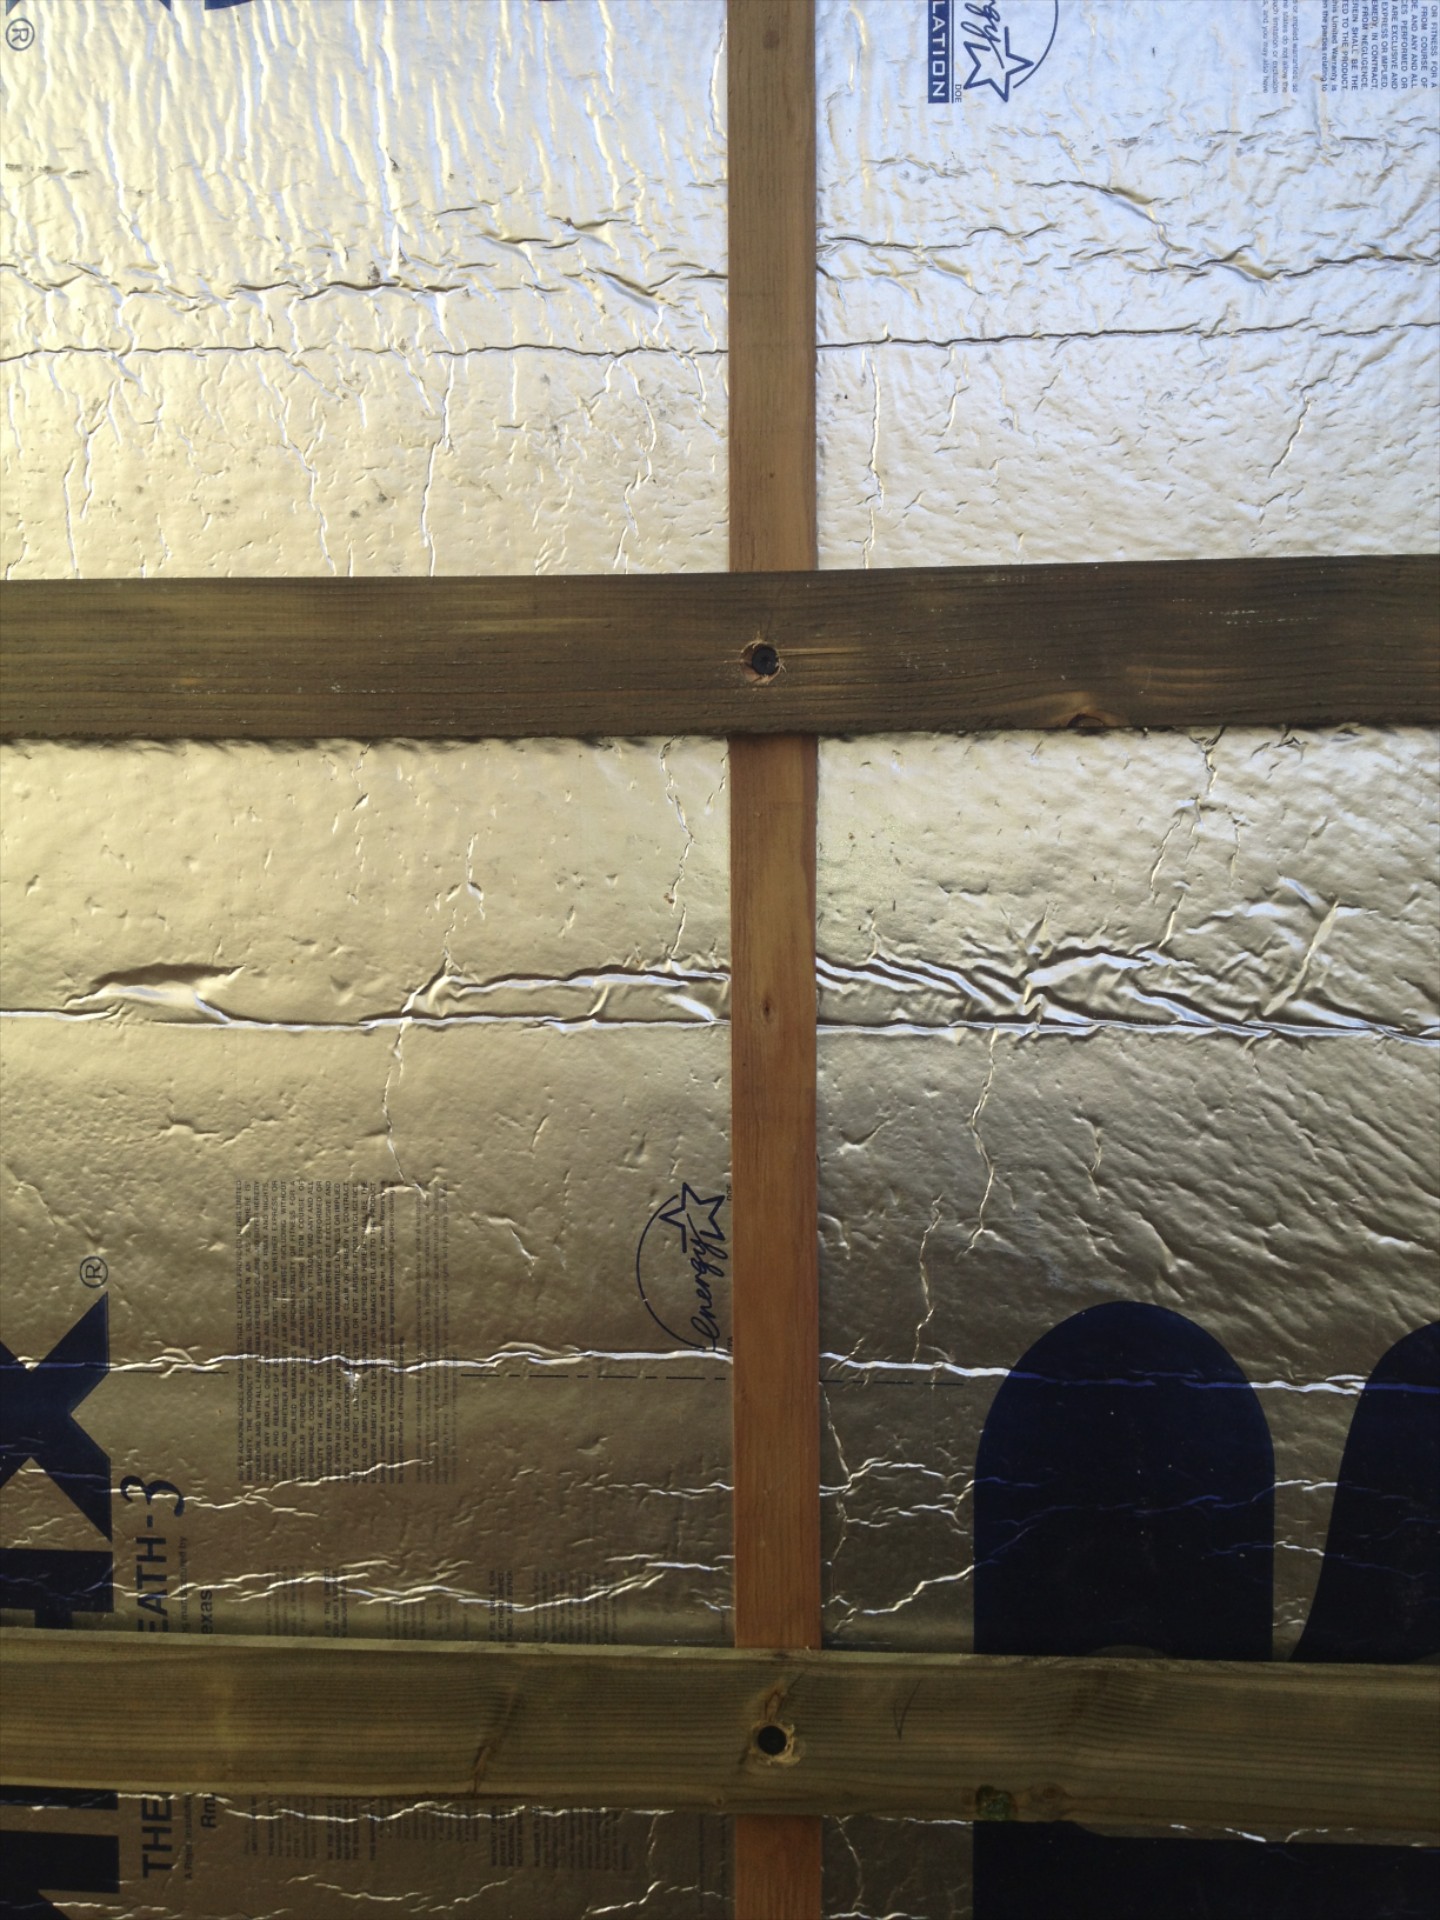
long fasteners secure the second layer of furring strips running horizontally through the foam to the studs. the straightforward framing layout makes the studs much easier to locate.
keep in mind that long fasteners get expensive. we settled on grabber #10 x 6" square drive coated screws (from nw staple).
next up on the exterior is trimming windows and installing siding.
stop by again soon.
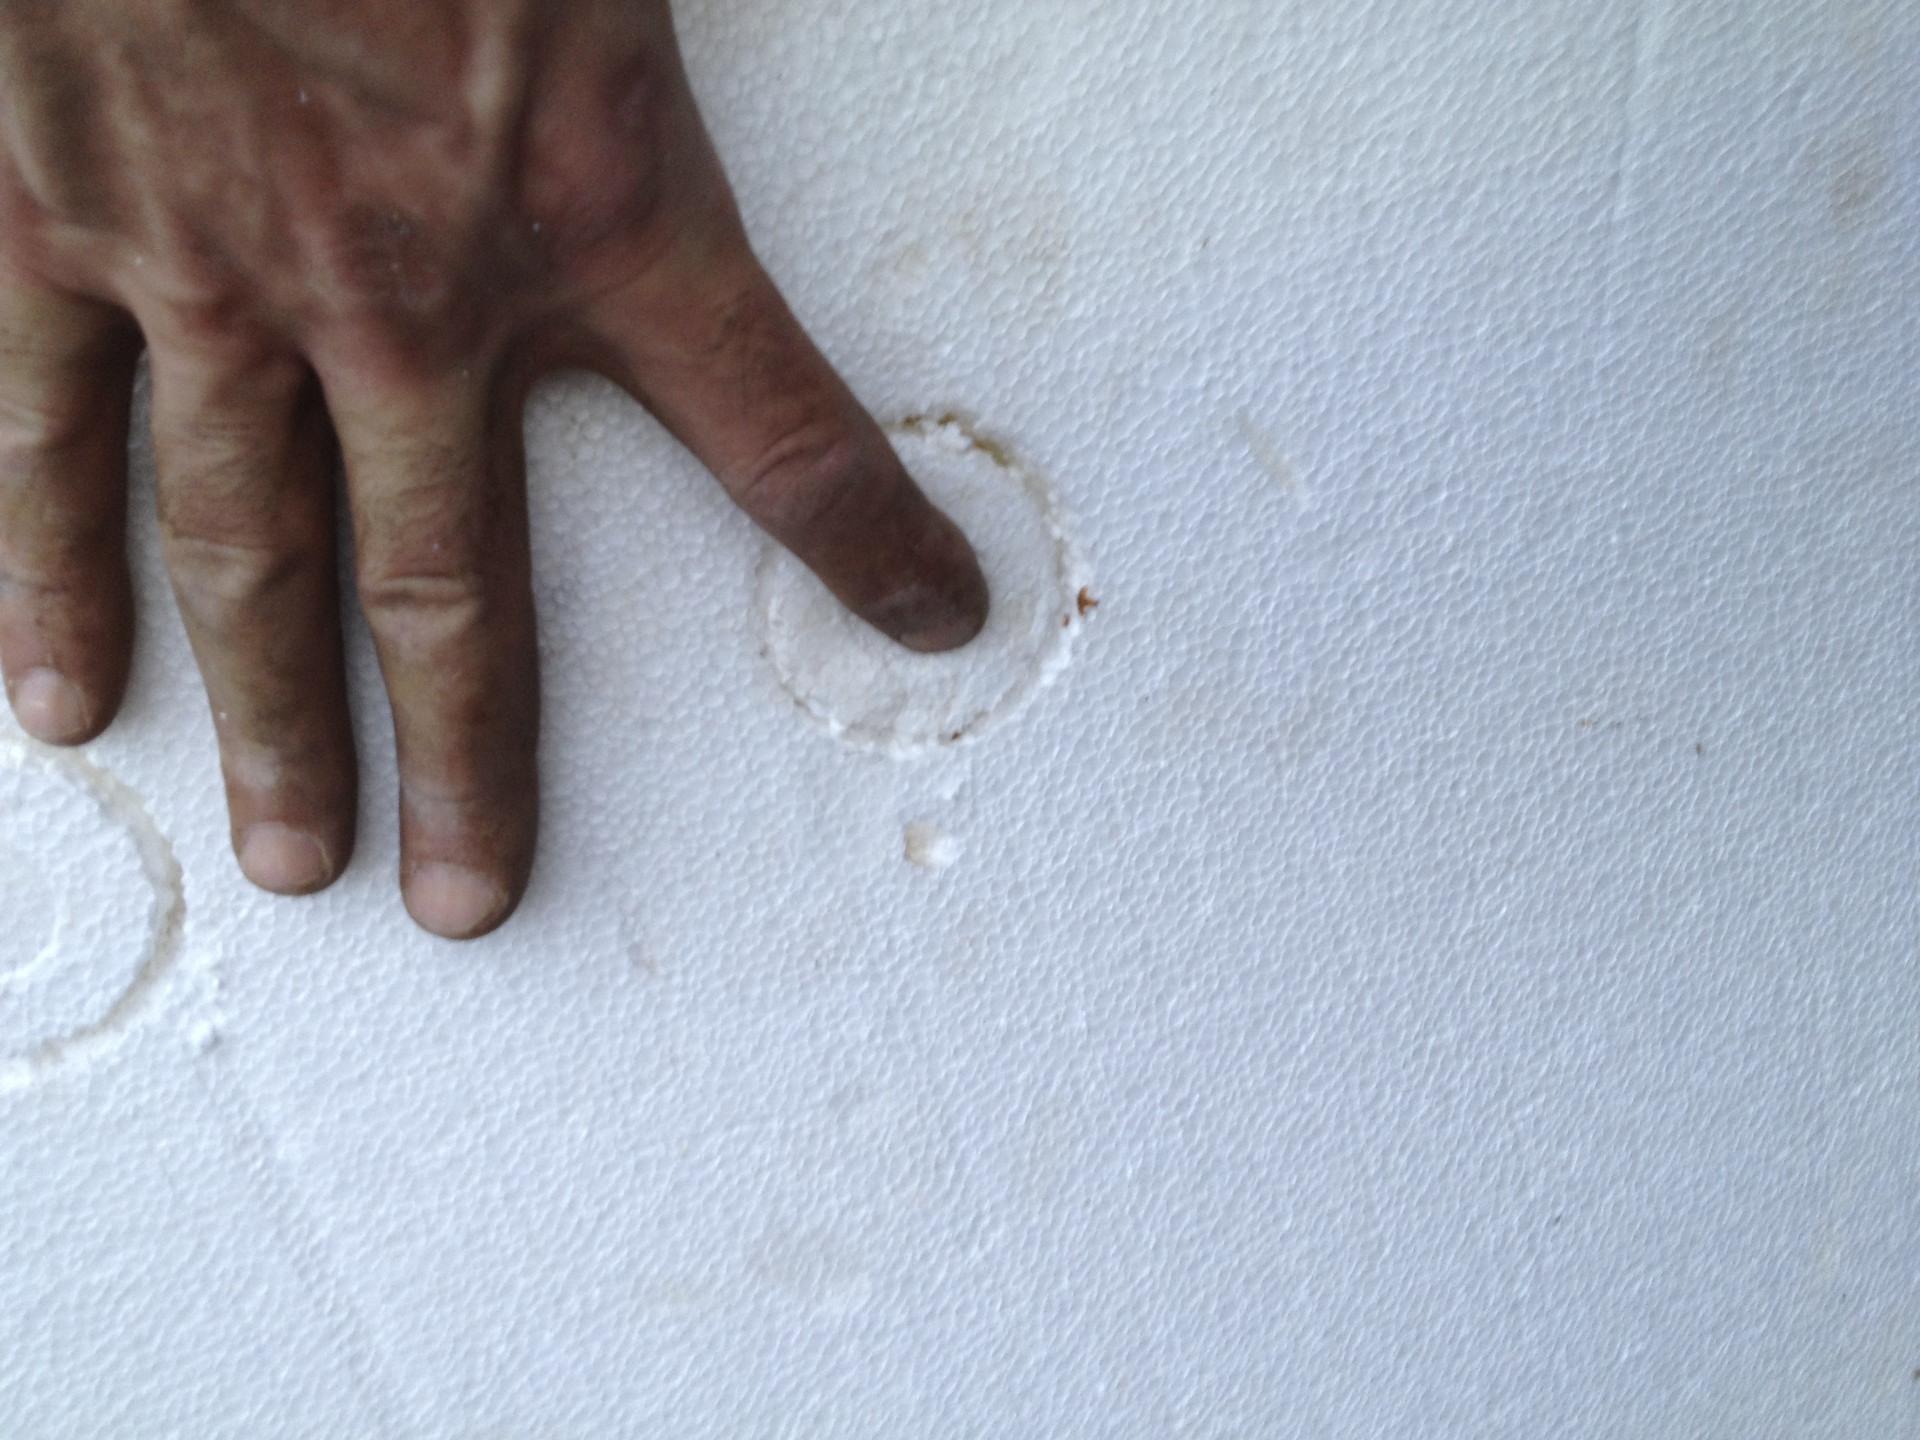
foundation foam
while there's a lot of talk these days about building without foam, we decided early on to use continuous rigid board foam outsulation for this project. to begin the foundation gets 4" of expanded polystyrene.
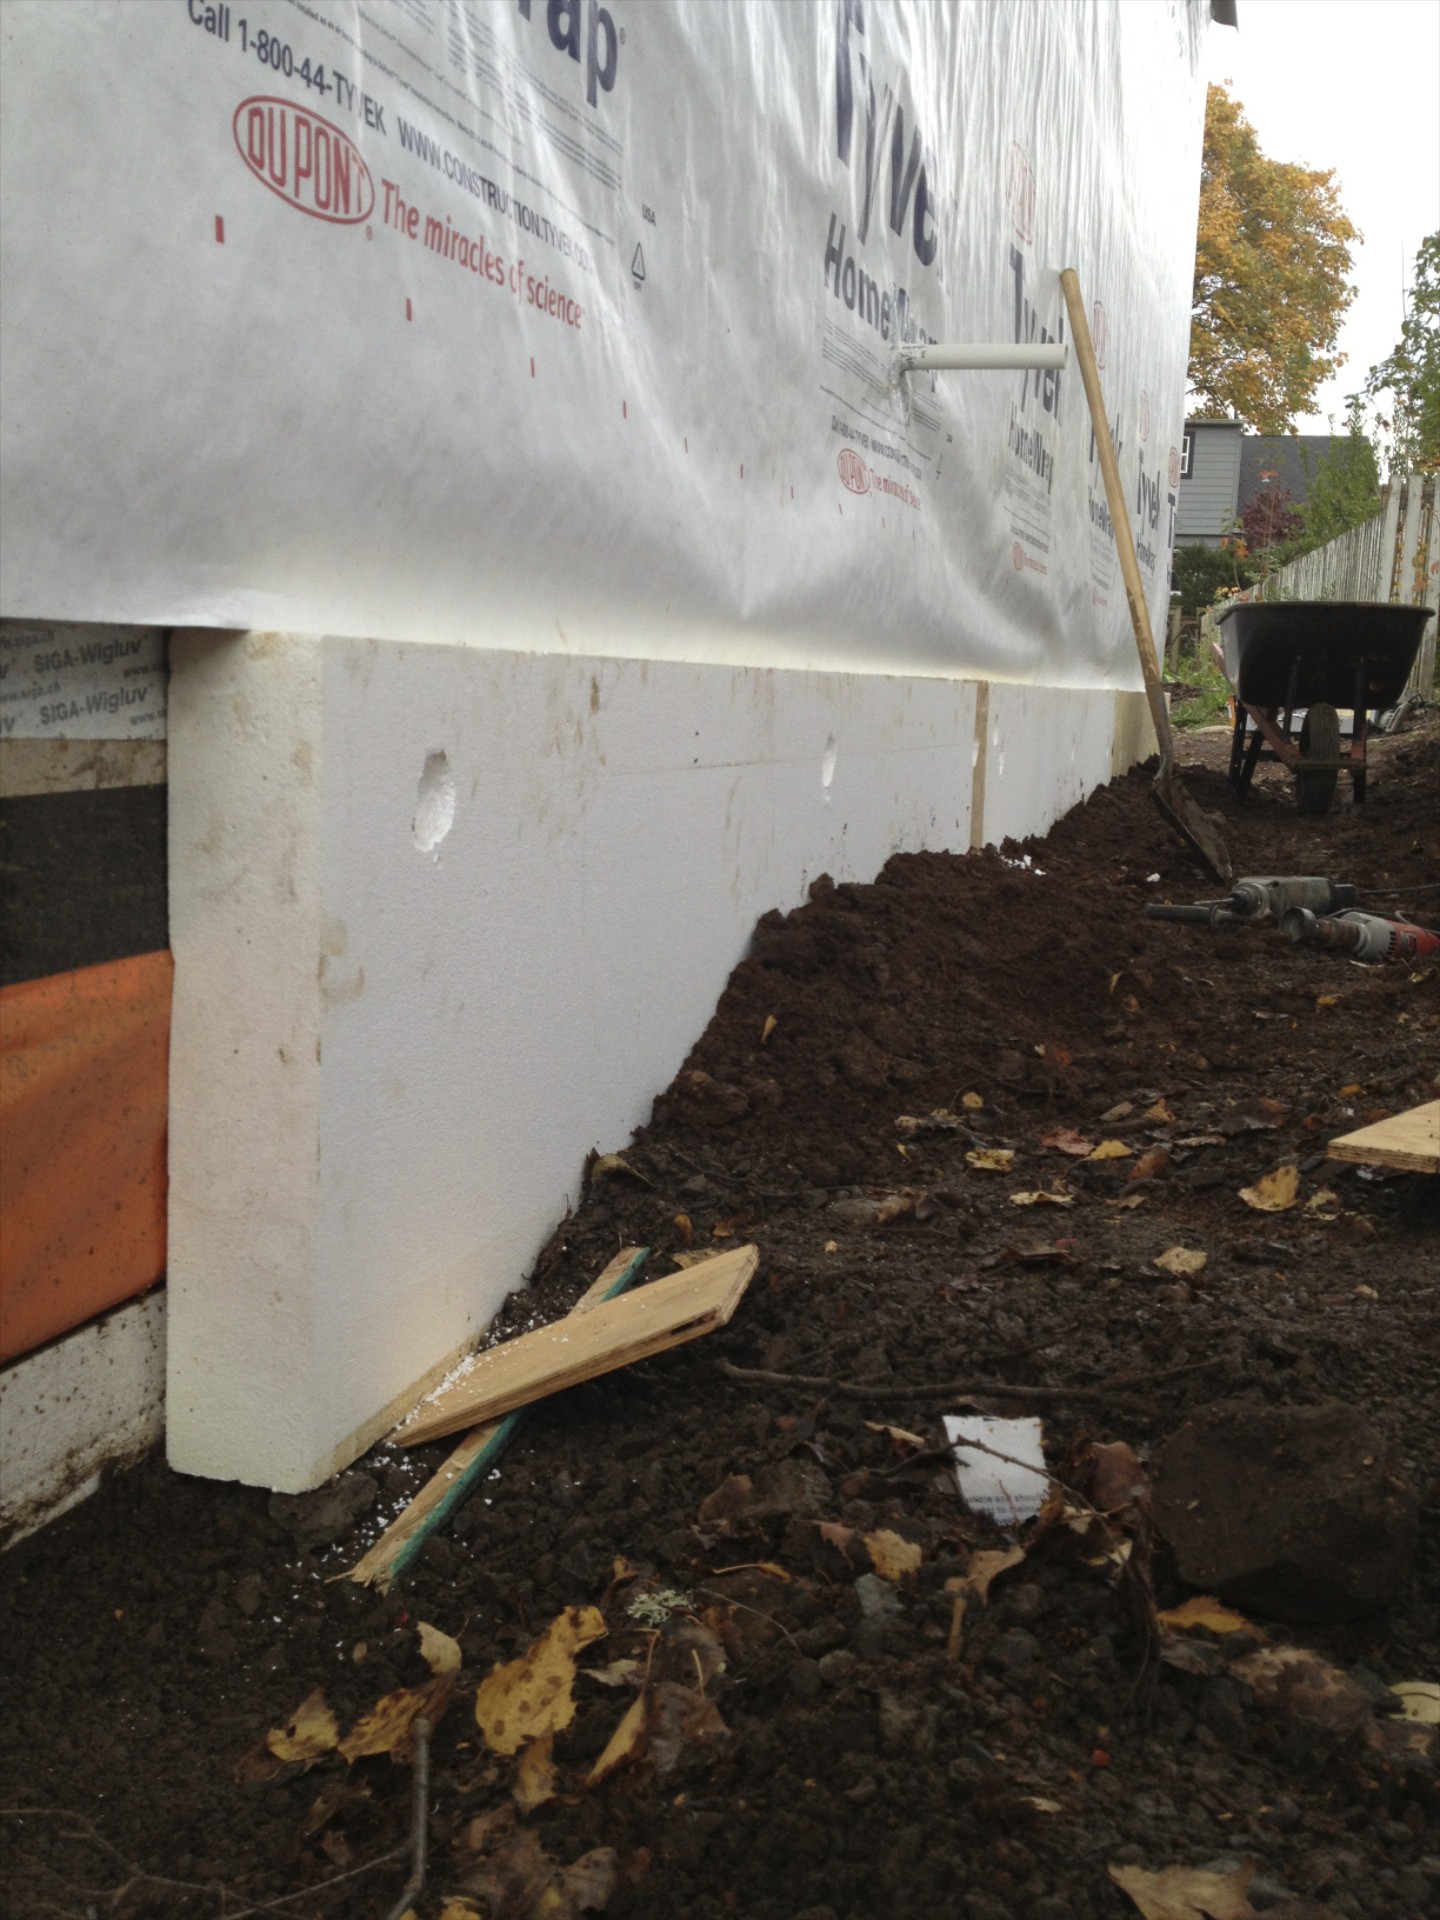
these 8' long pieces are held in place at the bottom by backfill and at the top by concrete spikes. spray foam was first applied to the back of the pieces to fill gaps and help secure them.
the concrete spikes are recessed into the foam to minimize thermal bridging. only 3 spikes were used per 8' long piece.
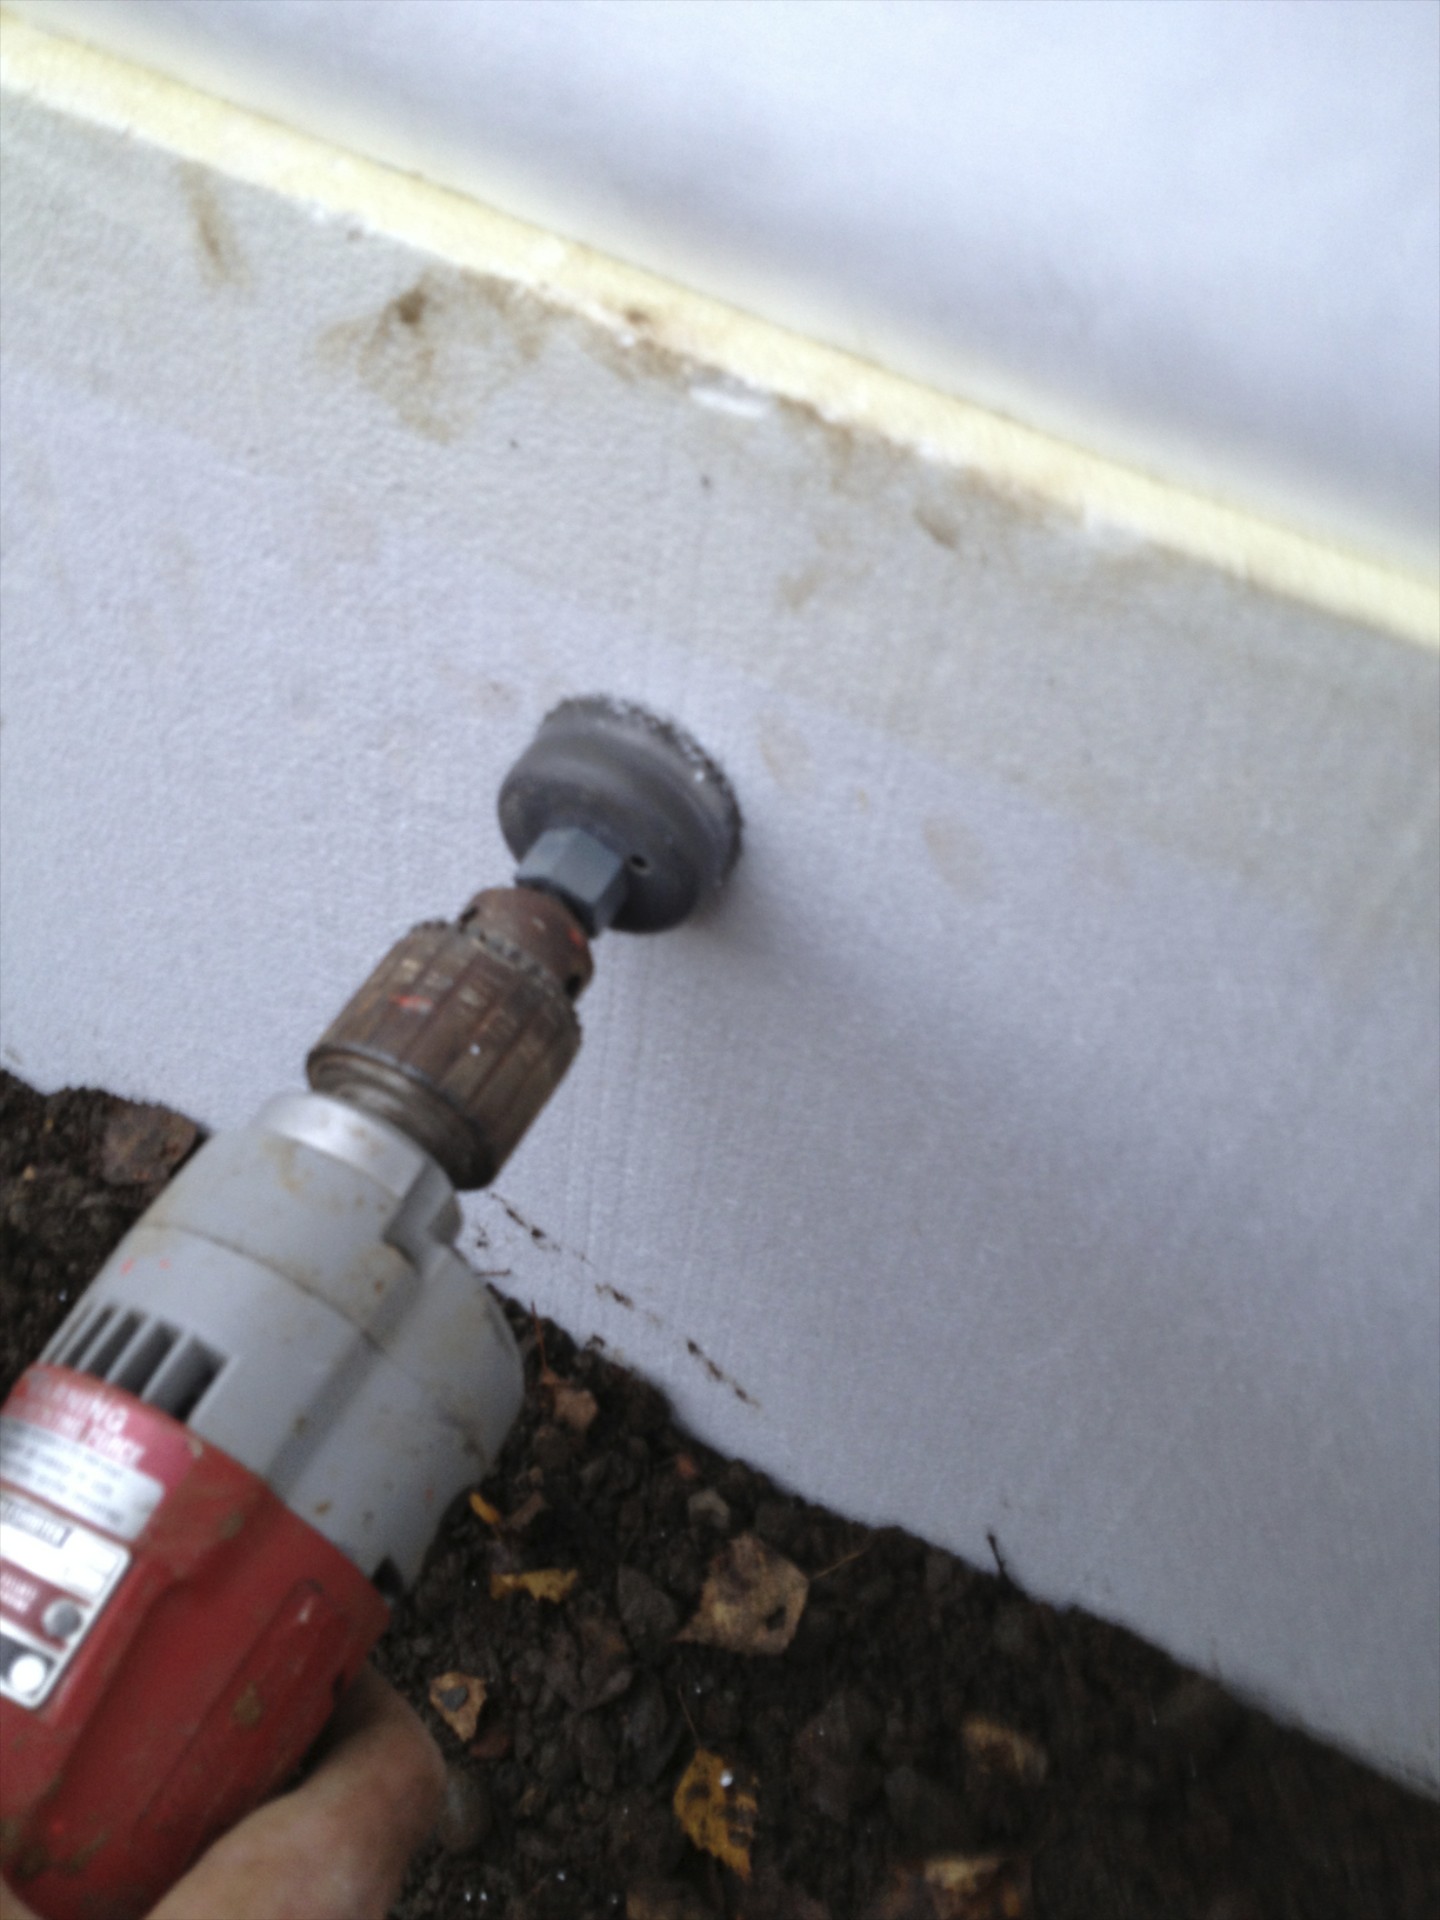
step 1: use hole saw bit and pry out hunk of foam.
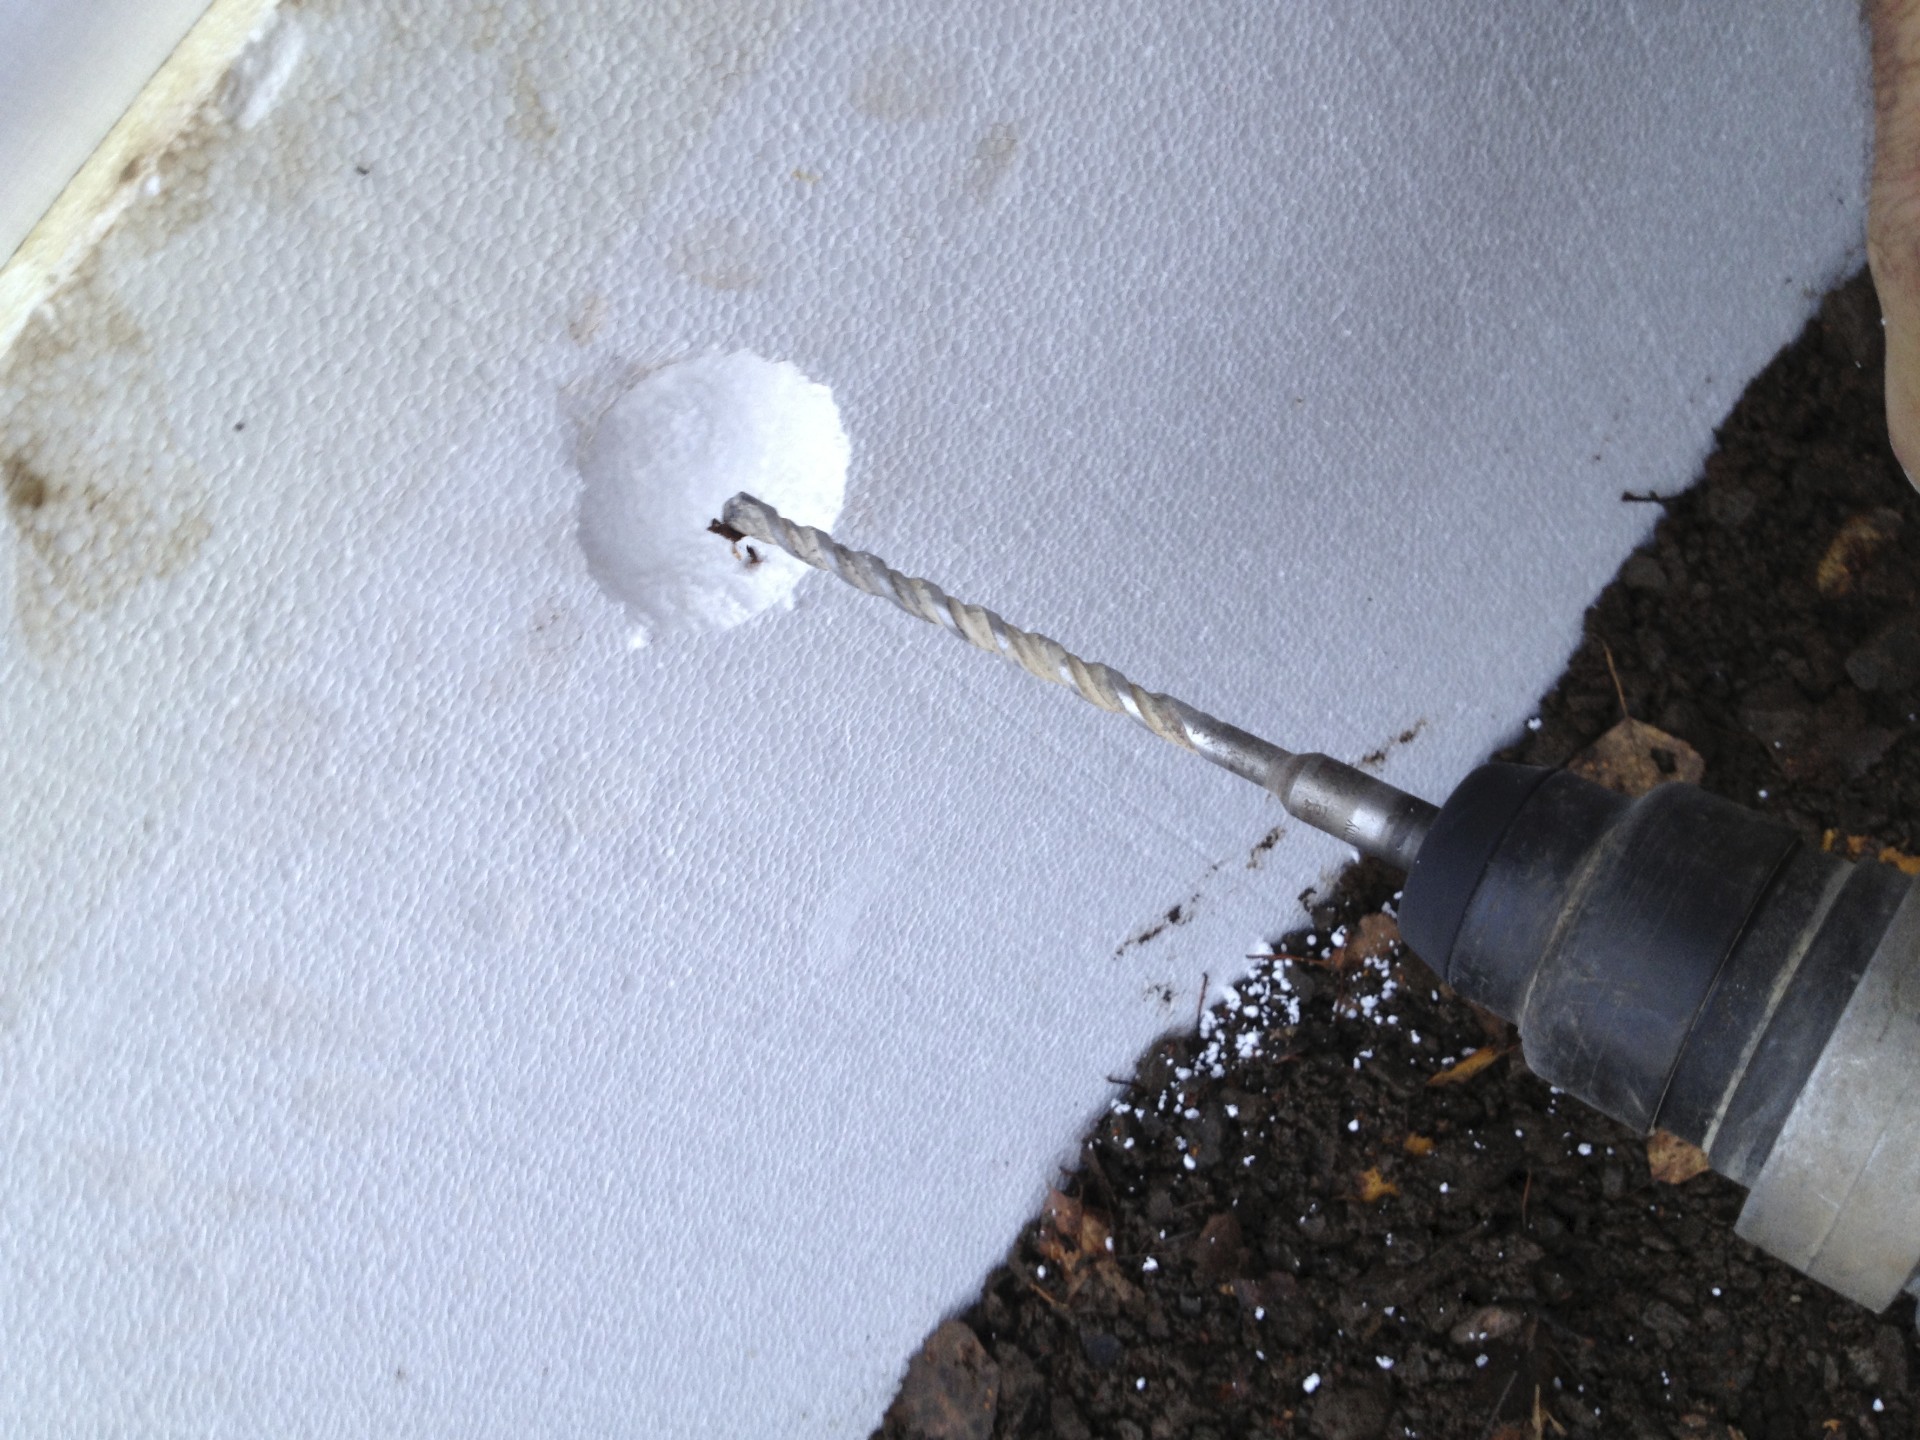
step 2: use hammer drill to drill hole in foundation.

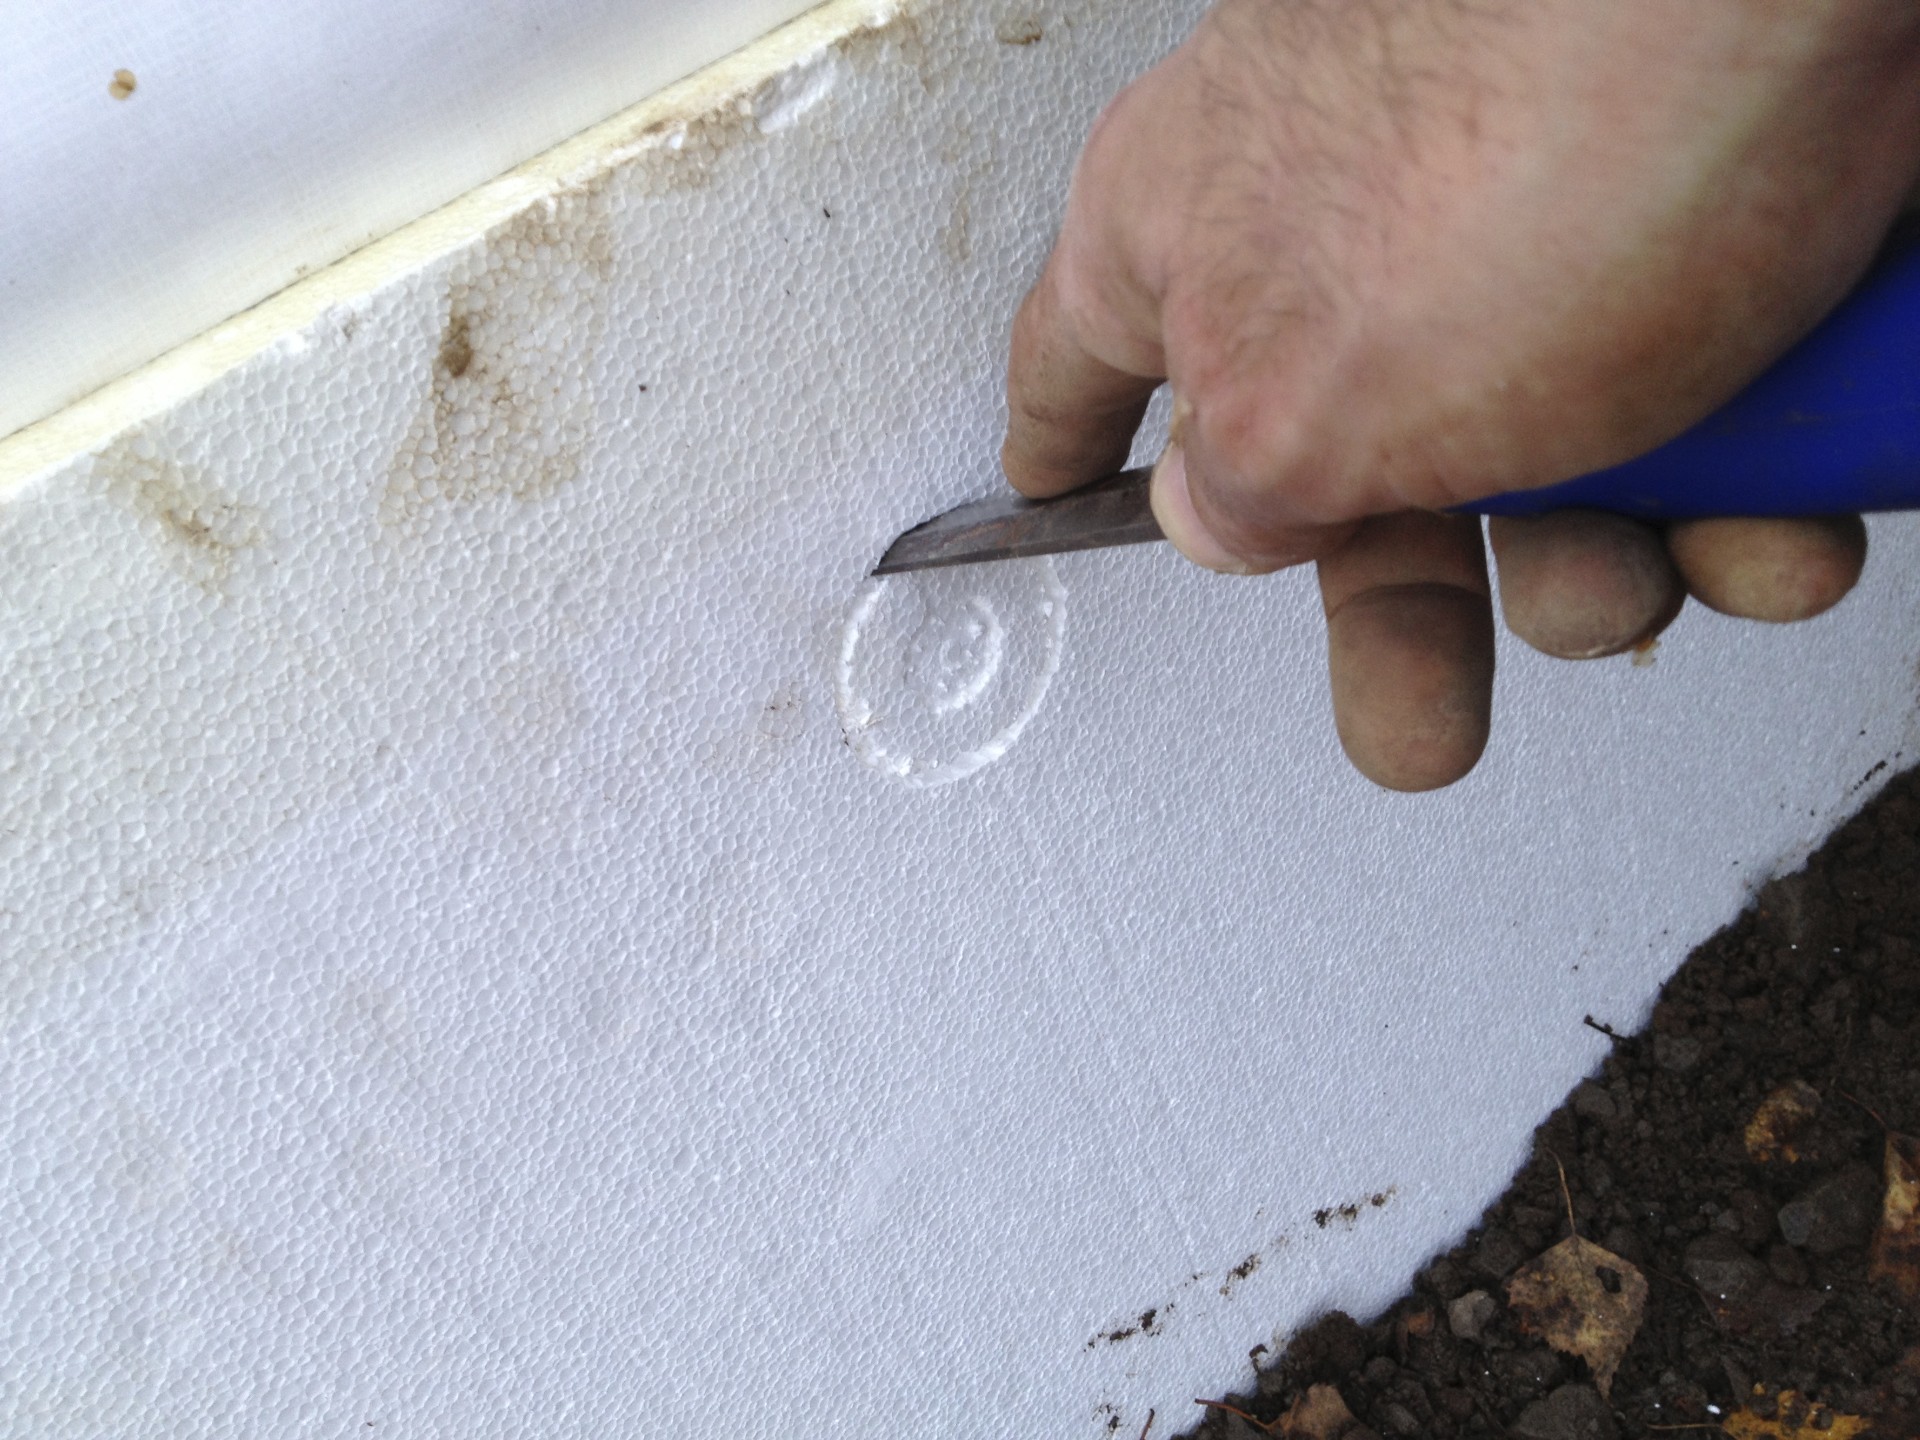
step 3: prepare 6" concrete spike and plastic washer. (concrete spike from dealers supply / plastic washer from service partners supply)
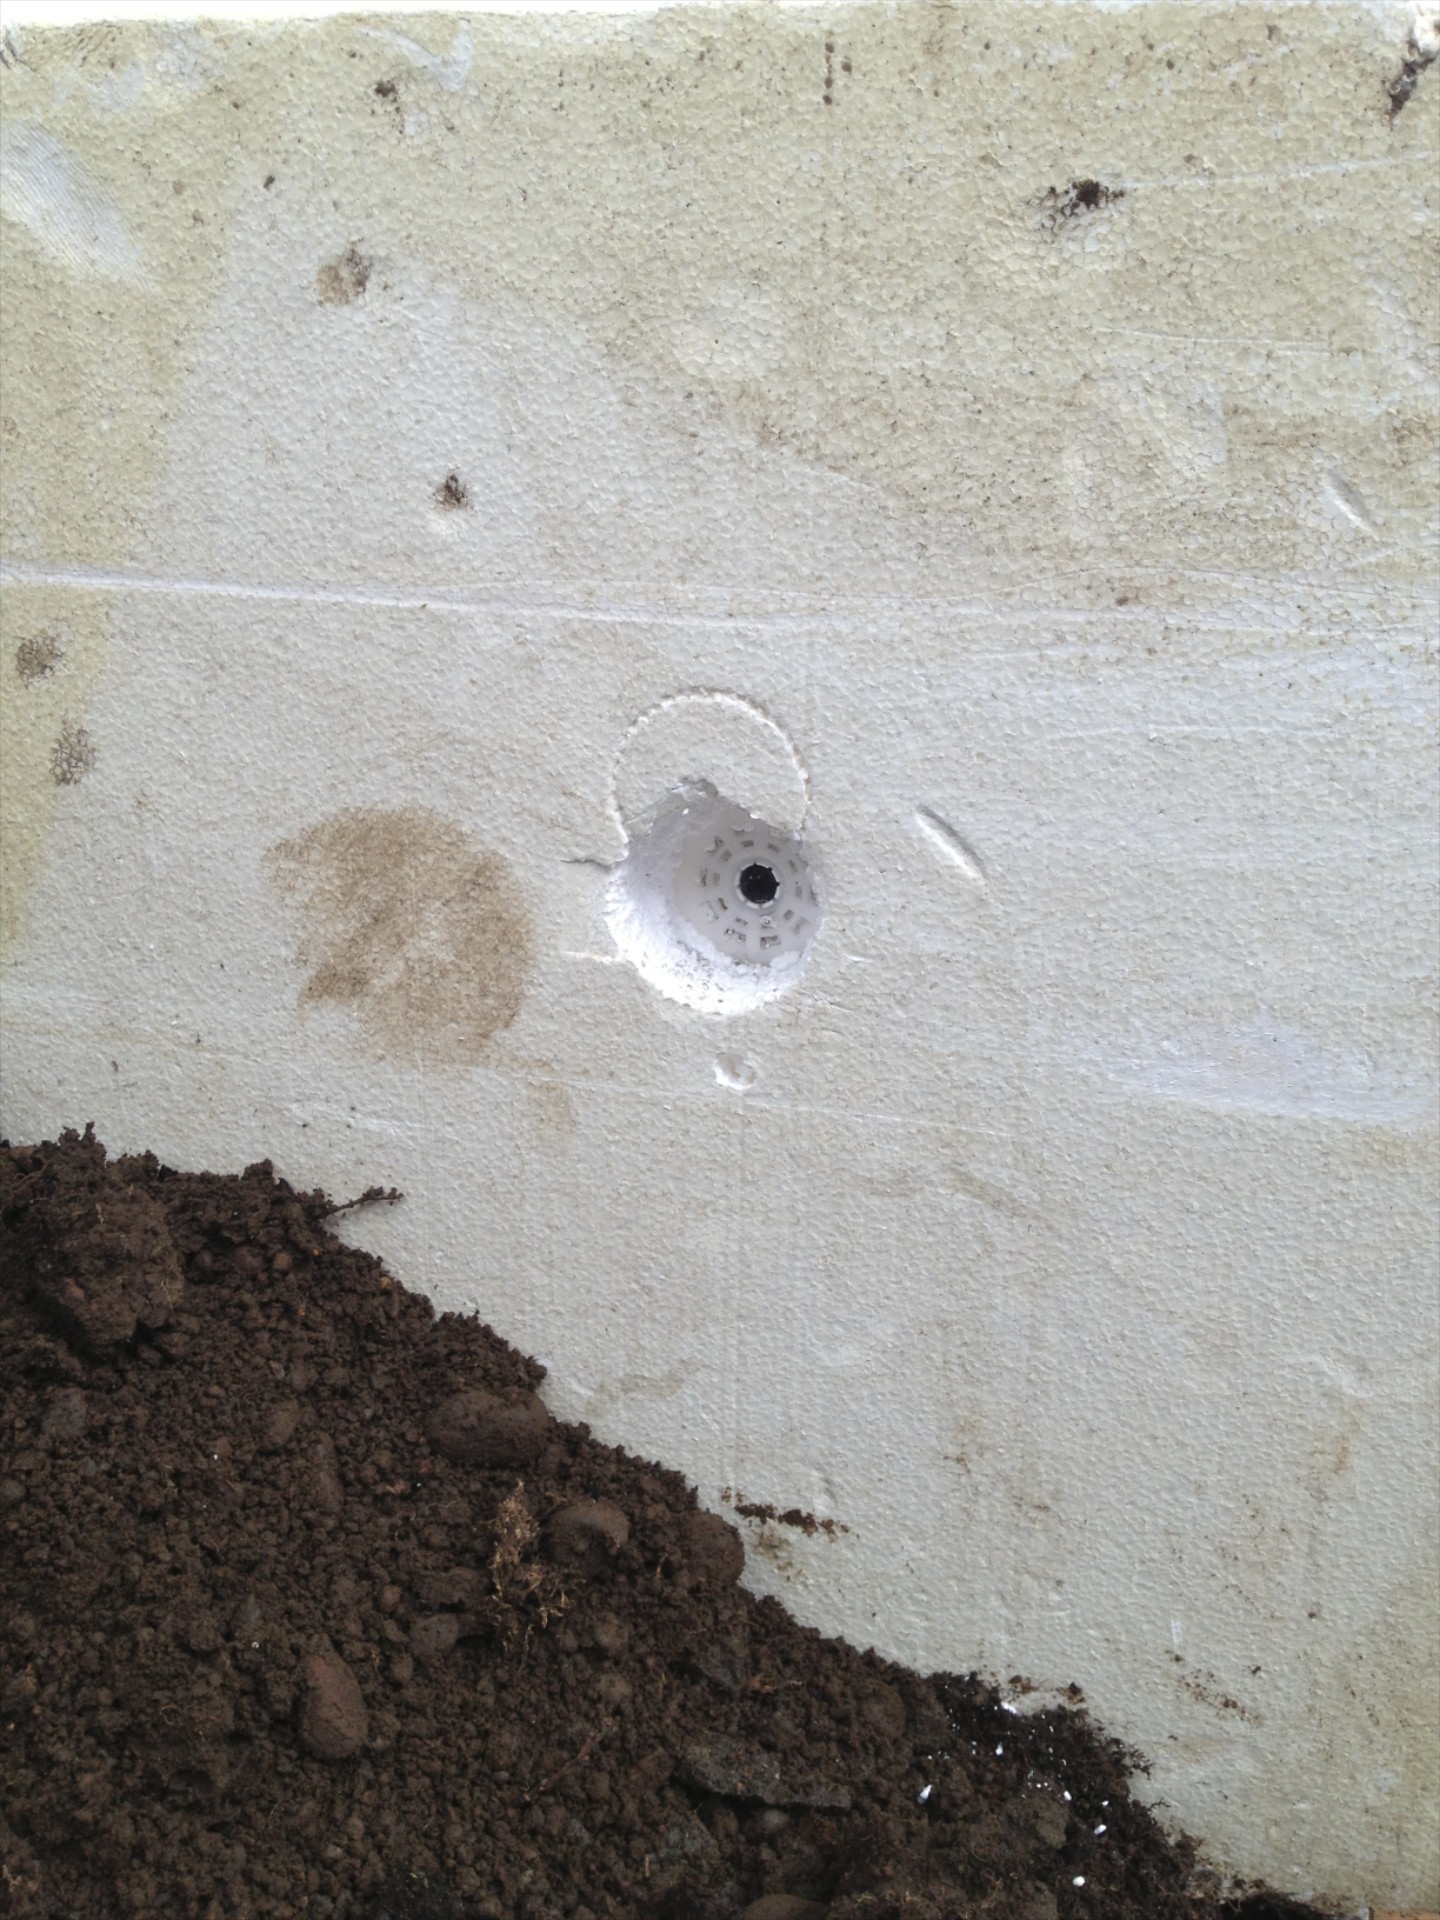
step 4: hammer spike and washer to secure foam.
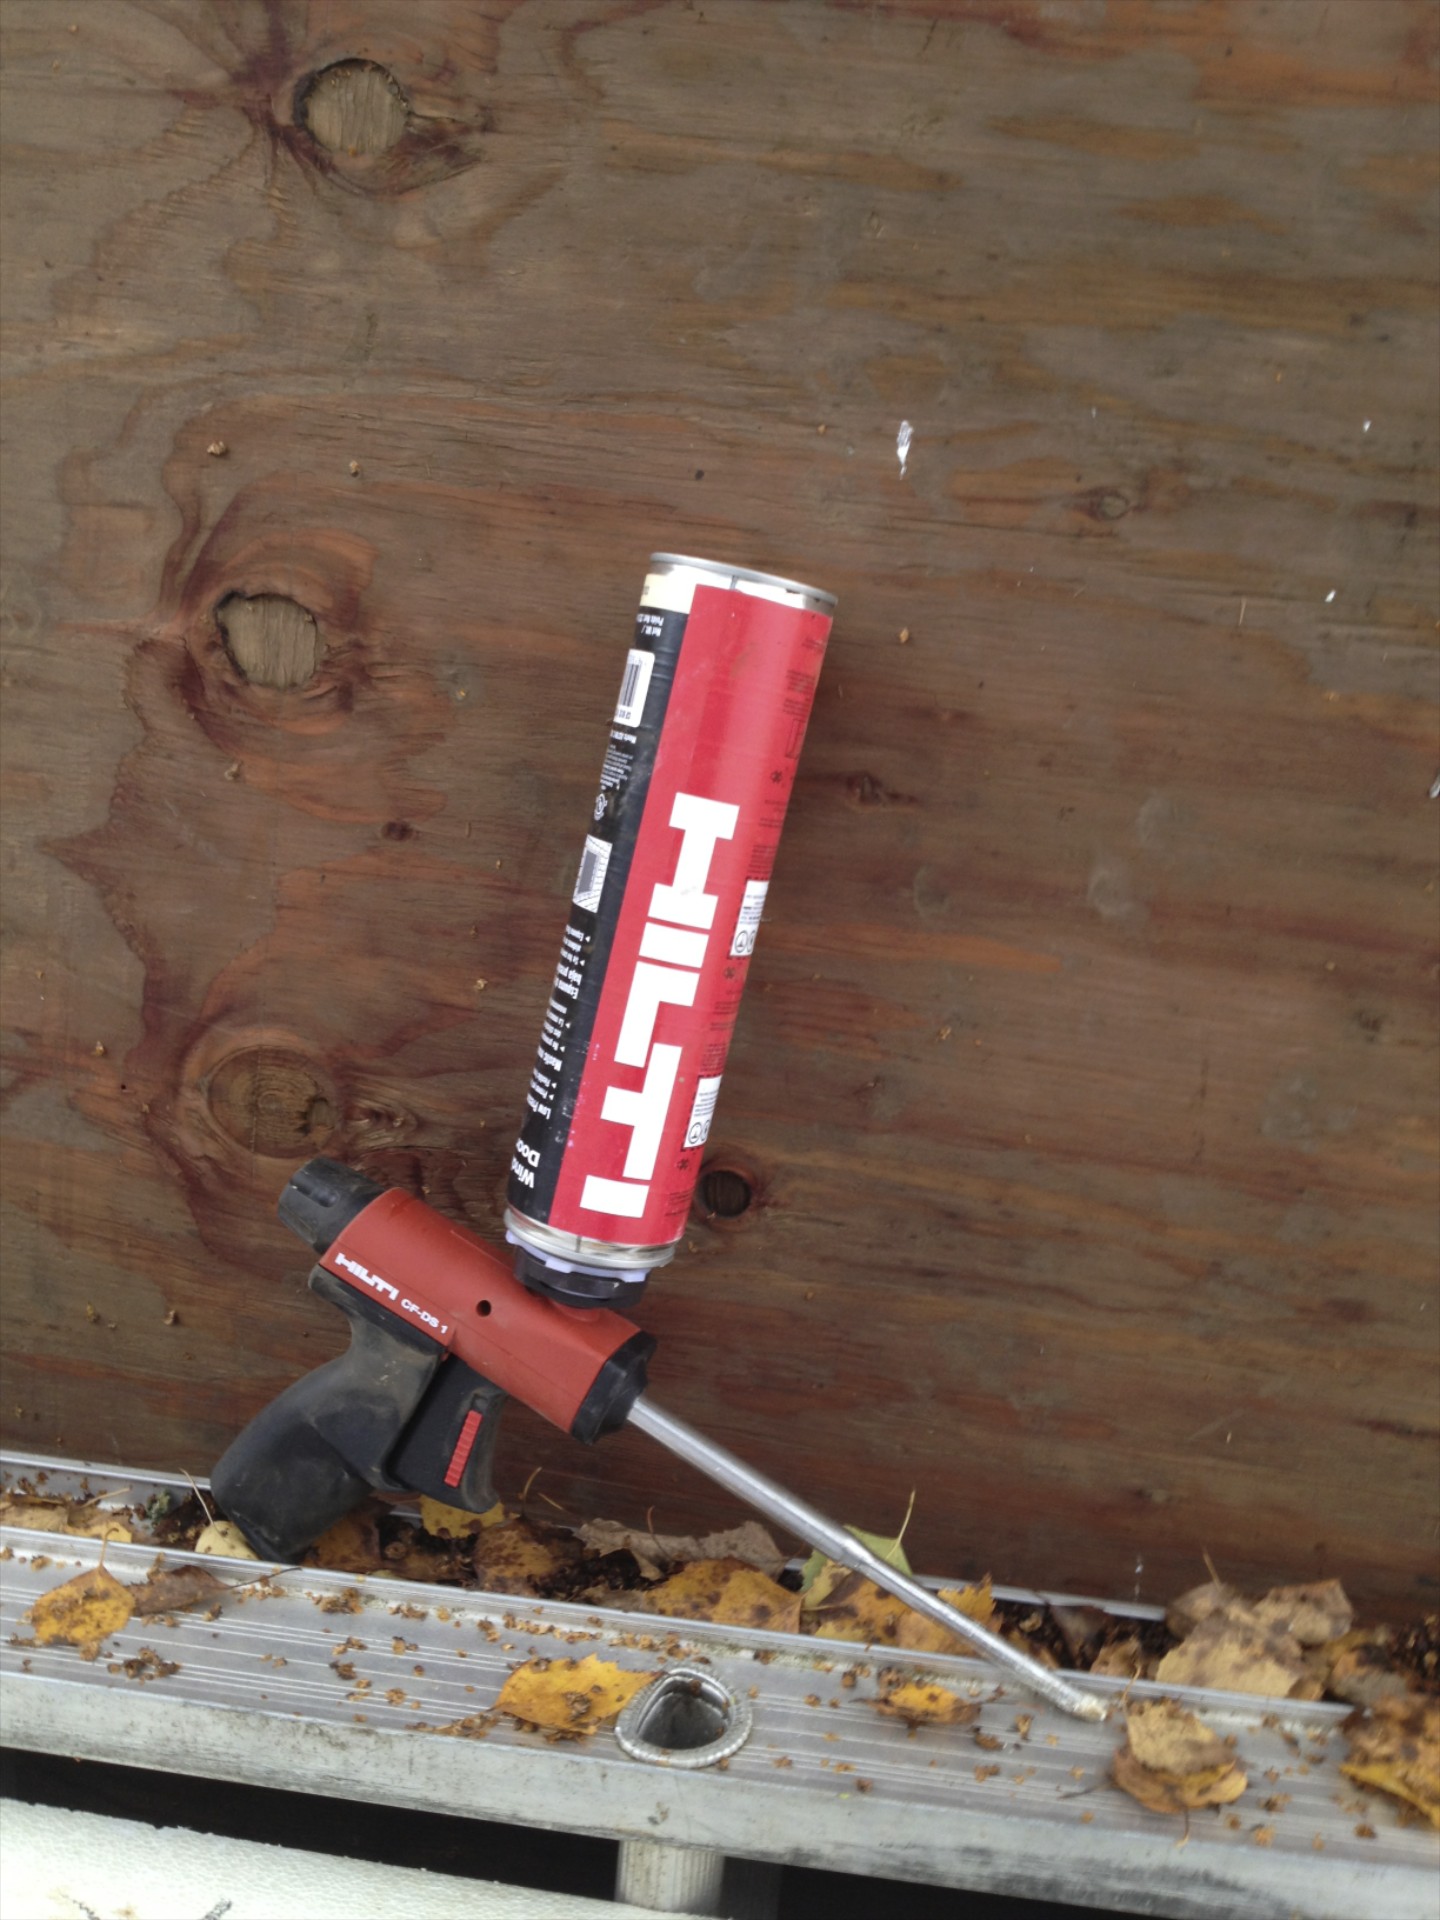
step 5: spray foam any gaps
step 6: reinstall foam plug using spray foam as adhesive
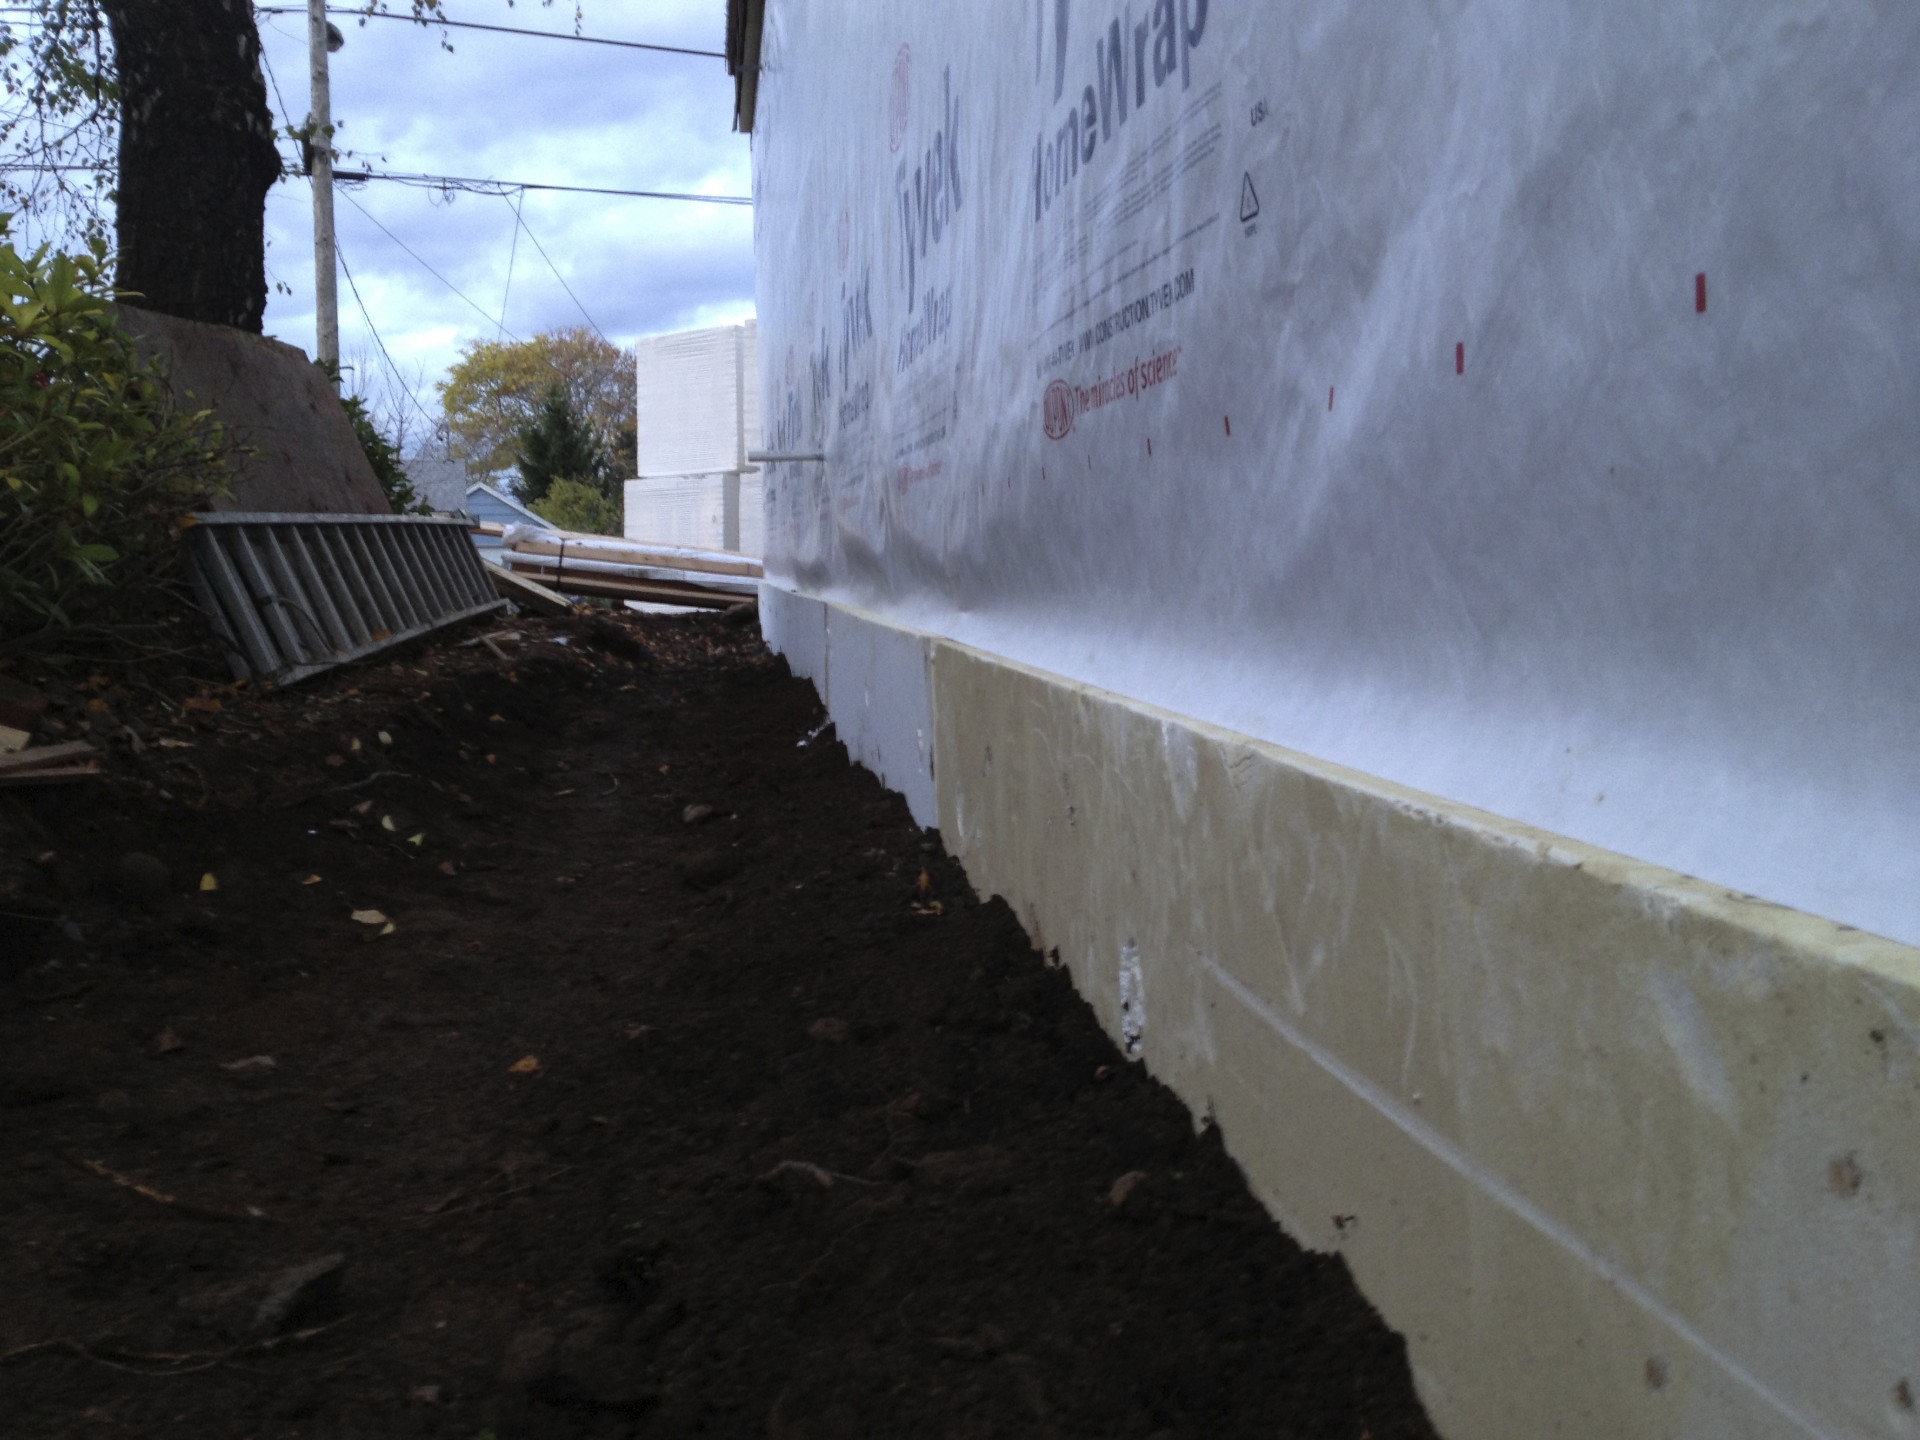
when the weather warms we will be applying a cementitious coating direct to the foam to provide the finished surface. after final grading, only 6" or so will be exposed to view.
waiting for guffman (or looking through windows - part 8)
when we began this process, we only had a few rules. one of them was real wood high performance windows. at the conception of this project, we were thinking about making a pretty good house. Super insulated, airtight, with triple glazed windows and a heat recovery ventilator, but not necessarily passivhaus. since we ruled out plastic or fiberglass, US built windows were at the top of the list. once we decided to build to passivhaus, it quickly became clear that we had to look overseas.
our initial pricing was from optiwin, internorn, and pazen. optiwin was very appealing aesthetically but super expensive. internorn provided fantastic pricing, but there was no rep in the US meaning distant communications and pretty much zero support. pazen offers a slightly different product with a fiberglass exterior cladding and more minimal frame profiles, but they only offered a stainless steel clad door. because we had lots of doors, the price jump was huge and they were way out of our budget.
about the same time, our local loewen rep started offering unilux. we visited another local passivhaus project to see them installed, and we were impressed. the pricing was strong, and we felt most comfortable having a rep locally, although they only had a limited understanding of passivhaus. we thought we'd made up our mind, until we stumbled onto zola windows. nearly identical to the german and austrian made passivhaus windows, zola windows are manufactured in poland and offered at a much more competitive price point. we worked through all the options, input the data into PHPP, and scrutinized the sample window section that we got our hands on. it seemed like a good balance between quality, aesthetics, and price point. decision made.
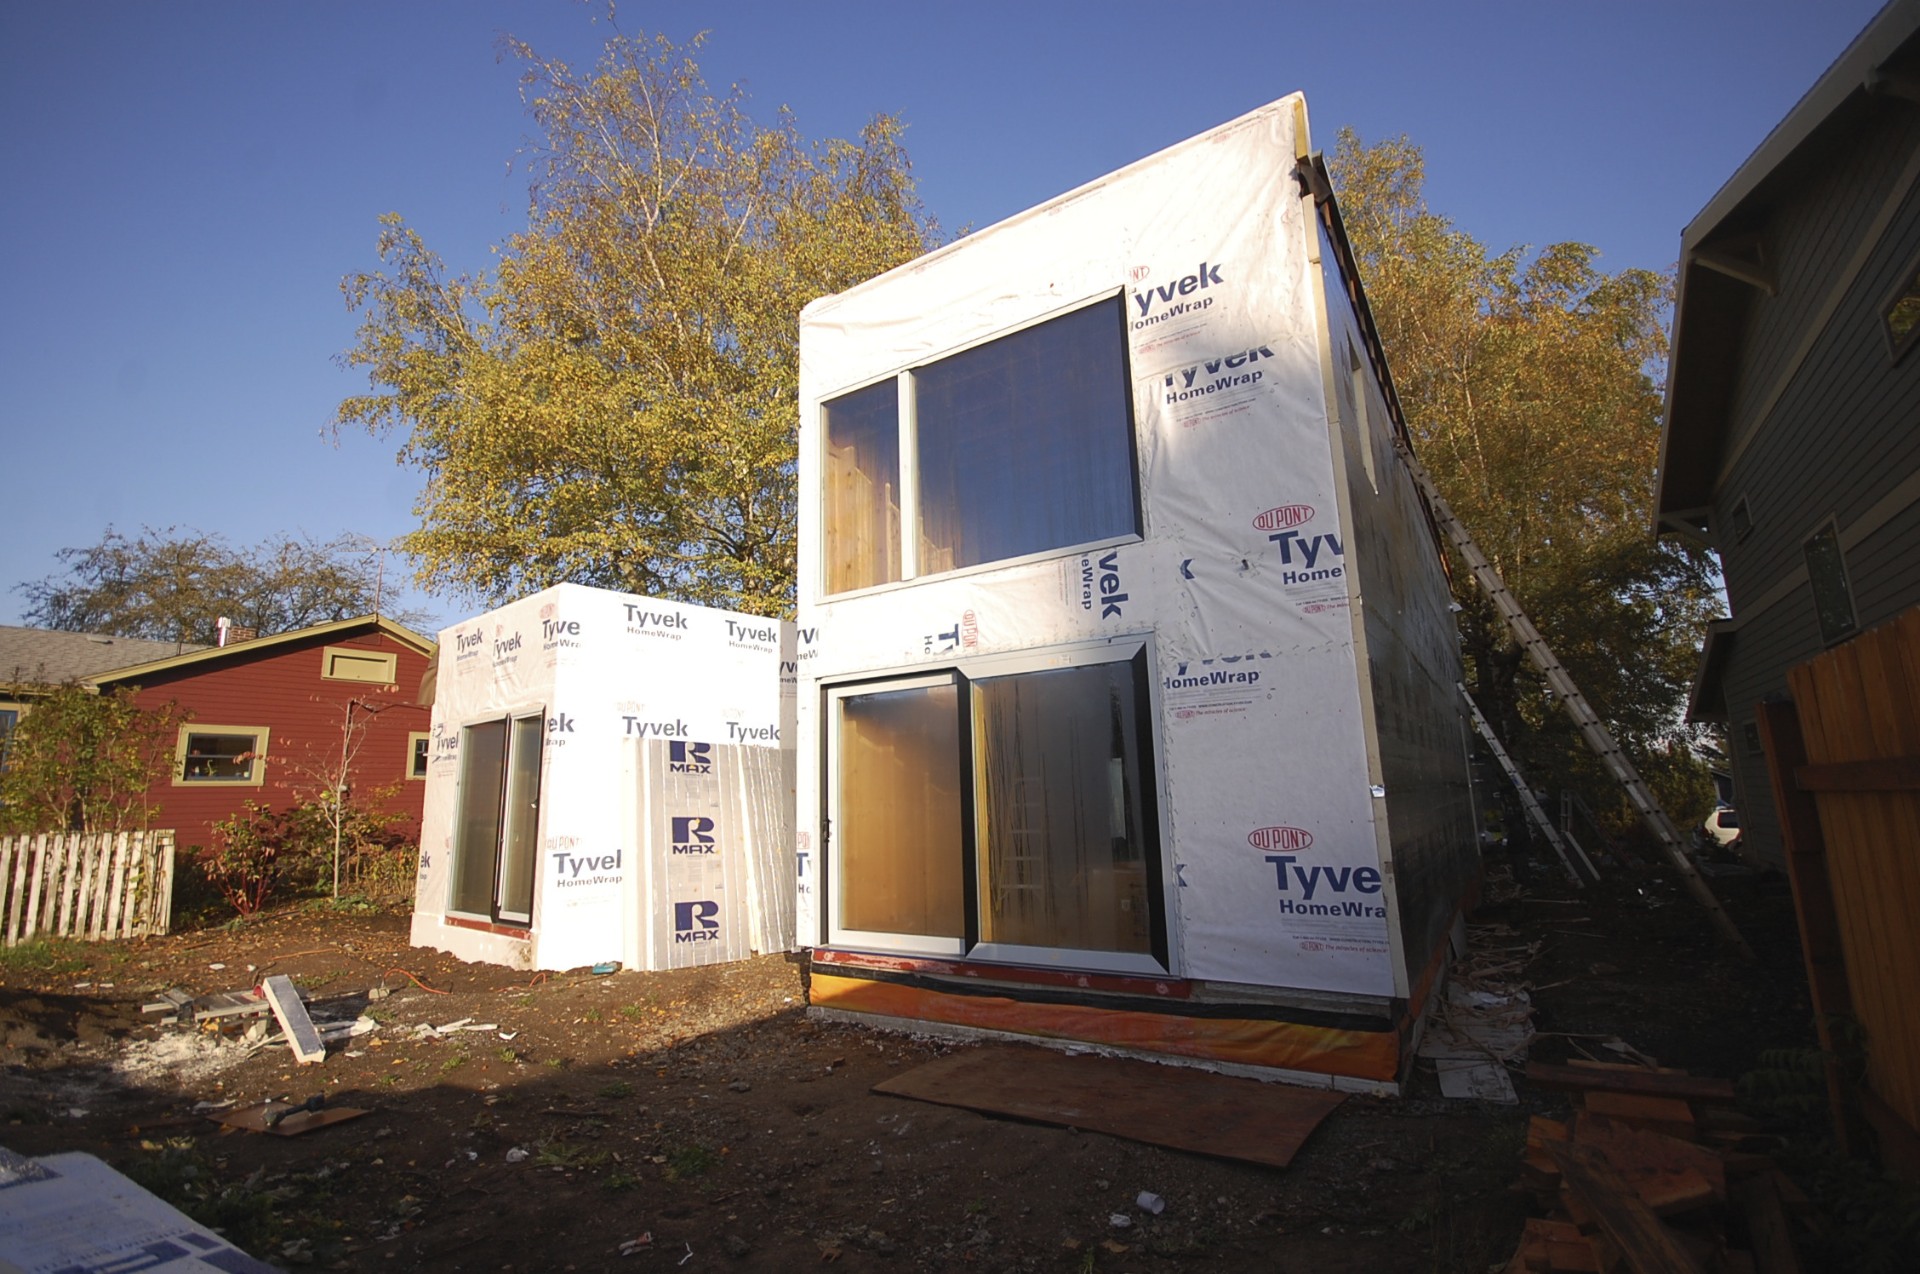
one of the biggest challenges of using european windows is the long lead time (for our order the lead time was estimated at 12-16 weeks). we worked hard to have our window order ready to go by the time we were breaking ground. once we placed the order, the race was on to make sure the house was ready when the windows finally arrived. 18 WEEKS LATER they finally arrived. when we finally opened the container door to check them out, 2 of the biggest units had broken free from their braces and had fallen over at somepoint during shipping. while nothing was catastrophic, there were issues both functional and aesthetic.
fast forward 6 weeks. zola has been super responsive and we're confident that in the end everything will be as good as new. the windows and doors are installed and are beautiful. the house is dry, the first blower door test went well (.44ach at 50pa), and we are steadily moving toward insulation and sheetrock.
here's a quick look at some of the process. first, prepping the rough openings:

step 1 - use pink prosoco joint and seam filler at corners and joints of rough opening.


step 2 - use red prosoco fast flash to coat rough opening and extend approx. 6" out onto sheathing.


to apply these prosoco products, simply lay down a bead from a caulking gun and spread with a cheap plastic spreader. the result is a waterproof, airtight, and vapor permeable flashing without the usual complications of peel and stick flashings. of course no through wall metal flashings on a passivhaus.


next, windows arrive and are unloaded.

not what you want to see when you open the door of the container. i think they forgot to do the ACTUAL bracing at the factory.

some of these units are HEAVY! thank to Doug Marshak and his Awesome Framing Crew for doing the very heavy lifting.

small tilt/turn unit for the kitchen.

Doug and Jesus installing the small window in the 2 story living room.

the big units waiting to be installed.

after a few nervous hours, the biggest unit finally goes in. thanks to Graeme Thomson for the smart hoisting method.

the large fixed unit installed above the lift/slide door.

front door with translucent glass and large window to the street.

breezeway with tilt/turn terrace door and fixed sidelite.

studio with tilt/turn door and fixed sidelite.


check back soon for more as we try to catch up with construction: HRV rough-in, steel stair installation, flashing the windows, installing the exterior insulation, and rainscreen furring.
air sealing
air tight per passivhaus = .60 ach at 50pa. if you don't know the terms or numbers, just know that this is extremely air tight. achieving this requires care and attention to detail, both in the design approach and in the execution.


our air barrier strategy is simple - use the exterior plywood roof and wall sheathing as the continuous air barrier. all seams, corners, and joints in the plywood are taped with SIGA wigluv tape.


the sill plate is taped to the concrete foundation (our 2x8 sill is cantilevered beyond the foundation). the concrete is first primed with SIGA dockskin primer to ensure adhesion. carefully apply tape. the result is an air tight joint. simple.


the plywood air barrier runs up the wall and over the roof. the joint is taped and then the parapet is framed on top. after seeing some tears in the tape we got nervous and taped the parapet too.

all roof and wall penetrations are sealed. we used SIGA wigluv for these too.

the tapes are super sticky, very flexible and easy to use. the paper backing is recyclable, which is good because there is a lot.

it's not inexpensive though, and we used far more than we originally thought. air sealing takes time too. it's worth it though.
SIGA tapes are available through small planet workshop.
another great exterior air sealing product is prosoco joint and seam filler (used at rough openings in combination with prosoco fast flash). more on that in the next post.
framing for efficiency
framing has been moving along at skidmore passivhaus since we placed our slab on grade. the house is quickly taking shape thanks to dam framers (doug marshak and crew).


there are a few things that make the framing on this house just a little different from the typical house:
- untreated bottom plates on 30lb building paper
- 2x8 wall studs at 24" o.c. (roof trusses align)
- balloon framed 2 story walls
- upper floor hung from ledgers
- single top plates that interlock at the splices
- open corners with minimal blocking
- open web trusses with sloped top and level bottom
- header free openings (except for the living room doors)
- long walls on plywood module
All of this results in more space for insulation!
Plus there's less wood used and less material cost.


Some of the many next steps include:
- taping the plywood with SIGA to create the air barrier
- installing the single ply membrane roof
- prepping the rough openings with Prosoco Fast Flash
- roughing in plumbing, HRV, and electrical
Check back soon for updates.
notes on placing an exposed slab on grade
Here are some quick notes on our Exposed Slab on Grade (placed on top of continuous 15mil vapor retarder and 4" of eps insulation): Placing concrete on a continuous vapor retarder definitely ups the degree of difficulty when it comes to finishing and curing the slab. Water in the slab can only move out the top, meaning the slab can dry unevenly, crack, and even curl. To compensate we are trying a wet "flood" cure.
We decided to use fiber mesh reinforcing and eliminate the steel reinforcing altogether from slab. Apparently the fiber can make finishing trickier, but it typically results in strong slab with less cracking and for a bit less cost.
The type and location of joints is always a question - we even considered for awhile not using them and letting the slab crack more randomly (it will crack). In the end we decided to use a tooled joint (in this case made with a custom tool from another project) and to place them strategically under walls so they are barely visible. Tooled joints can be made almost immediately before cracking can happen whereas sawcuts have to wait until slab is firm enough to handle the saw, and potentially after random cracks have already occurred. Saw cuts also have a risk of spalling, but when they are executed properly they certainly look best.
After knocking around options for curing the slab, we decided to go old school and use a wet flood method. The idea is to cure the slab slowly and evenly by keeping it wet and cool, allowing it to gain as much strength as possible before subjecting it to the stresses that occur when it dries out. The slab edge formwork was already above the top of the slab, so it was relatively easy to keep the slab underwater. It uses a fair amount of water as there are minor breaches in the perimeter formwork dam, but it eliminates the use of expensive chemical curing compounds.
So far we have kept the slab wet for 5 days (flooded most of the time) and we're still babysitting it. It's time to get set up for the last small concrete pour (a plinth for the stair which doubles as a landing), so the wet curing will come to an end. Only time will tell what the result will be, and we'll never know if our methods were better or worse.


breaking ground on skidmore (passive) house
After many many months (years really) of scheming and planning, we finally broke ground on our new house. A lot has happened since our last look at the project in passivhaus progression. It took us a bit of time to get our house ready for sale, but we eventually sold it, found a great house to rent complete with chickens, moved, and are getting settled in our temporary digs. First up was getting our delinquent and non-responsive tenant out of the house. We got our first (and hopefully last) taste of the eviction process. A few checks and a couple of weeks later we took possession and had a close up look at the sorry state of the house. Next we removed some of the existing trees. A few were unhealthy, a few were in or too close to the footprint, and a couple were creating massive shade. While we struggled with this decision and upset at least one neighbor, in the end we decided it was best in the long run to remove the largest Oak in the backyard. It was sad to see it come down but the lot has been transformed back into a sunny paradise and we hope over the next decade to develop a well designed and much more beautiful landscape.
While the first bank we approached about construction financing had favorable rates and seemed easy to work with, the process quickly turned sour as they began to question first the green roof, then the single ply membrane, separate structures, and finally the lack of a garage. In the end it became apparent that they didn't get it and it was time to try another route. At the same time, we decided that the separate structures created some domestic challenges in addition to lowering the value of the property in the eyes of the bank, so we quickly redesigned the house to incorporate the space between the buildings as interior living space. Although it adds more square footage and cost, it does make for a better surface to floor area ratio and had a favorable impact on our PHPP calculations. We then approached a local bank with our revised design complete with green roof, no garage, and modern aesthetic, and it was basically smooth sailing right up to the loan closing. Aside from their annoying tagline, so far I have nothing but good things to say about my experience with my local bank.
The permit process went a little more smoothly. After responding to a simple structural checksheet, answering some questions from the plans examiner about the Passive House specific details, filing a required Operations and Maintenance agreement for the ecoroof with the County, and smoothing out some internal confusion at the city about an existing cesspool tank and drywell, we got our new building permit as well as demolition permits for the existing house and garage. Next up was testing for Asbestos; the demolition contractor was required to have paperwork certifying that the debris was free from Asbestos. Somewhat to my surprise, Asbestos was found in a number of unusual places including window glazing, caulking at the roof penetrations, and drywall compound. Another check and about a week later the Asbestos was abated and demolition could finally begin.
Here's a quick progression of what's happened over the last 2 months:

Trees are cut and asbestos abatement in progress.

House and garage are gone!

Old tanks are decommissioned and building area is stripped.

Building pad is prepped with compacted gravel.

Footings are formed, EPS placed and moisture barrier taped.

Concrete is placed in footings.

Gravel backfill is placed and compacted underslab.

Underslab EPS insulation is getting set on sand bed.
Now that we've started, there's much to talk about. Some possible ideas:
- A better way to build an insulated slab on grade?
- PHPP calculations and optimization of systems
- PH certification: PHIUS+ vs PHA
- Passive House Windows
There are many people to thank for their help (directly and indirectly) in getting us to this point. Here are just a few:
- Aaron and Mike at Brute Force Collective
- Dan Whitmore at Blackbird Builders
- Florian at Zola European Windows
- Don Tankersley Construction
- John Russell (Concrete) Construction
- Matt at Zehnder
- Skylar at Hammer and Hand
- Ryan at Earth Advantage
All for now. Check back soon.
Jeff
karuna house in construction
toured the ambitious karuna house yesterday. this design driven single family residence is striving for minergie-p-eco, passivhaus, and leed platinum.


while this looks like it will be a great looking modernist house and there is much to applaud, the massive amount of foam does suggest that it has been shoehorned to meet minergie-p-eco and passivhaus.


exposed rigid insulation shows the thermal break at a door threshold. a gypcrete topping slab with radiant heat is planned for the main floor.

note the blue underslab air-barrier (15mil raven) wrapping up and over the stemwall and the epdm gaskets under the plates (visible at the steel base plate yet to be grouted).

the house uses prosoco's r-guard air and weather-resistive barrier system. the pink joint and seam filler is used to seal the plywood sheathing and plate to the trimmed air-barrier under the plate (the blue raven here is just temporary protection of the insulation). the entire sheathing surface will be coated with cat 5, a roller applied air and weather resistive barrier.

the window mockup uses the prosoco fast flash system around the rough opening that will be tied into the cat 5. the beautiful optiwin alu3holz is installed with tremco trio expanding foam around the window perimeter, and will be overinsulated on the exterior for a minimally exposed frame and exceptional install PSI. an aluminum sloped sill will screw attach to the bottom of the frame. the team is planning to construct a complete mockup in prosoco's test chamber to ensure the assembly performs as planned.

the windows will use glazing with a whopping .66 shgc on the south elevations with .50 shgc for the other orientations.

the house has been designed by holst architecture with green hammer as the PH consultant, and is being built by hammer and hand. check out more on the project here and here.
testing
 last week i successfully passed part 1 of the Certified Passive House Consultant exam, and in the next few weeks i'll be wrapping up the take home design portion. with a little luck in the new year i will be a Certified Passive House Consultant!
modern passivhaus
designed by bere:architects, the camden passivhaus is the first certified passivhaus in london. it's a fantastic example of high quality architectural design merged with ultra-energy efficiency.


treated floor area = 1098 ft²
annual heat requirement (calculated per PHPP) = 4.12 kBTU/ft²a
the wood structure including the larch exterior cladding was prefabricated in Austria.
main wall assembly 5/8" gypboard 4" wood fiber insulation 1/2" osb air barrier 11" rockwool cavity insulation 1/2" fiberboard sheathing larch rainscreen R-value = 49
floor assembly 1 1/4" wood flooring 4" wood fiber insulation 5 1/2" rockwool insulation 5 1/2" insulation 3/4" airspace 2 1/2" screed 12" concrete slab r-value = 51
main roof assembly 5 1/2" solid wood deck 11" rigid insulation 4 3/4" rockwool insulation 1" drainage layer 3 1/2" soil and plantings r-value = 75
windows bayer passivhaus windows wood polyurethane composite u-value = 0.134 btu/(hr ft² f)
bayer premium triple glazing v-value = 0.106 btu/(hr ft² f) shgc = .48


another great looking and high performing project from bere is "the muse".


passivhaus progression
as we inch closer to getting started on our project, we continue to scrutinize our current plans in an effort to create a house that is fine tuned for our needs. as an architect, i want a house that is inspiring and beautiful, and embodies what is important to us. as the owner with a very limited budget, we want to make sure that our cost expectations are realistic. since i'll be playing general contractor, i want an easy to construct and problem free building. we've taken another pass at redesigning the house with an eye toward efficiency and simplicity - both in terms of square footage and energy. we felt there were a few redundancies, tricky details, and program pieces that we are better off without. here's a quick snapshot of the progression of the plans.

as always, there are a few ideas though that we refuse to give up.
requirement #1: warm, comfortable, and extremely energy efficient
we want to live simply and in a beautiful inspiring place that is warm and comfortable regardless of the time of year. we also want to minimize our footprint and our energy costs. although we will most likely pursue passivhaus certification, the path we take isn't really as important as the end result. for us, passivhaus is just a means to a better end. our generous friends at brute force collaborative have been providing the expertise to help us get there.

meeting passivhaus requirements means the house will use no more than 4.75 kBTU / ft2 annually for space heating. for the main house, this translates to about 5.27 mBTU or 1544 kWh annually for space heating (we are planning to use electricity to heat the house). at our current rate of around $.09 / kWh, our annual heating bill would be no more than $139.
although we know that the studios will see far less use than the main house, using the same formula yields an annual heating bill for the studios of no more than $51.
requirement #2: wood windows and doors

since we want wood windows and doors, and they need to be extremely high performing to achieve requirement #1, we have been looking at manufacturers based in germany and austria. this is our largest single expense and perhaps an easy target for criticism, as these beauties will need to be shipped overseas. we would love to use a locally produced product, but unfortunately no wood windows made in the US come even close in terms of performance. it's a bit of a quandary, but brute force collaborative has performed an interesting analysis (based on our previous design) that has us feeling more comfortable with our decision: Can European windows actually save carbon?

requirement #3: separate work from home
an important part of our program is space to do work and make things. we know we could make a more cost effective and thermally efficient house if we combined our work space with our home, but we like the idea of some separation. we think we can make this simple idea a huge asset.

requirement #4: create positive outdoor space
our intention has always been to use the form of the house to shape outdoor space. again, this may contradict requirement #1 but we don't just want a box sitting in the landscape. we want two boxes sitting in the landscape creating positive space between!

requirement #5: keep it modest and make it beautiful
many people may not agree, but we think these two wood clad boxes with concrete floors, white sheetrock walls, natural wood doors and windows, and flooded with light will be quite beautiful.

shade
one of the key components in making a high performance building is a proper exterior shading device. combined with thermal mass and natural ventilation, a building can be passively cooled in most climates. a properly sized overhang, a fixed sunscreen, or a deciduous tree can sometimes provide an adequate solution, but unfortunately in our unpredictable northwest climate the cooling days don't coincide so perfectly with the arc of the sun or the leafy seasons. the most effective shading solution is usually an active adjustable shading, allowing precise shading only when desired, but also providing an animated building facade and creating an architectural language directly related to comfort and energy performance. too often the shading device is poorly conceived (wrong orientation or improperly sized), relegated to the interior where it's too late to prevent heat gain, or cut from the project due to cost considerations. yet, here in the temperate pacific northwest it is becoming more and more common to find good money spent on air conditioning to provide cooling for those few hot days. instead, that money could be shifted to the facade construction, substantially reducing energy use while creating beautiful architecture.
here are a few interesting european examples to start the conversation:


mgf architekten, university for technical studies, aalen


foreign office architects, carabanchel house, madrid

freshwater house, chenchow little architects, sydney


baumschlager-eberle, eichgut housing, winterthur


weil arets, university library, ultrecht

walter unterrainer, passive house


karawitz architecture, passive house, bessancourt